How to Draw a Living Room Step by Step
Updated: October 27, 2026
15
Drawing a living room is a fun way to explore interior design while improving your drawing skills. From arranging comfortable furniture to adding windows, rugs, and decorative details, every step helps bring your room to life on paper. Even if you are a beginner you can create an attractive living room drawing by starting with simple shapes and gradually adding more details. Follow these easy step-by-step instructions to draw a living room learn basic perspective and create a cozy space that reflects your imagination.
Table of Contents
Materials You Need for Living Room Drawing
Gather your drawing paper, pencils, ruler, and eraser before starting. Prepare your art supplies and get ready to sketch a comfortable living room with clear shapes and realistic details.
- Drawing paper with a smooth surface helps you create clean lines and control pencil movement. Gather basic art supplies, including an HB pencil, ruler, eraser, and 2B pencil to make your living room sketch easier and more accurate.
- Use an HB pencil to draw the room’s basic structure with light outlines before adding furniture. A ruler helps you create straight perspective lines for the walls, floor, and furniture, keeping the layout neat and balanced.
- Keep an eraser nearby to remove extra guidelines, correct mistakes, and adjust the room’s proportions. Erase gently to protect the paper and maintain a clean outline while refining the placement of different objects.
- After completing the main sketch, use a 2B pencil to add darker edges, furniture details, and shadows. These finishing touches create depth and help the sofa, tables and other interior elements appear more realistic.
- Choose materials that feel comfortable to use and practice regularly to improve your drawing skills. Keep your tools organized and use light pencil strokes so corrections remain easy throughout the process.
In my drawing practice, I prefer smooth paper because it allows better pencil control. I start with light HB strokes and use a ruler to keep the room’s lines straight. Before adding darker details, I erase unnecessary guidelines to create a cleaner interior sketch.
Step-by-Step Guide to Drawing a Living Room
Step 1: Draw the Basic Room Outline

Start by drawing the back wall, side walls, and floor with light pencil strokes. Keep the lines simple and leave enough space for furniture, windows, and decorations.
- Begin by sketching a light horizontal line to establish the back wall of your living room. Use a ruler to keep the line straight and create a clear starting point for the room.
- Next, draw two lines extending outward from the edges of the back wall to form the side walls. These lines help establish the room’s depth and create a basic interior perspective.
- Then, sketch the floor by connecting the lower edges of the walls. Keep the lines light so you can adjust the room’s size and shape if needed.
- Afterward, check the height and width of the walls to make sure the room looks balanced. Leave enough space for the sofa, coffee table, and other furniture you plan to include.
- Finally, review the basic outline before moving forward. A clear room structure makes it easier to position furniture and add realistic interior details.
Personal Experience: I usually begin with the walls and floor before drawing any furniture. Light pencil strokes help me correct the room’s proportions without damaging the paper. Checking the outline early makes the remaining steps easier and keeps the drawing organized.
Step 2: Draw the Sofa
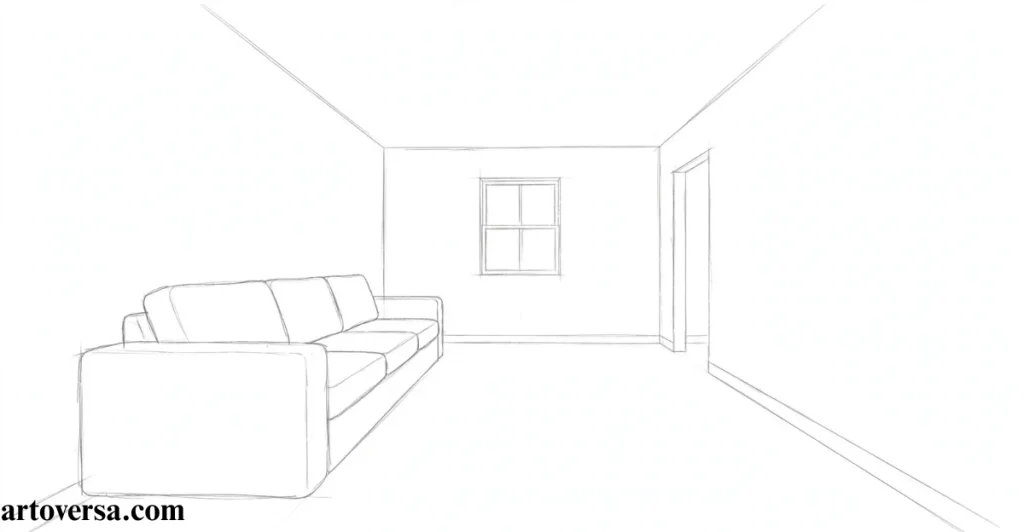
Sketch a sofa against one wall to create the main focal point of your living room. Use simple rectangular shapes for the seat, backrest, and armrests before adding smaller details.
- Start by drawing a long rectangular shape to represent the sofa’s main seat. Position it against the back wall or along a side wall, leaving enough space for the other furniture.
- Next, add the backrest above the seat using another rectangular shape. Adjust its height to match the sofa’s design and keep the edges aligned with the room’s perspective.
- Then, draw the armrests on both ends of the sofa. Use simple curved or straight lines depending on whether you want a modern, traditional, or comfortable design.
- Afterward, divide the seat into cushions and add a few lines to show their shape. Keep the details light so the sofa looks soft without making the drawing too complicated.
- Finally, check the sofa’s size in relation to the room. A balanced sofa should fit naturally against the wall without blocking the space needed for the coffee table.
I find it easier to draw a sofa by starting with rectangles and adding cushions afterward. I check its size against the walls before darkening the outline. This method helps me create furniture that looks proportional and fits naturally inside the room.
Step 3: Add the Coffee Table
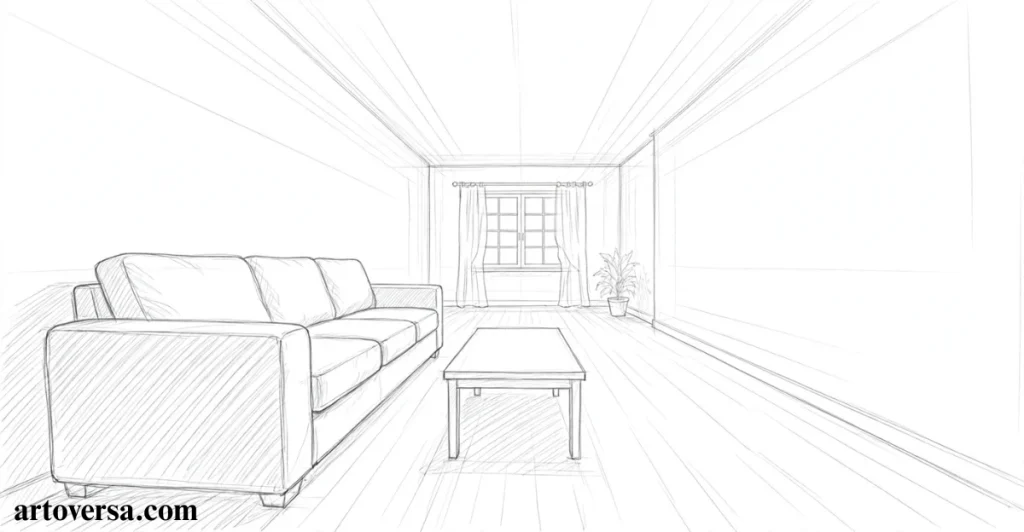
Draw a coffee table in front of the sofa to make the room look functional and complete. Start with a simple tabletop, then add legs that follow the direction of the room’s perspective.
- First, sketch a rectangular or oval shape for the tabletop. Place it in front of the sofa, leaving enough room for people to move comfortably around the furniture.
- Next, draw the visible edges of the tabletop. Use light perspective guidelines to make its shape appear three-dimensional rather than flat on the paper.
- Then, add the table legs beneath the top. Keep their height consistent and position them carefully so the table looks stable and balanced.
- Afterward, include small details such as a book, a flower vase, or a decorative tray. Choose only a few objects to avoid overcrowding the tabletop.
- Finally, review the distance between the sofa and coffee table. Their placement should look practical and maintain a natural arrangement within the living room.
I usually draw the tabletop before adding its legs because this helps me judge the table’s width and position. I keep the objects on top simple and check the space around the sofa. This creates a tidy furniture arrangement without unnecessary details.
Step 4: Draw the Windows and Curtains
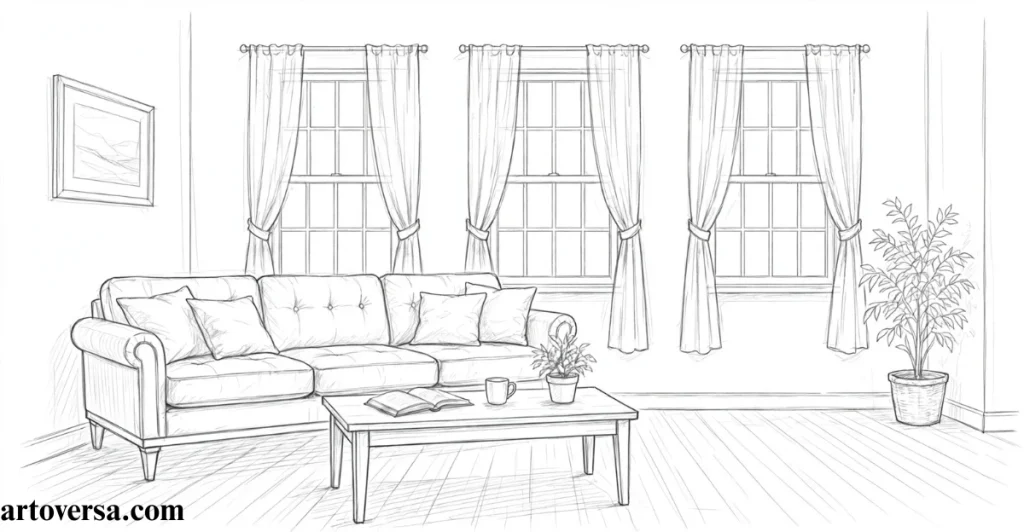
Add windows to the wall to make your living room look brighter and more inviting. Use straight lines for the frames and simple flowing lines for the curtains.
- Begin by choosing a suitable position for the window on one of the visible walls. Draw a rectangular outline and make sure its size matches the room’s proportions.
- Next, add the inner window frame by drawing smaller rectangles inside the main shape. These lines create separate glass panels and make the window look more detailed.
- Then, sketch curtains on both sides of the window. Use slightly curved lines to show the folds and allow the fabric to hang naturally from the curtain rod.
- Afterward, draw a few light lines inside the glass to suggest reflections or window divisions. Keep these marks subtle so they do not distract from the main structure.
- Finally, check that the window follows the perspective of its wall. Correct positioning and balanced proportions help the window and curtains fit naturally into the room.
I prefer drawing the window frame before adding curtains because it gives me a clear guide for their placement. I use gentle curves to make the fabric look natural. Keeping the glass details simple also helps the room feel open and uncluttered.
Step 5: Add Chairs and Other Furniture
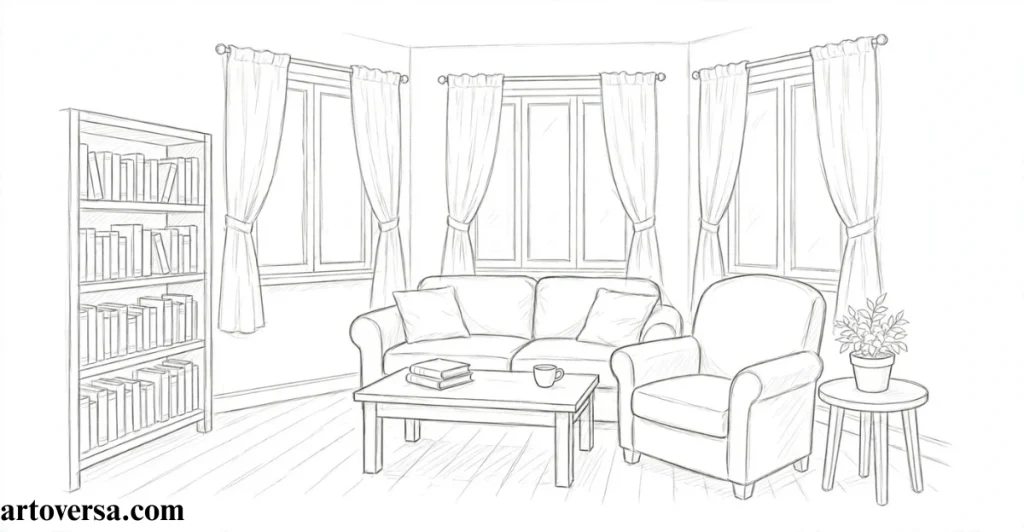
Include extra furniture, such as an armchair, side table, or bookshelf, to make the living room feel complete. Begin with simple shapes and arrange each object according to the available space.
- First, choose an empty corner or area beside the sofa for an armchair. Sketch its seat, backrest and armrests with basic geometric shapes.
- Next, add a small side table beside the chair or sofa. Keep its height and width proportional to the nearby furniture so the arrangement looks practical.
- Then, draw a bookshelf, cabinet, or television stand against a suitable wall. Use straight lines and simple rectangular sections to establish its structure before adding smaller details.
- Afterward, include a few objects, such as books, a lamp, or a potted plant. These accessories add personality while helping you practice drawing different shapes and textures.
- Finally, review the placement of every piece of furniture. Leave enough open floor space so the living room appears comfortable rather than crowded.
I like adding one extra furniture piece at a time instead of filling every empty space. Checking the size of each object against the sofa helps me maintain balance. A few carefully placed accessories usually make the room look more natural than too many decorations.
Step 6: Add Decorations and Interior Details
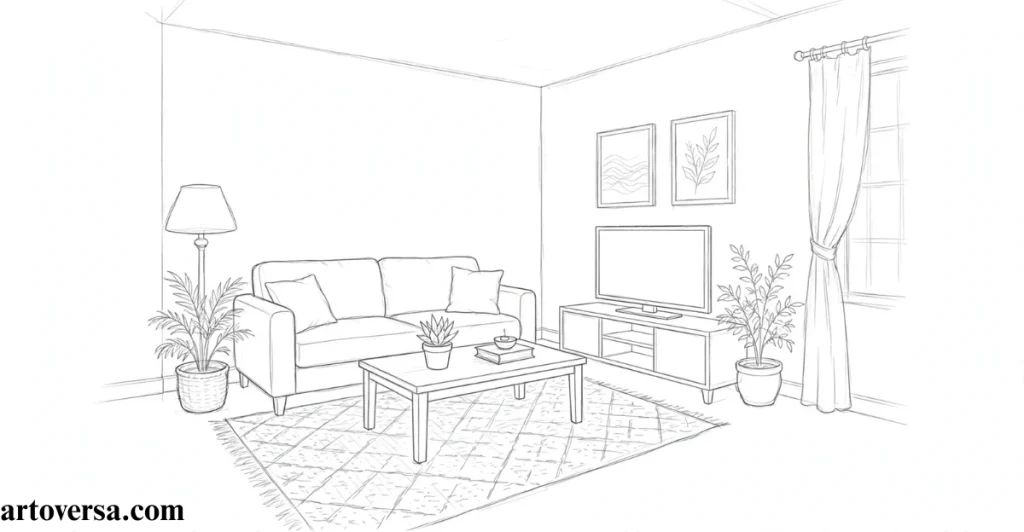
Decorate the living room with simple accessories, such as wall art, cushions, rugs, and plants. These details help define the room’s style without making the drawing too complicated.
- Begin by drawing a rectangular rug beneath the coffee table and sofa. Follow the floor’s perspective lines to make the rug look like it rests naturally on the surface.
- Next, add cushions to the sofa and chair using small rounded or square shapes. Draw a few curved lines to suggest folds and make the cushions look softer.
- Then, sketch a picture frame or wall decoration above the sofa. Keep the frame aligned with the wall and use a simple design inside it.
- Afterward, add a potted plant, a table lamp, or a small decorative object. These elements introduce variety and help the room look lived-in and welcoming.
- Finally, inspect the overall layout and remove any unnecessary lines. A few well-placed decorations can make the drawing attractive while keeping the furniture and room structure easy to see.
I usually add decorations after the larger furniture pieces are complete. This helps me avoid placing accessories where they might overlap important outlines. Simple cushions, rugs, and plants give the room character without taking attention away from its overall layout.
Step 7: Add Shading and Final Details
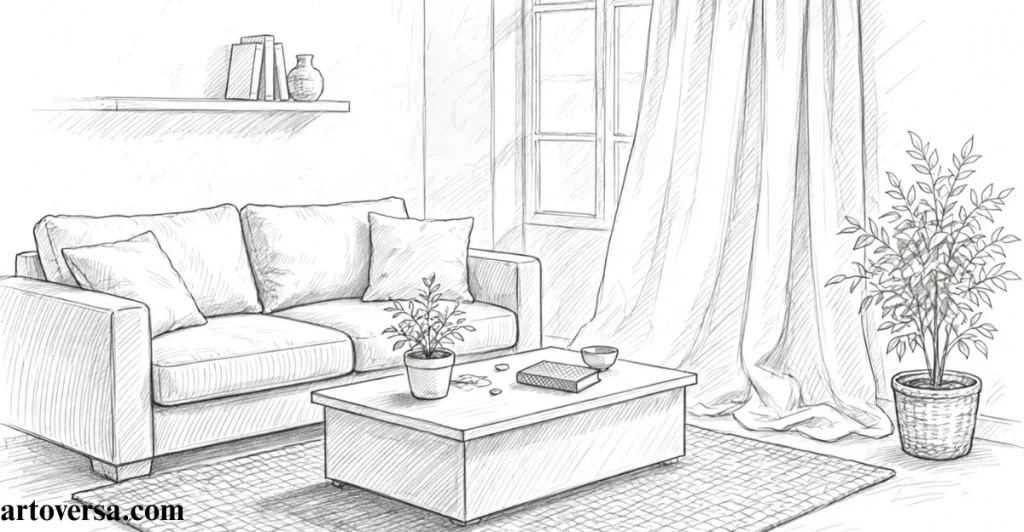
Finish your drawing by adding light and dark tones to the walls, floor, and furniture. Use shading to show depth, separate different surfaces, and give the living room a more realistic appearance.
- First, decide where the light enters the room, such as through a window. Keep the areas facing the light lighter and shade the opposite sides more heavily.
- Next, use a 2B pencil to darken selected furniture edges and areas beneath the sofa, coffee table and chairs. These shadows help the objects appear groun ded instead of floating above the floor.
- Then, shade the cushions, curtains, and rug with gentle pencil strokes. Vary the pressure to create subtle differences in tone and suggest the texture of each material.
- Afterward, erase extra construction lines that are no longer needed. Strengthen the most important outlines and refine small details without making every line equally dark.
- Finally, review the complete living room drawing for balanced proportions, consistent perspective, and natural shading. Small corrections can make the furniture and interior details look more polished.
I add shading only after completing the room’s structure and furniture. I pay special attention to the shadows beneath objects because they help create depth. Removing unnecessary guidelines at the end gives my interior drawings a cleaner and more finished appearance.
Common Mistakes to Avoid
When learning how to draw a living room, avoid making the furniture too large or too small compared with the room. Keep the walls and floor aligned with the correct perspective, and use light guidelines to maintain accurate proportions. Avoid adding too many decorations before completing the main structure, including the sofa, coffee table, windows, and chairs. Also, do not ignore light and shadows because consistent shading helps create depth and make the furniture look three-dimensional.
Final Tips for Beginners
For beginners, practice drawing simple boxes and furniture shapes before attempting a detailed living room. Use a ruler for straight edges, keep your first sketches light, and check the position of each object before adding details. With regular practice, you can draw realistic sofas, coffee tables, windows, curtain, and complete interior scenes. Improve your drawing skills by experimenting with different furniture arrangements, practicing perspective, and adding simple decorations to your sketches. Focus on balanced proportions and natural shading to create a comfortable-looking living room.
Conclusion
Drawing a living room becomes easier when you break the process into simple steps, starting with the walls and floor before adding furniture and decorations. Small details, such as cushions, curtains, lamps and indoor plants, can make your drawing feel more realistic and inviting. Practice drawing different furniture shapes and experiment with colors, patterns, and layouts to develop your skills. With patience and creativity, you can turn a few basic lines into a beautiful living room drawing you will be proud to share.
FAQs
How do you draw a living room for beginners?
Start by drawing the walls, floor, and basic room outline using light pencil strokes. Add a sofa, coffee table, and windows using simple geometric shapes. Use a ruler to maintain straight lines and balanced proportions. Finish with decorations and shading to make the room look more realistic.
Which materials are best for drawing a living room?
An HB pencil is ideal for sketching the room’s basic structure and furniture. Use a ruler to create straight lines and an eraser to correct mistakes. A 2B pencil helps add darker outlines and shadows. Smooth drawing paper makes it easier to control your pencil strokes.
Why does my living room drawing look uneven?
Uneven drawings often result from incorrect proportions or inconsistent perspective lines. Furniture may look out of place if its size does not match the room. Sketch the walls and floor first, then position each object carefully. Use light guidelines to correct the layout before adding details.
Where should you place furniture in a living room drawing?
Place the sofa against a wall and position the coffee table in front of it. Add chairs, side tables, or bookshelves where enough space is available. Keep the furniture proportional to the room and leave open areas for movement. This creates a balanced and natural-looking interior.
Can you draw a living room without using perspective?
Yes, you can draw a simple living room using basic shapes without advanced perspective techniques. However, perspective helps the walls, floor, and furniture appear more realistic. Beginners can start with simple rectangular forms and gradually practice perspective lines. This approach makes interior drawing easier to understand.
How do you make living room furniture look realistic?
Begin with simple shapes that match the size and structure of each furniture piece. Add details such as cushions, legs, armrests, and table edges. Use shading to show depth and separate different surfaces. Consistent proportions and carefully placed shadows make the furniture look more natural.
When should you add shading to a living room drawing?
Add shading after completing the room outline, furniture, windows, and decorations. Decide where the light enters the room before applying darker tones. Shade areas beneath furniture and on surfaces away from the light source. This creates depth and helps objects appear grounded.
What details can make a living room drawing more attractive?
Small details such as cushions, curtains, rugs, plants, lamps, and wall art can improve your drawing. Choose decorations that fit the room without overcrowding the space. Use light pencil strokes to sketch these objects before refining their outlines. Balanced details help create a welcoming interior scene.
Please Write Your Comments