Eye Expressions Drawing: How to Draw 9 Common Emotions in the Eyes
Updated: October 26, 2026
14
Eyes can reveal a wide range of emotions, from happiness and sadness to anger, fear and surprise. Learning eye expressions drawing helps artists understand how small changes in eyelids, eyebrows pupils and surrounding lines can communicate different feelings. Whether you are a beginner practicing facial features or an artist looking to make your characters more expressive, studying these nine common eye emotions can improve your drawing skills. Grab your pencil and sketchbook then explore each expression step by step to discover how simple adjustments can bring more emotion personality and life to your artwork.
Table of Contents
Understanding the Basics of Eye Expressions
Learn how small changes in eye shape, eyelids and eyebrows can communicate different emotions. Start with basic guidelines to make your eye expressions more realistic and expressive.
- Observe eye shape, eyelids, pupils and eyebrows to understand how they work together to express emotions.
- Use light guidelines to establish the correct proportions and placement of the eyes before adding details.
- Study how eyebrow angles, eyelid positions and pupil direction change the overall expression.
- Pay attention to eyebrow angles, eyelid positions and pupil direction because small adjustments can change the overall eye expression.
- Practice drawing different eye shapes and shading techniques to create depth, emotion and realistic details.
When practicing expressive eyes I find it helpful to study reference images before sketching. Breaking the eye into simple shapes makes it easier to understand its structure. Small adjustments to the eyelids and eyebrows can noticeably change the emotion. I also compare both eyes regularly to maintain balanced proportions and a natural appearance.
How to Draw Happy Eyes
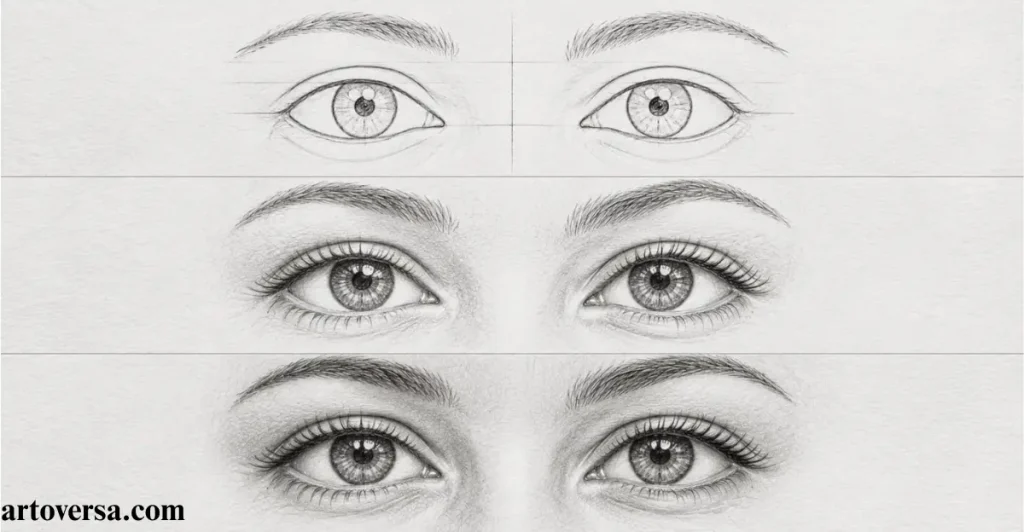
Bring warmth and joy into your artwork by practicing different shapes and movements of happy eyes. Use simple sketching techniques to create natural smiles and expressive realistic characters.
- Begin by shaping happy eyes with soft curves, relaxed eyebrows and gentle eyelid details to create convincing smiles.
- To suggest a genuine smile curve the upper eyelids and slightly raise the lower eyelids.
- Add naturally arched eyebrows, subtle wrinkles and details around the outer corners eye corners, and smile lines.
- While greater depth apply soft shading around the facial muscles to improve happy expressions, emotional warmth, natural appearance and drawing accuracy.
- Finally observe smiling reference photos and practice eyelid movement, natural curves and expression variations to make your realistic eyes more expressive.
When drawing happy expressions I pay close attention to eyelid movement and the natural shape of the eyes. Studying smiling reference photos helps me understand how a genuine smile affects the surrounding features. I find that gentle natural curves create more realistic eyes than overly sharp lines. Regular expression practice also improves my facial details and overall drawing skills.
How to Draw Sad Eyes
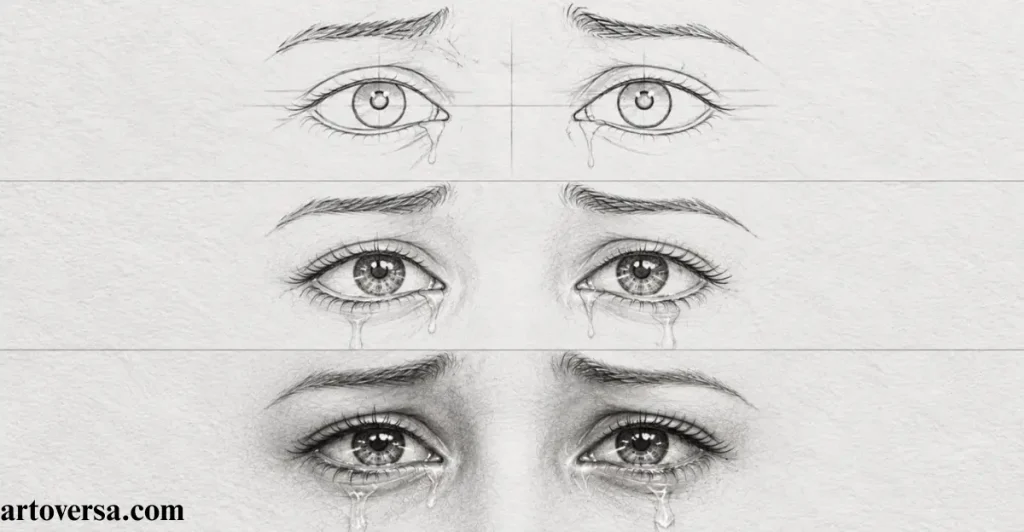
Learn to communicate sadness through subtle changes in the eyes rather than exaggerated facial details. Practice eyebrow placement, eyelid shapes and shading to create emotionally expressive drawings.
- Create sad eyes with drooping eyelids, raised inner eyebrows, heavy eyelids and carefully positioned inner eyebrow ends.
- Use a downward gaze, adjust the pupils and observe eye direction to communicate a sorrowful expression.
- Another important detail is the relationship between sadness, delicate changes, emotional depth, sorrow sadness in eyes eyebrow angles and eye shape.
- For more realistic expressions, study emotional communication and emotional drawing, using small adjustments to create a believable natural expression.
In my drawing practice I have found that small changes in eyebrow position communicate sadness effectively. A slightly lowered gaze often creates a stronger emotional effect than dramatic changes. I use gentle shading to add depth while maintaining a natural expression.
Observing references regularly helps me create more realistic eye expressions.
How to Draw Angry Eyes
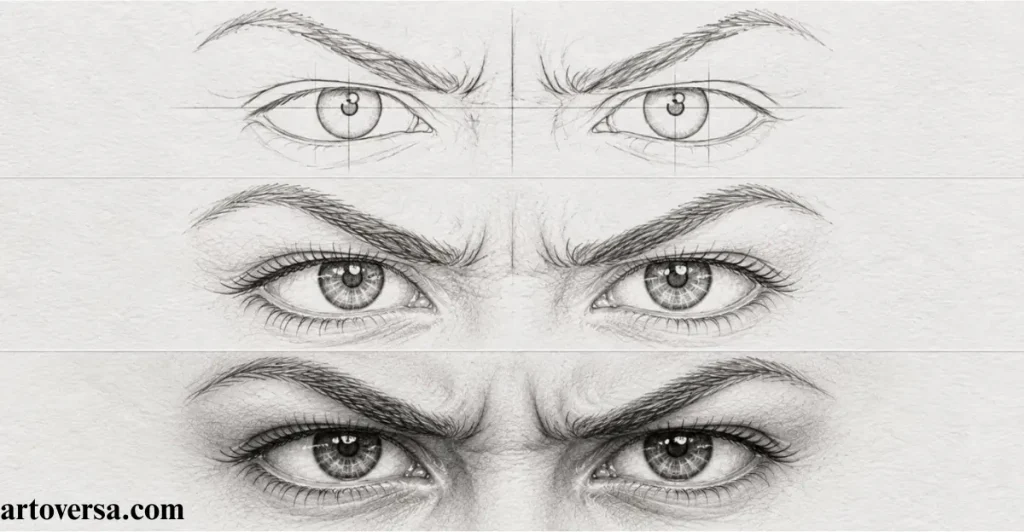
Create intense and expressive characters by learning how anger changes eyebrow angles and eyelid positions. Practice controlled lines and shadows to develop a powerful believable stare.
- Shape angry eyes with a powerful expression, defined eyebrow shapes, sharp eyebrow angles and lowered eyebrows.
- Sketch narrowed eyelids, focused pupils and eyebrows downward toward the center of the face to establish eye tension and an intense stare.
- Adjust pupil direction, line thickness and upper eyelids, using darker shading beneath the brow ridge to control the intensity of anger.
- To a more convincing result practice controlled shading eyebrow sketches, strong angles, facial tension, dark eyes and a focused gaze.
- Practice controlled shading eyebrow sketches, strong angles, facial tension, dark eyes and a focused gaze to create believable expressions, angry expressions, emotional intensity and realistic anger.
I usually sketch several eyebrow angles before choosing the strongest expression. Controlled shading beneath the brow ridge helps me create intensity without making the eyes too dark. Maintaining a clear pupil direction makes the character’s gaze more convincing. This method improves my eye structure and expressive drawing.
How to Draw Surprised Eyes
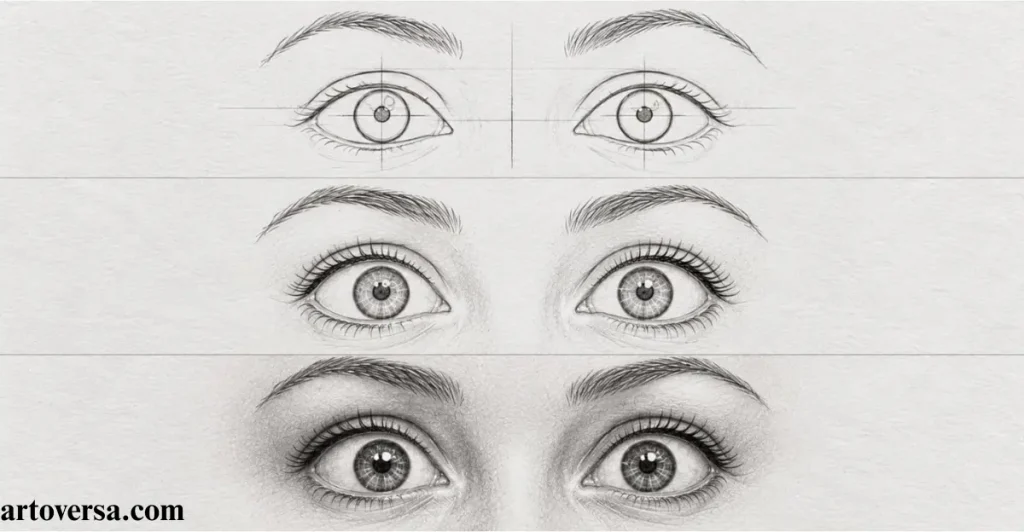
Make your characters look genuinely surprised by experimenting with wider eye openings and raised eyebrows. Use simple shapes and accurate proportions to portray anything from mild amazement to complete shock.
- Illustrate surprised eyes with wider eyes, raised eyebrows, simple shapes, and careful proportions to communicate mild amazement or complete shock.
- Adjust the normal eyebrow position and the distance between the upper eyelids and lower eyelids to control the eye opening and eyelid distance.
- Keep the irises pupils and visible white space clear using rounded shapes and accurate iris placement.
- Using light guidelines check eye proportions, eye structure, visible details, eye shape and eye anatomy before adding darker outlines.
- More realistic expressions study facial emotion, shock, amazement, drawing techniques and eyebrow movement to understand how small changes affect the overall expression.
I check the iris placement before adding darker outlines or other details. Increasing the eye opening gradually helps preserve natural proportions. Comparing mild surprise with complete shock makes the differences easier to understand. These checks help me draw more expressive characters without distorting the eyes.
How to Draw Fearful Eyes
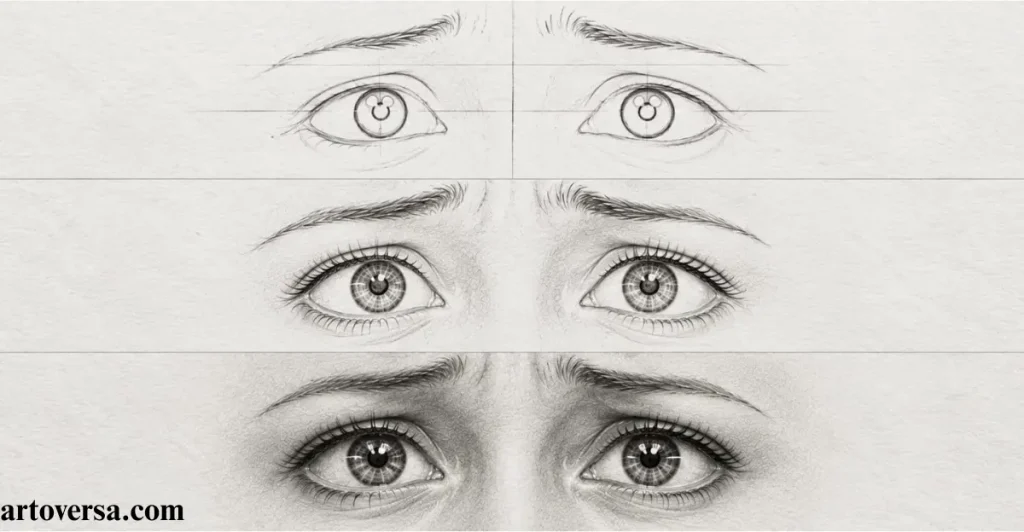
Learn to distinguish fear from surprise by studying tension around the eyebrows and lower eyelids. Practice alert gazes and subtle shading to make fearful expressions look more convincing.
- Depict fearful eyes with tense lower eyelids raised inner eyebrows and alert gazes to communicate fear uncertainty or danger.
- Raise the inner eyebrow ends, maintain wide eyes and emphasize lower eyelid tension to create a worried expression.
- Direct the pupils toward a perceived threat and add subtle lines around the inner corners to strengthen facial tension.
- Through controlled shading compare fearful expressions with surprised expressions to understand eyebrow movement pupil direction overall mood and emotional intensity.
- Use controlled shading and compare fearful expressions with surprised expressions to understand eyebrow movement pupil direction overall mood emotional intensity eye shape realistic fear eye details side-by-side comparison emotional communication, expressive drawing and eye direction.
When practicing fearful expressions I compare them directly with surprised eyes. The tension in the lower eyelids often makes the biggest difference. Adjusting the pupil direction helps establish the character’s focus and emotional state. I use subtle shading to communicate fear without making the expression appear angry.
How to Draw Disgusted Eyes
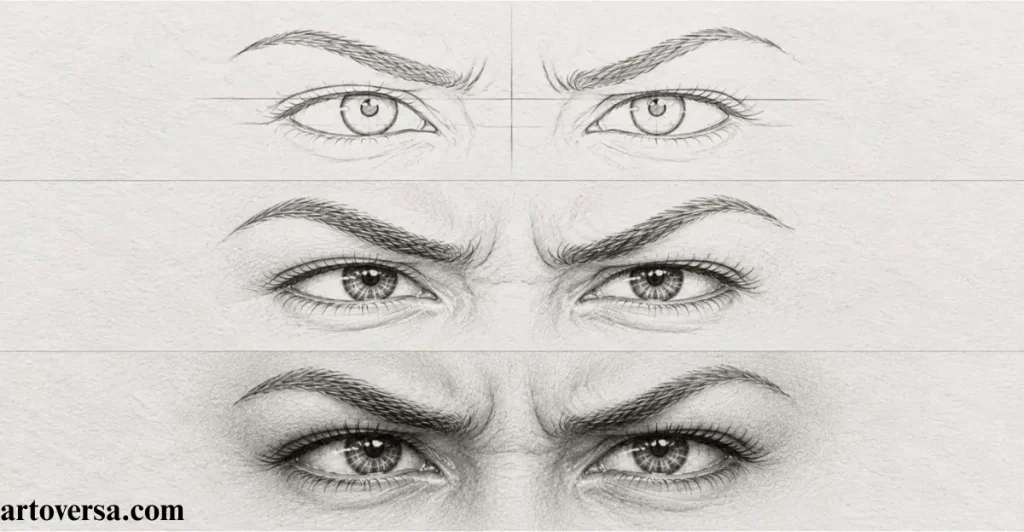
Explore how asymmetrical eyebrows and narrowed eyelids can communicate disgust. Practice small changes in facial tension to create believable and expressive eye drawings.
- Desinge disgusted eyes using asymmetrical features narrowed eyelids and subtle eyebrow changes to create an expression of disgust.
- Adjust eyebrow height, uneven eyebrows and the squinting appearance while maintaining natural eye symmetry where appropriate.
- Add subtle shadows around the inner eye corners and eyelid folds considering the nose upper lip and nose wrinkles in the complete facial expression.
- To communicate discomfort or disapproval observe facial tension lower eyelids eyebrow angles eye shape and facial muscles without adding excessive tension.
- Study facial tension expressive drawings, believable expressions discomfort, disapproval lower eyelids excessive tension angry expression eyebrow angles eye shape facial muscles realistic emotions eye details expression drawing natural appearance and facial features.
I experiment with different eyebrow heights to communicate disgust naturally. Keeping the eyes slightly asymmetrical can make the expression more believable. I also check the lower eyelids to avoid making the character look unnecessarily angry. Small adjustments to the nose and eyebrows help unify the facial expression.
How to Draw Confused Eyes
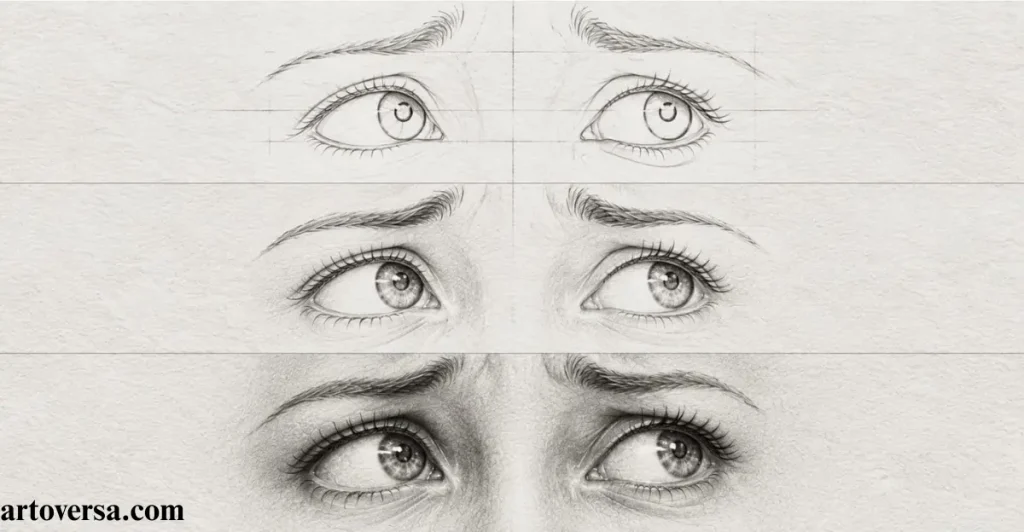
Give your characters a thoughtful and uncertain appearance by practicing asymmetrical eye expressions. Experiment with eyebrow positions and gaze direction to communicate confusion naturally.
- Create confused eyes with a thoughtful appearance, an uncertain expression and asymmetrical eye expressions using uneven eyebrows and different eyelid positions.
- Adjust a relaxed eyebrow, eyebrow height and eye proportions while using shifting gazes and pupil direction to express confusion, uncertainty or thought.
- Maintain balanced eye proportions despite asymmetry and use surrounding lines, soft lines, and light shading to preserve a natural appearance.
- When refining the expression examine eye shape gaze direction facial meaning eye details expressive characters and eye structure.
- Study eye shape aggressive expression gaze direction facial meaning eye details expressive characters eye structure realistic expressions emotional communication drawing techniques natural confusion facial features and eyebrow movement.
I often sketch each eyebrow separately to find a natural balance between the two eyes. A small difference in eyebrow height can communicate uncertainty effectively. Keeping the shading light helps prevent confusion from looking like anger. A slight change in gaze direction adds more meaning to the finished drawing.
How to Draw Tired Eyes
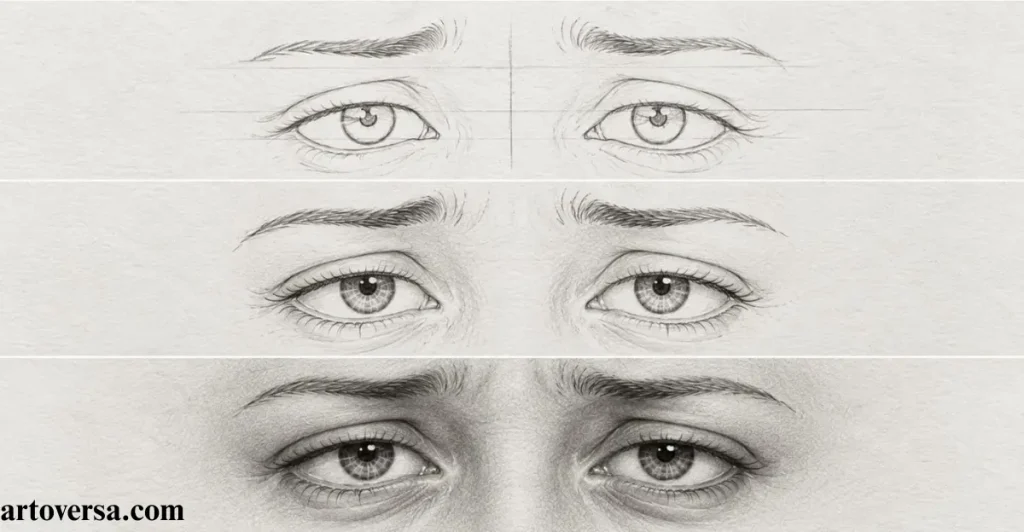
Learn to portray exhaustion through heavy eyelids, relaxed eyebrows and subtle under-eye shadows. Practice gradual shading and natural eye shapes to create convincing sleepy expressions.
- Shape the tired eyes with heavy eyelids, relaxed eyebrows and under-eye shadows to communicate exhaustion and portray sleepy characters.
- Lower the upper eyelids over part of the irises maintaining flat eyebrows relaxed lower eyelids and natural relaxed shapes.
- Apply soft shadows, a slightly unfocused gaze and restrained dark circles to communicate fatigue and sleepiness without exaggerated lines or excessive shading.
- To make the drawing convincing use gradual shading instead of heavy dark outlines and examine the overall expression of tiredness and possible similarities with sadness.
- Use gradual shading instead of heavy dark outlines and study the overall expression, tiredness sadness eye shape eyelid position realistic drawing facial features subtle shadows eye details and drawing practice.
I find that slightly lowering the upper eyelids is an effective way to show tiredness. Soft shadows beneath the eyes create depth without overwhelming the drawing. I avoid heavy outlines unless the character needs a more exhausted appearance. Comparing the overall expression helps me distinguish fatigue from sadness.
How to Draw Loving Eyes
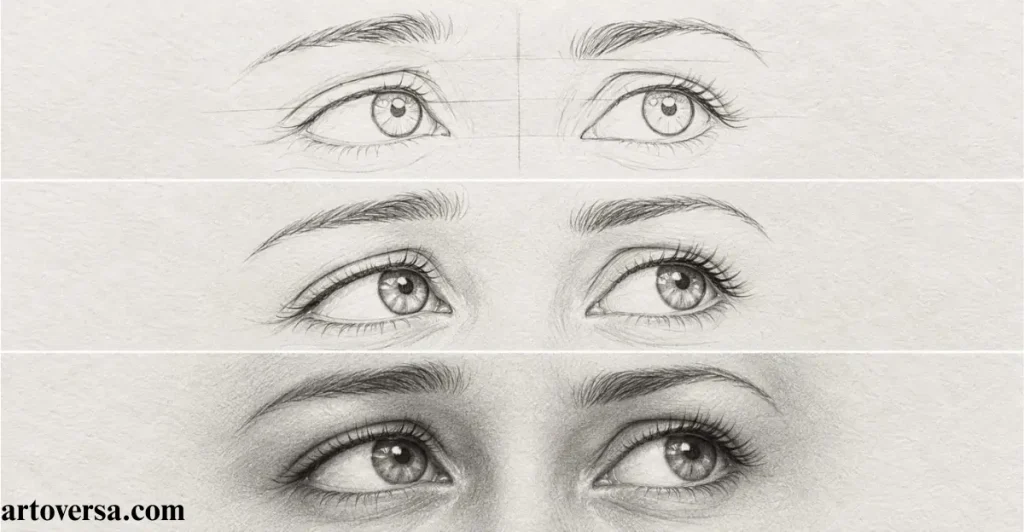
Capture warmth and affection by practicing relaxed eyes, gentle gazes and natural eyebrow curves. Use highlights and soft shading to make your characters appear lively and emotionally engaging.
- Construct loving eyes with warmth, affection , relaxed eyes and a gentle gaze using natural eyebrow curves, subtle highlights and soft shading.
- Shape curved eyebrows naturally and adjust the gaze direction toward the person of interest or object of interest.
- Add natural highlights to the irises and use gentle eyelid curves instead of sharp angles or tense angles to create depth and a warm expression.
- For a believable appearance, avoid exaggerated features and an artificial appearance while studying lively eyes, relaxed eyebrows, and light and shadow.
- Avoid exaggerated features and an artificial appearance while studying lively eyes relaxed eyebrows light and shadow realistic drawing eye highlights emotional connection eye shape facial expression natural appearance and expressive eyes.
I focus on the direction of the gaze to communicate affection. Subtle highlights make the irises look lively without appearing artificial. Keeping the eyebrows relaxed helps maintain a warm and natural expression. Smooth transitions between light and shadow give the eyes more depth.
Common Mistakes to Avoid When Drawing Eye Expressions
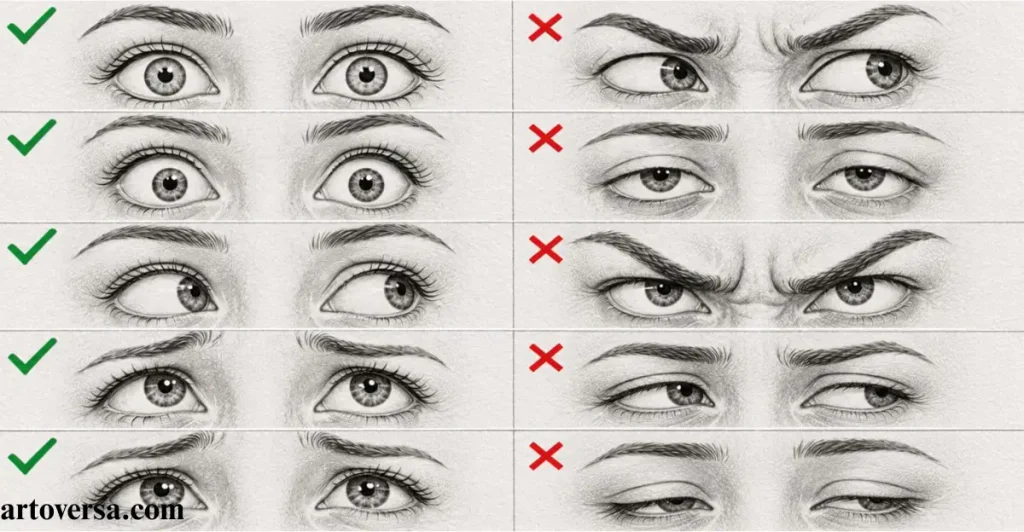
Improve your artwork by identifying mistakes that make emotional eyes appear unnatural. Review your sketches and correct proportions, eyebrow placement and shading before finalizing details.
- Avoid common mistakes in eye expressions, such as changing the eye shape while ignoring the eyebrows or adding exaggerated features that do not match the drawing style.
- Check alignment, eye proportions, and eye symmetry instead of using identical shapes for every range of emotions.
- Compare unfinished sketches with reference images to identify drawing problems, incorrect eyebrow placement, unclear expression, awkward proportions and unnecessary differences.
- Before adding final details, refine sketches, make small corrections and control dark shading to improve expression proportion realism and drawing accuracy.
- Refine sketches make small corrections and control dark shading to improve expression proportion realism drawing accuracy facial anatomy realistic eyes expressive drawing sketch review and eye details.
I review the eye proportions before adding dark shading to a sketch. Checking eyebrow placement often reveals why an expression looks unclear. Comparing both eyes helps me identify alignment problems and unnecessary differences. Making corrections early keeps the finished drawing cleaner and more balanced.
Tips for Practicing Expressive Eyes
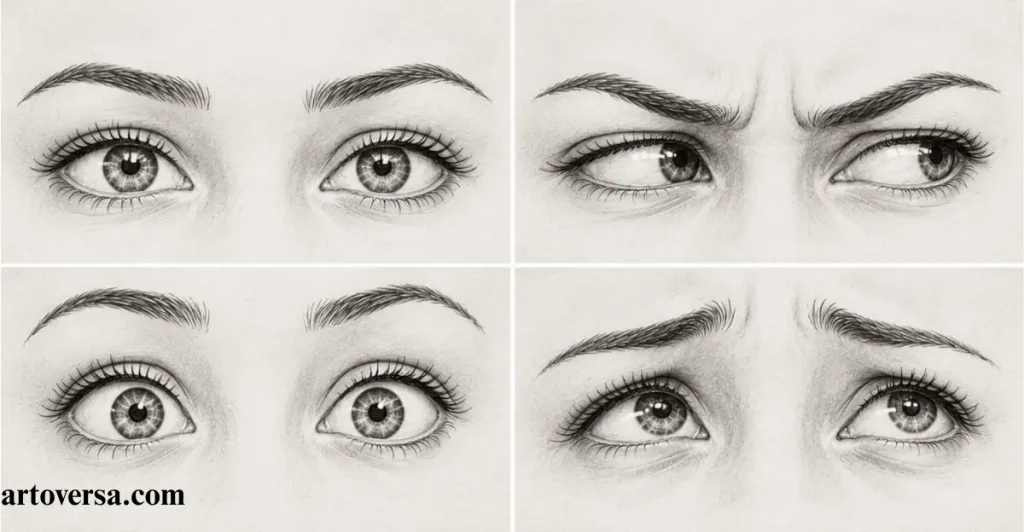
Build confidence in drawing expressive eyes through regular practice and careful observation of real references. Create an expression sheet to improve your control over proportions, shading, and emotional details.
- Develop expressive eyes through consistent drawing practice confidence and exploration of different emotions using real references and an expression sheet.
- Include different shapes shading facial details and all nine emotions on a practice sheet using photographs to study facial movements.
- Practice different intensity levels begin with light sketches, add darker details and review older drawings to measure improvement through regular practice.
- Experiments with different intensity levels begin with light sketches, add darker details and review older drawings to measure improvement through regular practice.
- Study similar emotions eyebrow angles eyelid positions drawing techniques emotional expressions facial features sketching drawing progress eye proportions reference study shading control realistic eyes artistic skills and visual observation.
I practice the same emotion at different intensity levels to understand its defining features. Creating an expression sheet makes it easier to compare eyebrow angles and eyelid positions.
Reviewing older drawings helps me recognize progress and identify areas that need improvement.
Conclusion
Drawing different eye expressions becomes easier when you understand how the shape of the eyes and the position of the surrounding features work together. From joyful, relaxed eyes to narrowed, angry ones, each expression has distinctive details that help communicate a character’s emotions. Practice all nine expressions by observing real faces, experimenting with eyebrow angles, and adjusting eyelid curves and pupil placement. Do not worry if your first sketches look similar, as careful observation and repetition will help you improve. With regular practice, you can create more convincing characters and make your drawings communicate feelings clearly without relying on words
FAQS
What is the easiest way to start drawing eye expressions?
Begin with simple eye outlines and guidelines, then adjust the eyebrows, eyelids, and pupils to communicate different emotions. Practice one expression at a time before adding detailed shading.
Which pencil is best for drawing realistic eyes?
An HB pencil is useful for initial sketches, while 2B and 4B pencils can create darker outlines and shadows. A harder pencil can also help with light guidelines and delicate details.
How can I make eye expressions look more realistic?
Study real facial expressions and pay attention to eyebrow angles, eyelid movement, pupil direction, and the small creases around the eyes. Subtle changes often communicate emotion more effectively than exaggerated details.
Is it possible to show different emotions using only the eyes?
Focus on the relationship between the eyebrows, upper and lower eyelids, and gaze direction. Raised eyebrows can suggest surprise or fear, while lowered brows and narrowed eyelids often communicate anger.
At what pace can beginners improve their eye expression drawing skills?
The time varies depending on your current drawing skills and how consistently you practice. Short daily exercises using references can help you recognize facial patterns and improve your control over proportions and shading.
Please Write Your Comments