How to Draw a Realistic Turkey: Step-by-Step Guide for Beginners and Artists
Updated: October 28, 2026
10
Drawing a realistic turkey is a great way to improve your sketching skills while learning to capture the details of this distinctive bird. From its layered feathers and fan-shaped tail to its textured body and tiny facial features, each element adds character to your artwork. Whether you are picking up a pencil for the first time or refining your artistic techniques this step-by-step guide will help you build your drawing from basic shapes to lifelike details. Follow each stage at your own pace and create a realistic turkey drawing you can proudly share.
Table of Contents
Why Learn to Draw a Turkey?
Many beginners think a turkey is difficult to draw because of its layered feathers, large tail fan, and unique facial features like the snood and wattle. In reality, once you break the bird into simple construction shapes, the drawing becomes much easier to manage. Learning to draw a turkey also strengthens your observation skills, improves pencil control, and helps you practice different hand movements for sketching curves, feathers, and realistic textures. These techniques not only make your turkey drawing better but also help you draw other birds and wildlife with greater confidence.
Understanding Turkey Anatomy Before You Draw
Before you start sketching, take a moment to observe the turkey’s overall shape. Instead of focusing on every small detail, notice how the large body, small head, long legs, broad wings, and fan-shaped tail fit together. These basic forms will help you build accurate proportions from the beginning.
Pay special attention to the turkey’s unique facial features, including the snood, wattle, and beard, as they give the bird its distinctive appearance. Also observe how the primary and secondary feathers overlap to form the wings and tail. Understanding these features before you draw will make it much easier to sketch realistic outlines, add feather texture, and apply natural shading in the later steps.
Materials You’ll Need
Before you begin, gather a few basic drawing tools to make the sketching process easier and more enjoyable. You don’t need expensive supplies, just a few quality materials will help you create clean lines, realistic textures, and smooth shading.
- Graphite Pencils (HB, 2B, and 4B): Use an HB pencil for light construction lines, a 2B pencil for refining outlines, and a 4B pencil for adding rich shadows and darker details.
- Drawing Paper: Choose smooth or medium-textured sketch paper that can handle shading without smudging too easily.
- Kneaded Eraser: Perfect for lifting graphite, softening highlights, and correcting mistakes without damaging the paper.
- Blending Stump: Helps blend graphite smoothly to create natural gradients, feather texture, and realistic shadows.
- Pencil Sharpener: A sharp pencil gives you better control when drawing fine details such as the eye, beak, feathers, and claws.
- Reference Photo: Keep a clear photo of a turkey nearby to study its proportions, anatomy, feather direction, and lighting while you draw.
With these materials ready, you’ll be prepared to sketch confidently and focus on building a realistic turkey step by step.
Step 1 – Draw Basic Construction Shapes
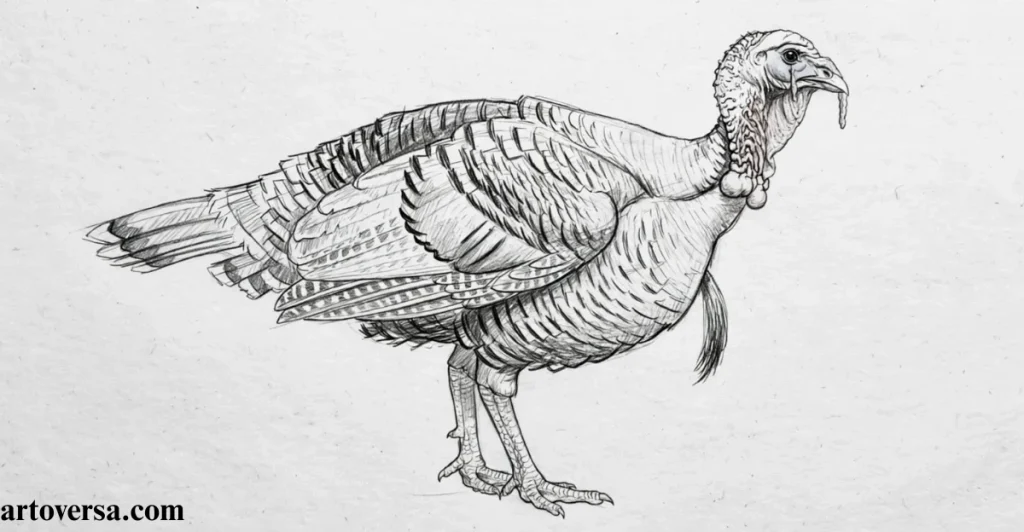
- Sketch a large light oval to create the turkey’s main body.
- Draw a small circle above it for the head, leaving enough room for the neck.
- Connect the head and body with two soft curved lines.
- Keep your construction lines light so they’re easy to adjust later.
- Focus on the overall proportions instead of adding feathers or small details.
Common Problems and How to Overcome Them
Many beginners press too hard or rush to draw the final outline, making corrections difficult later. Use an HB pencil with light pressure and treat these shapes as simple guides until you’re satisfied with the overall structure.
One pattern I’ve observed while guiding new artists is that they often rush into drawing feathers and facial details before building a solid foundation. Once I encouraged them to slow down and focus on simple construction shapes first, their sketches became more balanced, accurate, and much easier to refine. Follow these steps patiently, and you’ll soon develop the confidence and control needed to sketch realistic birds with ease.
Step 2 – Sketch the Body Proportions
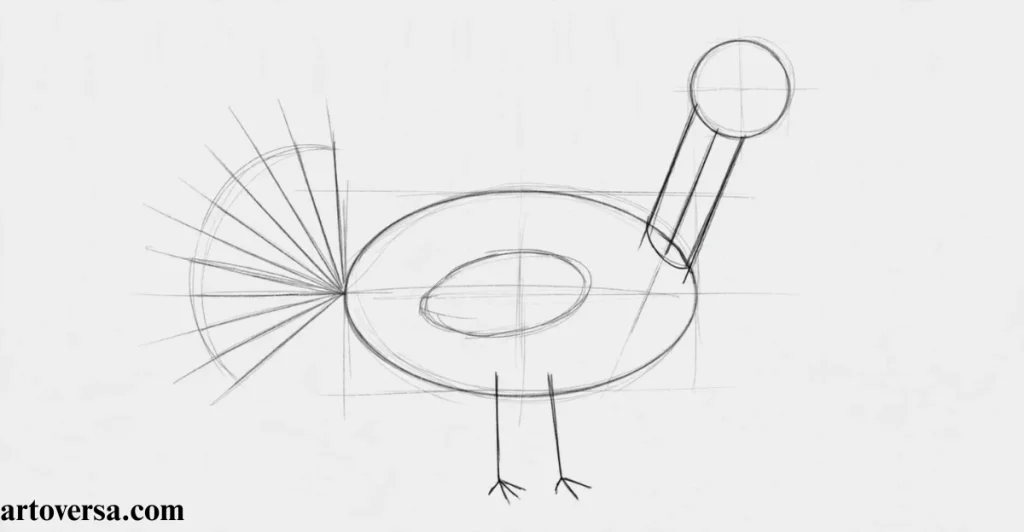
- Draw two overlapping ovals to create the turkey’s main body mass.
- Keep the front oval slightly smaller and the rear oval slightly larger for a natural body shape.
- Make the lower body a little fuller to match a turkey’s rounded appearance.
- Check that the head looks small compared to the body before moving forward.
- Adjust the proportions until the overall silhouette feels balanced and stable.
Common Problems and How to Overcome Them
A common mistake is making the head too large or placing it too close to the body, it may look like both ovals are the same size, which makes the turkey look stiff and unrealistic. Keep the body about three to four times larger than the head and check the spacing before darkening any lines.
As I reviewed practice sketches, I noticed that artists who paused to compare the body proportions made far fewer corrections later. Taking a moment to balance the head, body, and tail early saved both time and effort throughout the drawing. Develop this habit from the beginning, and your turkey sketches will become more balanced, realistic, and easier to complete.
Step 3 – Draw the Head and Facial Features
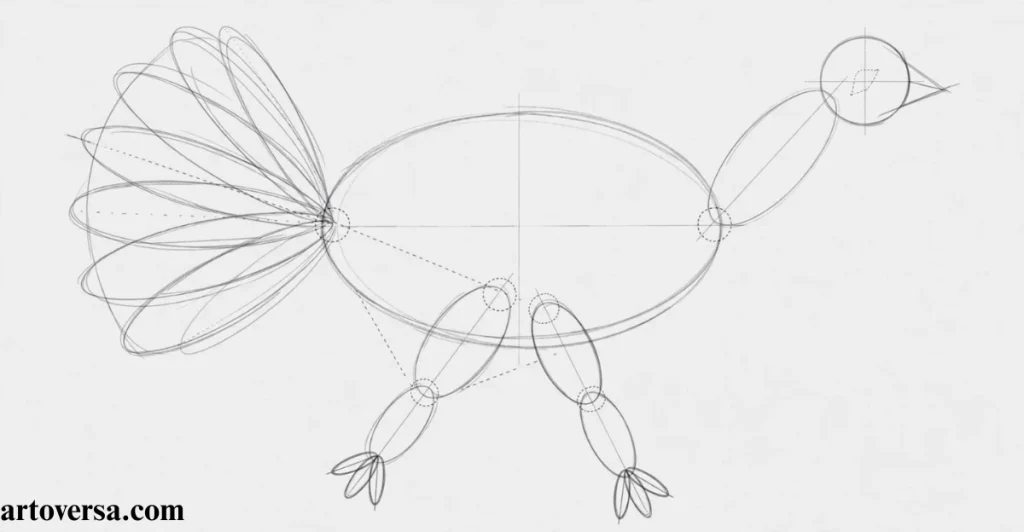
- Refine the head by smoothing the circle into a more natural shape.
- Sketch a short, slightly curved beak that blends naturally into the head.
- Place the eye just above the beak, keeping it small and evenly positioned.
- Add the snood hanging over the beak and the wattle beneath the neck using soft, curved lines.
- Keep all facial features proportional so they complement the head instead of overpowering it.
Common Problems and How to Overcome Them
Many beginners make the beak too long or draw the snood and wattle larger than they should be. Compare each facial feature with the size of the head and make small adjustments until everything looks balanced.
As I looked through finished sketches, I noticed that even a well-drawn body couldn’t compensate for poorly placed facial features. Once artists focused on the position of the eye, beak, and snood instead of their size, their turkey drawings immediately looked more lifelike. Pay close attention to these small details, and you’ll add personality and realism to every sketch.
Step 4 – Add Wings
- Sketch the wing using a long, curved outline that follows the side of the body.
- Keep the wing tucked naturally against the body instead of extending it too far outward.
- Divide the wing into simple sections before adding individual primary and secondary feathers.
- Let the feathers overlap slightly to create a more natural layered appearance.
- Compare both the wing size and placement with the body to maintain realistic proportions.
Common Problems and How to Overcome Them
A common mistake is drawing the wing too small or placing it too high on the body. Start with the overall wing shape first, then gradually add feather details while keeping the wing aligned with the turkey’s body.
While studying wildlife drawings, I realized that the most convincing wings weren’t the ones with the most feather details, they were the ones placed correctly from the start. Artists who concentrated on the wing’s position before refining the feathers achieved a much more natural pose. Build the wing carefully, and the rest of your drawing will come together much more easily.
Step 5 – Sketch the Tail Feathers
- Draw light guide lines to mark the overall shape of the tail fan.
- Sketch the center feathers first, then work outward to keep both sides balanced.
- Vary the feather lengths slightly for a more natural appearance.
- Leave small gaps between the feathers instead of drawing them as one solid shape.
- Refine the outer edges with smooth, curved lines while keeping the tail evenly spread.
Common Problems and How to Overcome Them
Many beginners make every tail feather the same size or spread them too far apart, causing the tail fan to look stiff. Start with the overall fan shape, then adjust the feather spacing and length gradually until the tail looks full and balanced.
After comparing many turkey sketches, one detail consistently stood out. The best drawings focused on the overall tail fan before worrying about individual feathers. Once artists established the correct shape first, adding feather details became much simpler and the finished sketch looked far more realistic. Take your time with this stage, and your turkey will have a strong, natural-looking silhouette.
Step 6 – Draw the Legs and Feet
- Draw two straight but slightly tapered legs extending from the lower body.
- Keep both legs evenly spaced to give the turkey a balanced standing posture.
- Sketch the tarsus first, then add the feet and toes with simple curved lines.
- Add the spurs only if you’re drawing a mature Tom Turkey.
- Finish by refining the claws and checking that both feet rest naturally on the ground.
Common Problems and How to Overcome Them
A common mistake is drawing legs that are too short, too thick, or uneven, making the turkey appear unstable. Compare the length and position of both legs before adding the feet, and keep the toes spread naturally for better balance.
While reviewing wildlife sketches, I found that artists often spent plenty of time on the body but hurried through the legs and feet. Once they gave the lower body the same attention as the rest of the drawing, their turkeys looked more grounded and realistic. Treat the legs as an important part of the overall pose, and your finished sketch will feel much more lifelike.
Step 7 – Add Feather Layers and Texture
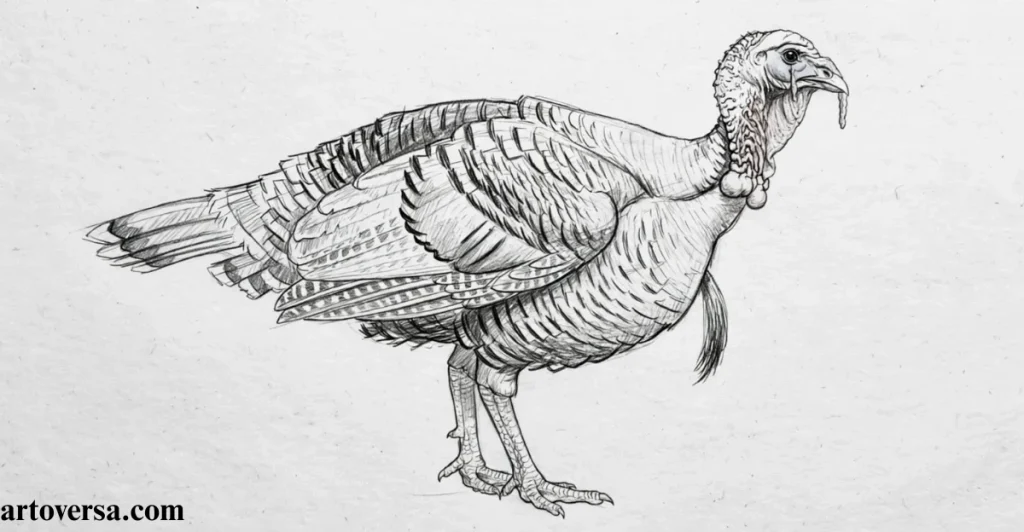
- Sketch the feathers in overlapping layers instead of drawing them one by one.
- Follow the natural direction of feather growth across the body and wings.
- Use short, light pencil strokes to create a soft feather texture.
- Keep the feathers near the neck smaller and gradually make them larger toward the body and tail fan.
- Avoid outlining every feather; suggest groups of feathers to keep the drawing clean and realistic.
Common Problems and How to Overcome Them
Many beginners try to draw every single feather, making the sketch look busy and unnatural. Focus on the overall feather flow first, then add texture gradually to create depth without overcrowding the drawing.
During practice sessions, I noticed that the most realistic turkey drawings weren’t the ones with the most feathers.They were the ones with the best feather flow. Once artists learned to think in layers instead of individual feathers, their sketches gained depth, texture, and a much more natural appearance. Build the feathers gradually, and realism will come naturally.
Step 8 – Clean the Line Art
- Erase the unnecessary construction lines without removing your final sketch.
- Darken the important outlines using smooth, confident pencil strokes.
- Refine the edges of the wings, tail, and body to create a cleaner silhouette.
- Keep the line thickness consistent, adding slightly darker lines only where needed.
- Check the entire drawing one last time before moving on to shading.
Common Problems and How to Overcome Them
Many beginners erase too much and accidentally remove important outlines, while others leave too many construction lines visible. Erase gradually, strengthen the final contours, and make sure the sketch looks clean before adding any shading.
One habit I noticed among artists with the cleanest sketches was that they never rushed this stage. They spent a few extra minutes refining their line art, and the difference was immediately visible once shading began. A clean drawing is the foundation of a professional-looking result, so don’t skip this important step.
Step 9 – Shade the Turkey for Realism
- Start shading with an HB pencil, then switch to a 2B or 4B pencil for darker areas.
- Build the shading gradually using light layers instead of pressing hard.
- Add form shadows beneath the wings, neck, and body to create depth.
- Leave small highlights where natural light hits the feathers to make them look more realistic.
- Use a blending stump sparingly to soften transitions while preserving the feather texture.
Common Problems and How to Overcome Them
Many beginners apply heavy shading too early, making the drawing look flat and difficult to correct. Build the midtones, shadows, and highlights gradually, increasing the contrast only after you’re satisfied with the overall lighting.
While comparing finished drawings, I found that the most realistic sketches weren’t always the darkest ones. They had the best balance between light and shadow. Artists who layered graphite patiently achieved smoother transitions and more natural depth. Trust the process, and let each layer bring your turkey drawing to life.
Step 10 – Add Final Details and Highlights
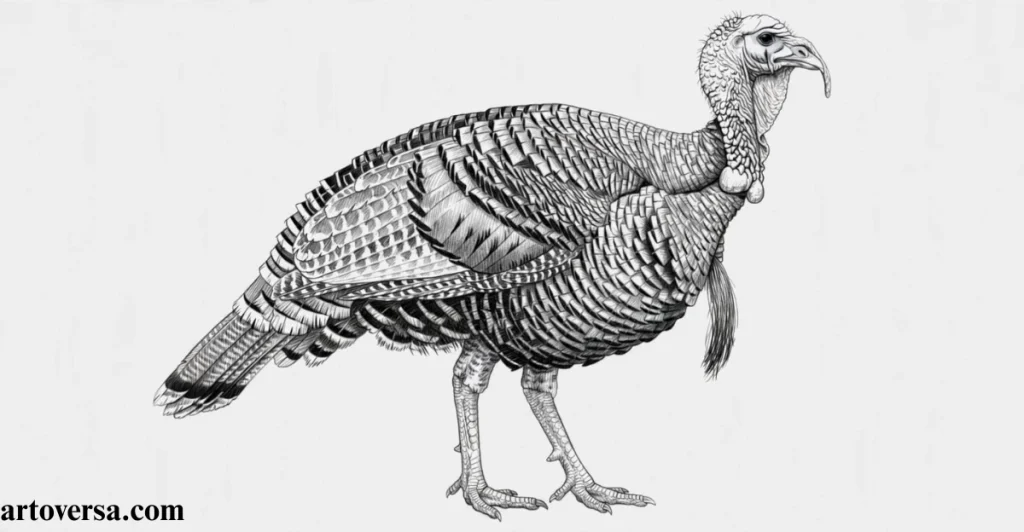
- Sharpen the eye, beak, and claws with clean, precise pencil strokes.
- Add subtle feather texture where the drawing needs more depth, avoiding unnecessary details.
- Use a kneaded eraser to lift small highlights on the feathers and facial features.
- Deepen the darkest cast shadows to increase contrast and make the turkey stand out.
- Step back and review the entire drawing, making only the adjustments that improve the overall result.
Common Problems and How to Overcome Them
Many beginners keep adding details long after the drawing is finished, making the sketch look crowded and overworked. Knowing when to stop, small thoughtful refinements often create a stronger final result than excessive detailing.
One habit I admire in experienced artists is their ability to recognize when a drawing is complete. Instead of chasing perfection, they make a few intentional finishing touches and let the artwork speak for itself. Learn to trust your progress, and every completed sketch will become a stepping stone toward mastering realistic wildlife drawing.
Professional Drawing Tips
Professional artists begin by observing the subject carefully before making the first pencil stroke. Study a clear reference photo, build the sketch with light construction lines, and check the overall proportions before refining smaller details. Work from simple shapes to complex forms, keeping your lines clean and your pencil pressure light throughout the drawing process.
To achieve a realistic finish, build graphite gradually using light layers instead of heavy strokes, and create feather texture by suggesting groups of feathers rather than drawing every one. Step back occasionally to review the overall balance, make small adjustments where needed, and practice regularly to improve your observation skills, pencil control, and confidence with every sketch.
How to Draw Different Types of Turkeys
Wild Turkey
A Wild Turkey has a slimmer body, longer legs, and darker plumage with an iridescent sheen. Keep the posture alert, draw a modest tail fan, and use layered pencil strokes to capture the natural feather texture found in the wild.
Domestic Turkey
A Domestic Turkey is larger and rounder, with a fuller body and softer feather appearance. Sketch broader body proportions, a wider chest, and a more relaxed stance to reflect its farm-raised characteristics.
Male Turkey (Tom)
A Tom Turkey is the most striking to draw because it has a large tail fan, a longer snood, a prominent beard, and visible spurs on its legs. Emphasize these features while keeping the body powerful and well-balanced for a realistic appearance.
Female Turkey (Hen)
A Hen Turkey has a smaller body, a shorter snood, and a less dramatic tail display than a tom. Use softer body proportions, subtle facial features, and shorter feathers to create a natural and accurate female turkey drawing.
Conclusion
Drawing a realistic turkey becomes much easier when you build the sketch step by step, starting with basic shapes and gradually adding feathers, facial features, and natural textures. Paying attention to the turkey’s body proportions, layered tail feathers, and subtle shading will help your artwork look more lifelike. Keep practicing different feather patterns, pencil strokes, and color combinations to develop your drawing skills. With patience and attention to detail, you can turn a simple outline into a realistic turkey drawing that captures the beauty of this unique bird.
How do you draw a realistic turkey step by step?
Start by sketching simple construction shapes for the body and head. Gradually add the wings, tail feathers, legs, facial features, feather texture, shading, and final details to create a realistic turkey drawing.
Is drawing a turkey easy for beginners?
Yes. Drawing a turkey becomes much easier when you break it into basic shapes and follow each step in order. Beginners can achieve realistic results with regular practice and patience.
What materials do I need to draw a turkey?
You’ll need graphite pencils (HB, 2B, and 4B), drawing paper, a kneaded eraser, a blending stump, a pencil sharpener, and a clear reference photo.
How can I make my turkey drawing look realistic?
Focus on correct proportions, layer the feathers naturally, use smooth shading, preserve highlights, and study a reference photo to capture realistic anatomy and texture.
What is the hardest part of drawing a turkey?
Many artists find the tail feathers and feather texture the most challenging. Drawing them in overlapping layers instead of individual feathers creates a more natural appearance.
How do you draw turkey feathers realistically?
Sketch feather groups that follow the natural direction of growth. Use light, short pencil strokes and vary the feather sizes instead of outlining every single feather.
Please Write Your Comments