How to Draw a Tiger Face & Head Step by Step
Updated: October 20, 2026
19
A tiger’s face is one of the most exciting animal subjects to draw because its bold stripes, expressive eyes and powerful features give it a distinctive appearance. Although capturing these details may seem challenging for beginners breaking the drawing into simple shapes makes the process much easier. Follow this step-by-step tutorial to learn how to draw a tiger face and head while improving your proportions, line control and shading techniques.
Table of Contents
Materials Needed to Draw a Tiger Face
Gather your pencils, eraser, drawing paper and coloring tools to get started! Prepare your materials and follow the simple steps to sketch a tiger’s face, draw its bold stripes and bring its fierce expression to life. Grab your supplies and start drawing today!
- Pencil: Used to sketch the tiger’s face, outline its features and draw the stripes.
- Eraser: Helps remove unwanted lines and correct drawing mistakes.
- Drawing Paper: Provides a surface for sketching, shading and coloring the tiger’s face.
- Sharpener: Keep your pencil sharp for drawing fine details around the eyes, nose and mouth.
- Ruler: Helps measure proportions and create guidelines for the tiger’s facial features.
- Colored Pencils: Used to color the tiger’s orange fur, black stripes, white cheeks and other facial details.
- Black Marker or Fine-Liner Pen: Helps outline the tiger’s face and make its stripes and facial features stand out.
- Blending Stump: Blends pencil shading smoothly to create realistic fur texture and shadows.
- Reference Image: Helps you understand the tiger’s facial structure, stripe patterns and natural colors.
- Paintbrushes and Watercolors: Optional tools for adding color and creating a vibrant tiger face illustration.
Step-by-Step Guide to Drawing a Tiger Face and Head
Grab your drawing supplies and follow each step to sketch a tiger’s face and head with ease. Start with basic shapes, outline the facial features, add bold stripes and finish with realistic colors and details. Pick up your pencil and bring your tiger drawing to life today!
Step 1: Make a Construction Line Drawing of the Overall Shape of the Tiger’s Head
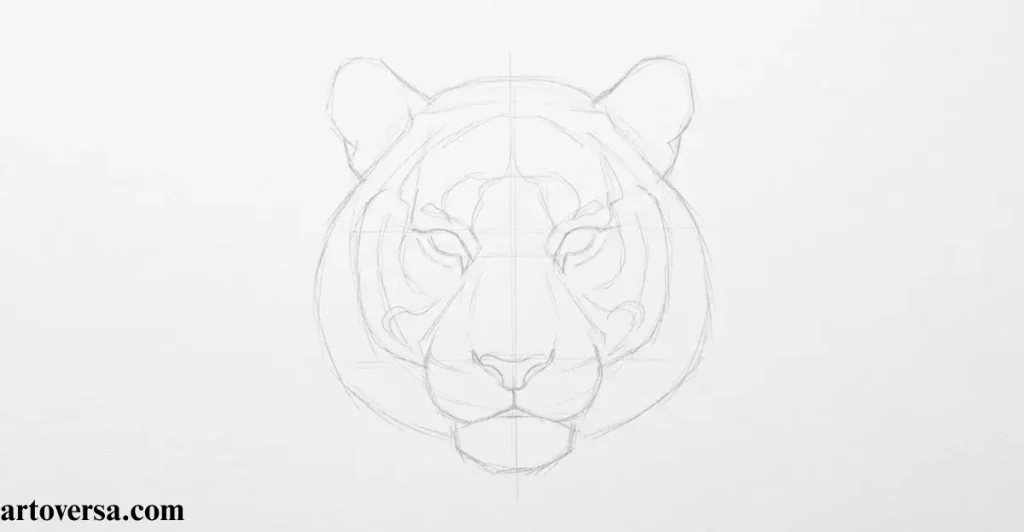
- Begin your tiger head drawing by sketching the major shapes of the head and face using simple geometric forms. Focus on the overall shape, including the broad forehead, rounded cheeks and tapered lower face.
- Use light construction lines and guidelines to create the head structure and facial structure. Draw a rough outline and keep the basic forms balanced with correct width, height and proportions.
- Keep your lines light during this drawing stage so you can erase unwanted marks easily. A clean sketch makes it easier to refine the outline and add shading in later steps.
- Check the left and right sides of the sketch to maintain visual balance. Adjust the forehead, cheeks and jaw to improve shape accuracy before adding the eyes, nose, muzzle and ears.
- Review the initial drawing and refine the outline, construction lines and basic forms. Keep the tiger’s head recognizable and leave the necessary guidelines visible for drawing facial features in the next step.
When I work on a tiger head sketch, I find it helpful to concentrate on the large shapes before attempting the smaller features. A light framework makes corrections easier and helps maintain consistent proportions throughout the drawing. I also check the silhouette from a distance because it often reveals imbalances that are difficult to notice up close.
Common Mistakes
One frequent mistake is adding stripes, fur and facial details before establishing the head’s basic structure. Drawing construction lines too dark can also make erasing difficult and leave unwanted marks. Avoid making the head too narrow or uneven and always check the overall proportions before moving on to the facial features.
Step 2: Facial Features Outline Drawing
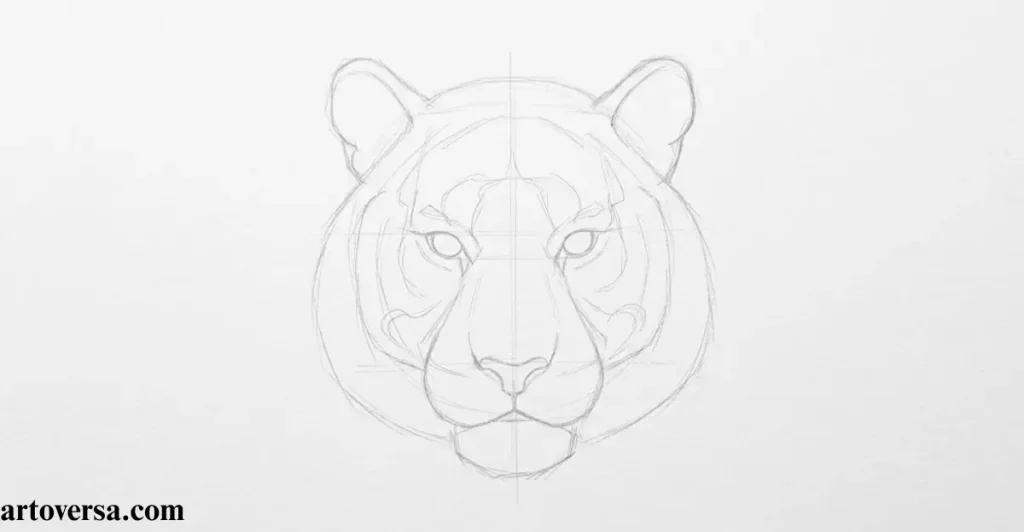
- Inside the guidelines from Step 1 begin drawing the outline of the tiger’s facial features. Use light lines to sketch the eyes, nose, ears and cheeks while maintaining balanced proportions.
- Focus on the overall face shape and arrange the features carefully. Keep the facial outline simple so you can adjust the shapes before adding smaller details.
- Use the existing construction lines to guide the placement of each feature. Check the distance between the eyes, the width of the nose and the position of the ears to keep the face symmetrical.
- Keep your line drawing light and clean. If any shapes look incorrect, erase and redraw them before moving forward leaving only the necessary guidelines visible.
- Refine the sketch by checking the head outline and facial features together. Make sure the muzzle, cheeks, eyes and nose fit naturally within the overall shape.
From my experience with animal face sketches, outlining the facial features lightly before adding darker details makes corrections much easier. I pay particular attention to the relationship between the eyes, nose and muzzle because even small adjustments can improve the overall balance. Taking time to check these features together also helps the tiger’s expression look more natural.
Common Mistakes
A common problem at this stage is drawing the eyes, nose and muzzle too large or placing them too close together. Dark outlines can make corrections difficult especially when the facial proportions are not yet accurate. Avoid adding unnecessary details too early and keep the guidelines light until the overall face shape looks balanced and symmetrical.
Step 3: Basic Line Drawing
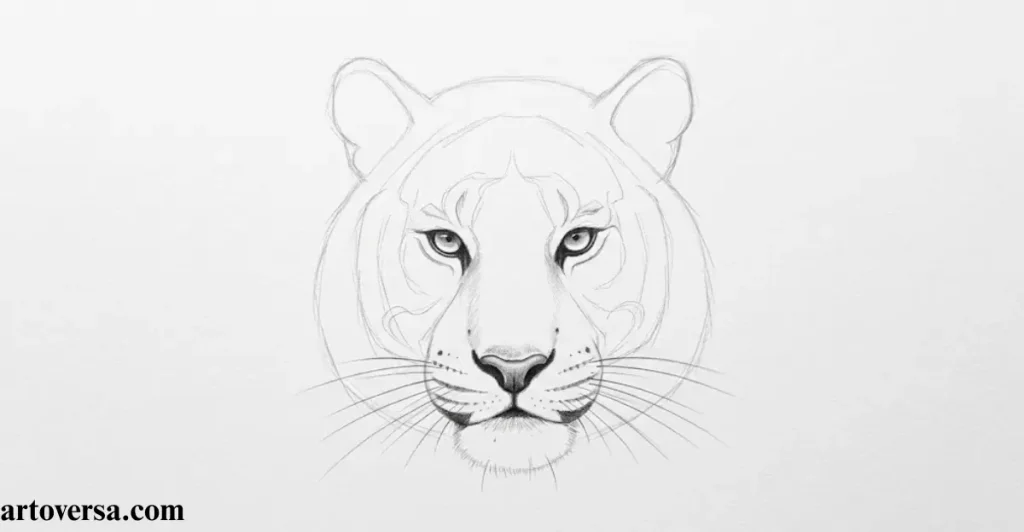
- Erase unnecessary or overlapping guidelines from the previous step while keeping the main outline intact. Begin adding smaller details to the tiger’s face using clean, controlled lines.
- Draw the pupils inside the eyes paying attention to their shape and placement. Keep both eyes aligned to create a natural facial expression.
- Add a few fine lines around the whisker area near the muzzle. These whisker lines help define the tiger’s face without making the sketch look crowded.
- Shade the darker areas of the eyes and nose with a solid dark fill. This creates contrast between the lighter facial areas and the more prominent features.
- Refine the basic line drawing by checking the outline, eye details, nose shading and facial details. Remove stray construction lines and keep the fine lines clean.
When developing the expression of a tiger, I usually pay close attention to the pupils and nose before refining the whiskers. These features give the face much of its character while carefully placed dark areas help define its structure. I find that adding details gradually produces a cleaner result than trying to finish every facial feature at once.
Common Mistakes
One mistake to watch for is making the pupils uneven or filling too many areas with dark shading. Excessive whisker lines can crowd the muzzle and make the face appear untidy. Leaving overlapping construction lines around the eyes and nose can also weaken the final drawing, so clean up the sketch carefully while preserving the important outlines.
Step 4: Detailed Line Drawing
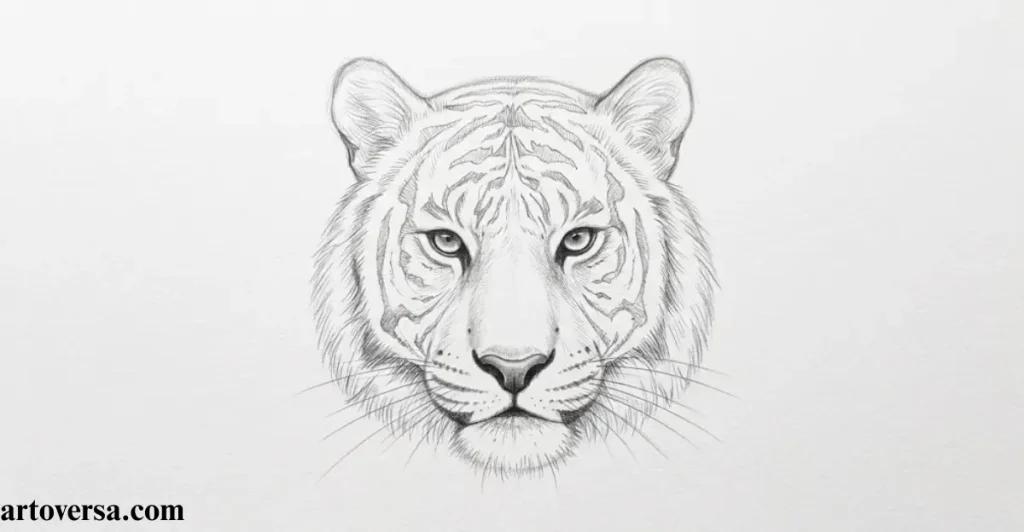
- Add short lines of fur along the outer edges of the tiger’s head. Follow the natural contour of the forehead, cheeks and jaw to give the outline a textured appearance.
- Draw small clumps of fur in varying shapes and sizes. Avoid making every clump identical as natural fur has an irregular pattern and direction.
- Add fine fur details inside the ears following their curved shapes. Keep the ear details subtle so they complement the overall head outline.
- Sketch the outer shapes of the tiger’s stripes across the forehead, cheeks and other visible facial areas. Plan their placement around the eyes and muzzle.
- Refine the stripe outlines, markings and patterns using controlled linework. Check the fur texture, facial details and contour to ensure the tiger face remains recognizable.
While adding details to a tiger illustration, I find that varying the direction, length and spacing of fur strokes creates a much more convincing texture. I also prefer outlining the major stripes before filling them with darker marks, as this helps maintain their shape around the eyes and muzzle. Small variations in the markings can make the drawing feel more natural without overwhelming the facial features.
Common Mistakes
Making every fur clump the same size can leave the tiger’s head looking stiff rather than textured. Stripes that are too uniform or poorly positioned may interfere with the eyes, cheeks and muzzle. Avoid filling every available space with markings; instead, vary the shapes and follow the natural contours of the face to maintain a clear and recognizable outline.
Step 5: Basic Shading
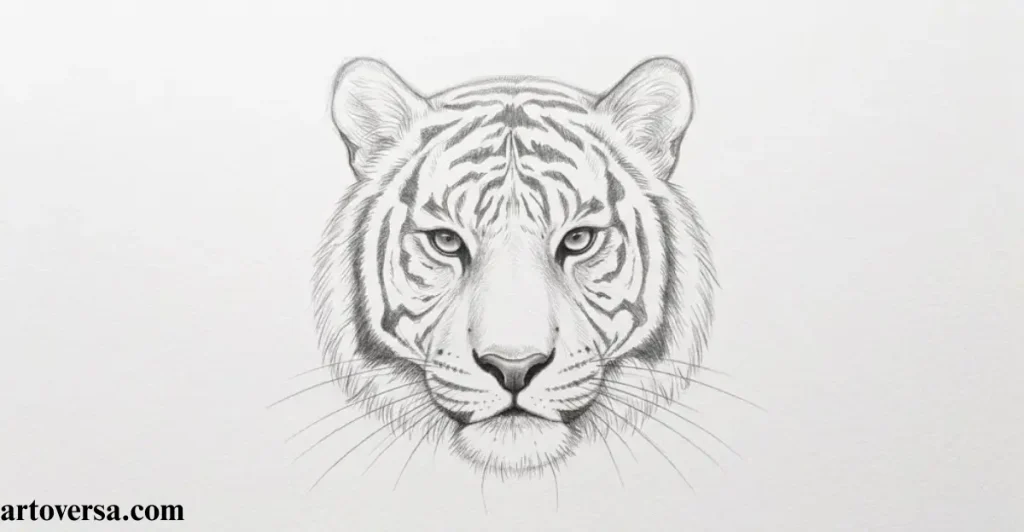
- Shade the tiger’s fur stripes using one-directional strokes of varying lengths. Follow the direction of the markings to create a natural texture without relying on crosshatching.
- Build up the stripe patterns gradually, keeping the strokes within their outlines. Vary their length and darkness to give the fur a more realistic appearance.
- Add a few extra strokes along the head outline and inside the ears. These details help define the fur texture and create subtle depth around the face.
- Draw whiskers from the whisker lines around the mouth area. Use slightly different lengths and gentle curves to make the whiskers appear natural.
- Review the shading, linework and facial details. You can leave the drawing at this stage or continue to Step 6 for a more fully shaded result.
My preferred approach to basic shading is to build up the darker stripes in several light passes rather than filling them completely at the beginning. This makes it easier to control the texture and preserve lighter areas around the face. I also check the whiskers after shading, since their curves and spacing should remain visible against the surrounding fur.
Common Mistakes
Using strokes in too many directions can make the fur look messy and inconsistent. Another mistake is making every stripe equally dark which reduces contrast and makes the markings appear flat. Avoid drawing whiskers with identical lengths or overly sharp curves and keep the shading controlled so the facial details remain clear.
Step 6: Fully Shaded Drawing
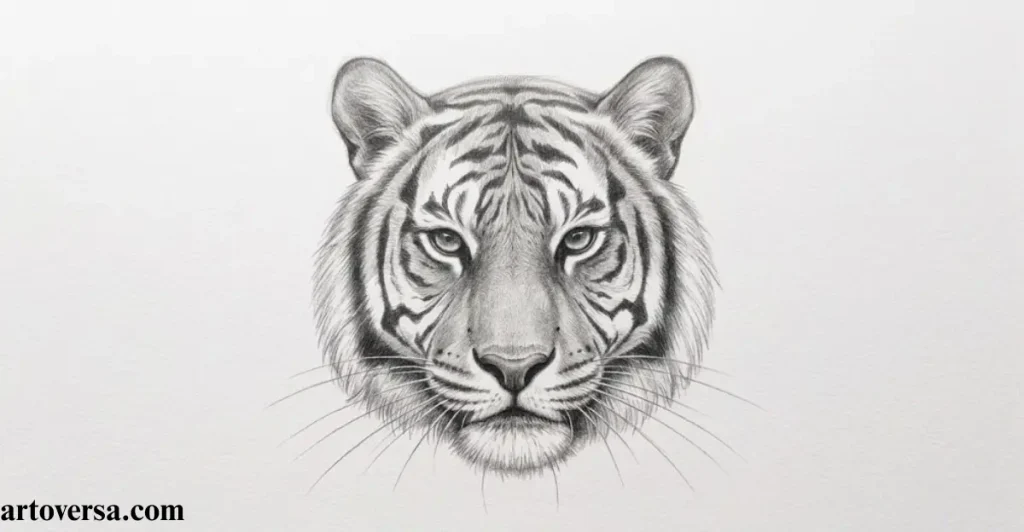
- Add light shading to the darker fur areas of the tiger’s head to make the drawing stand out. Use gentle strokes to establish the main areas of light and shadow.
- Concentrate darker shading around the nose, forehead and top of the head. Blend the tonal values gradually to create depth while preserving the important facial features.
- Imagine the main light source coming from above and in front of the tiger. Keep the bridge of the nose slightly lighter than the surrounding dark fur to create highlights and define its shape.
- Darken the inside of the ears with additional strokes because these areas receive less direct light. Smooth out the drawing by adding extra strokes where needed to improve the fur texture and overall appearance.
- Erase unnecessary lines from the previous step around the eyes and snout. Use shading to define their shapes, refine the contrast and complete the realistic appearance of the tiger face.
When finishing a shaded animal portrait, I find it helpful to step back and assess how the light and shadow work together across the entire head. Keeping the bridge of the nose lighter while gradually darkening the forehead and inner ears creates a stronger sense of dimension. I also refine the fur with a few carefully placed strokes instead of shading every area equally which helps preserve the tiger’s facial structure.
Common Mistakes
Applying the same darkness across the whole head can flatten the drawing and reduce its depth. Over-shading the bridge of the nose may hide the highlights while leaving the inner ears too light can weaken the sense of shadow. Adding too many strokes can also obscure the facial outline and fur patterns, so build up the tonal values gradually and erase unnecessary construction lines without disturbing the finished details.
Conclusion
Drawing a tiger’s face and head becomes easier when you build the basic structure before adding the finer details. Focus on placing the eyes, nose, ears and muzzle in the correct positions to create a balanced appearance. Once the outline is complete, carefully add the tiger’s distinctive stripes, whiskers and shading to bring your artwork to life. Remember that the stripes do not need to be perfectly identical because their natural variations help make each tiger unique. Keep practicing with simple pencil strokes and reference images to improve your technique and create a tiger drawing you can be proud of.
FAQs
What is the easiest way to start drawing a tiger’s face?
Begin with a large circle or oval to establish the head shape then add guidelines for the eyes, nose and mouth. These simple shapes help you keep the facial features balanced as you develop the drawing.
How can beginners draw realistic tiger stripes without making mistakes?
Start by sketching the stripes lightly with a pencil following the natural curves of the forehead, cheeks and sides of the face. Vary their shapes and thicknesses to create a more natural tiger pattern.
Which facial features make a tiger drawing instantly recognizable?
The bold stripes, rounded ears, strong muzzle, broad nose and focused eyes give a tiger its distinctive appearance. Paying attention to these features helps your drawing look more convincing.
What drawing supplies should I use for a detailed tiger portrait?
A regular pencil, eraser, drawing paper and black pen or colored pencils are enough to get started. Orange, black, white and brown coloring tools can help you recreate a tiger’s familiar fur pattern.
How do I make a tiger’s eyes look expressive and lifelike?
Position the eyes evenly on either side of the facial guidelines paying attention to their shape and direction. Add small highlights and gentle shading around the eyelids to give the tiger a more expressive appearance.
Why does my tiger’s head look uneven when I finish the outline?
Uneven proportions often happen when the eyes, ears, or muzzle are placed without reference guidelines. Lightly divide the face into sections and compare both sides before adding the final details.
Please Write Your Comments