The Definitive Tutorial for Drawing a Parrot
Updated: September 23, 2026
22
Parrots are colorful and intelligent birds, admired for their vibrant feathers, curved beaks, and graceful posture, making them one of the most exciting birds to draw. However, creating a realistic parrot can be challenging because of its layered feathers, detailed facial features and accurate body proportions. With the right techniques and a step-by-step approach, even beginners can achieve impressive results. Follow the complete tutorial below to learn every stage of the drawing process and create a lifelike parrot with confidence.
Table of Contents
Easy Steps on How to Draw a Parrot Using Graphite Pencils
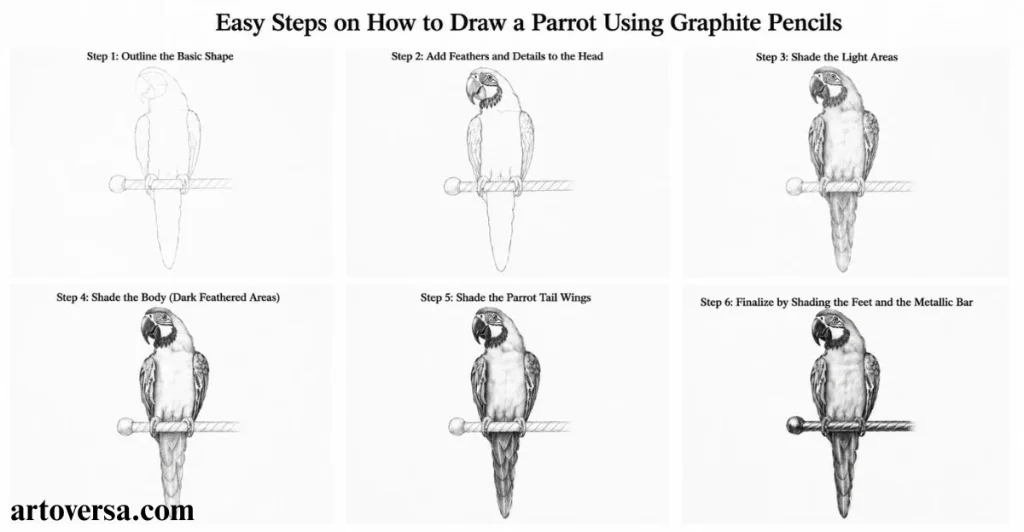
Follow these simple step-by-step instructions to draw a realistic parrot with graphite pencils, even if you’re a complete beginner.
Step:1 Sketching the Parrot
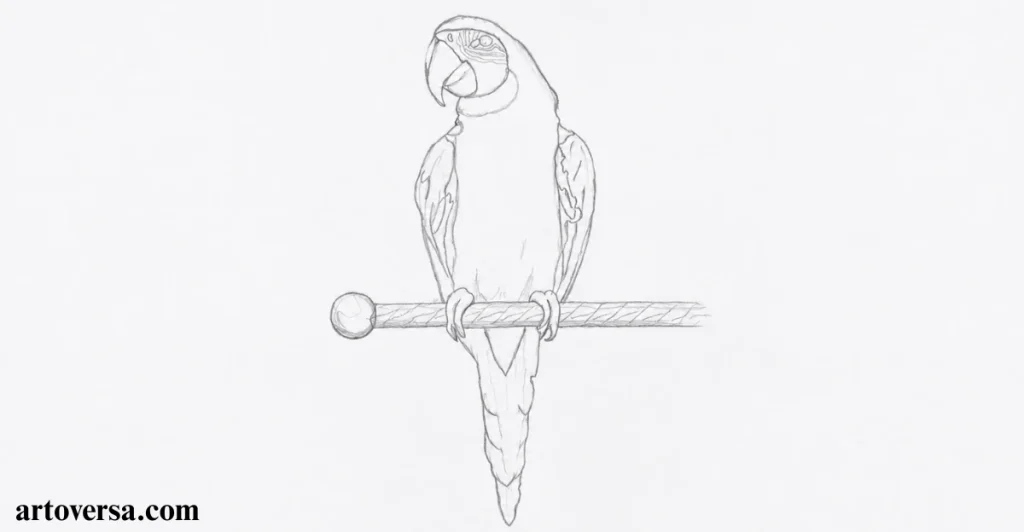
Start with a simple framework and build the sketch one step at a time so every new line naturally connects to the previous one.
- Begin by drawing the overall gesture of the parrot to capture its natural pose. Keep the proportion simple by breaking the bird into recognizable shapes and if needed, use the grid method for more precise guidance.
- Once the basic shape feels balanced, start lightly mapping the bird posture with faint lines. Then position the head first and extend it smoothly toward the beak tip without pressing too hard.
- After finishing the head, connect it to the body using smooth neck curves. Shape the chest, adjust the body width and continue the flow by sketching the tail direction before deciding the final tail length.
- With the body complete, place the feet position naturally beneath the bird and wrap them around the perch or metallic bar. This helps the illustration drawing look balanced and believable.
- Finally, review the complete line sketch before thinking about shading. If it still looks like a bad sketch, make small corrections and don’t hesitate to draw several sketches until you’re happy with the sketch.
Common problems and how to overcome them:
Many beginners focus on the details before the overall bird posture, making the sketch feel unbalanced. Build the drawing in sequence and check each stage before moving to the next one.
I used to jump straight into the head and feathers, but the body proportions never looked right. Once I started following the drawing from the gesture through to the tail length step by step, the entire parrot became much easier to sketch and needed far fewer corrections.
Step: 2 Basic Shading for Form and Volume
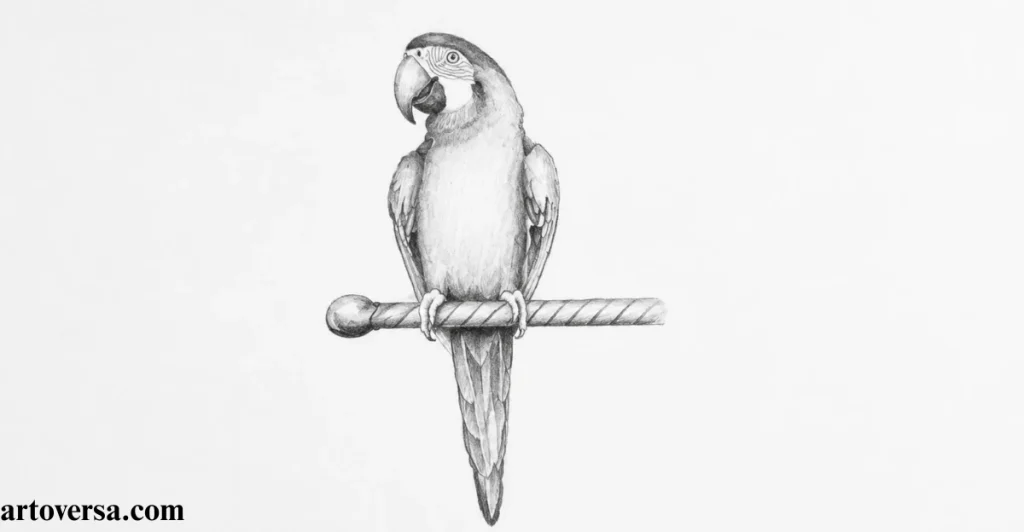
Build the first layer of shading slowly to give the bird natural form and volume before adding the darker details.
- Begin shading over the line sketch with an even midtone using light pressure and small strokes. Focus on the overall bird first so the basic form and volume develop evenly across the drawing.
- Once the base layer is complete, leave the highlights untouched around the eyes, the top ridge of the beak, and the metal bar. Preserving these reflections now will make the drawing look much more realistic later.
- Continue building the first layer gradually instead of covering the entire white paper at once. Start with a gentle tone, then slowly introduce darker tones and lighter tones to define the larger forms.
- After the graphite is applied, blend softly with a blending stump or tissue. Avoid blending over the important features, and if any sketch lines become too faint, simply redraw lightly before moving forward.
- Finish by using curved shading across the rounded parts of the chest and neck to strengthen the natural bird form. Avoid straight strokes and place a piece of cardboard under your drawing hand to keep the paper clean.
Common problems and how to overcome them:
Many beginners use straight strokes across the bird, making the form look flat instead of rounded. Follow the natural curves with small strokes and keep the light pressure consistent for smoother volume.
When I first practiced this stage, I rushed the first layer because I wanted to see darker shading quickly. After slowing down and building a soft even midtone first, the chest and neck immediately looked more three-dimensional, and the later shading became much easier to control.
Step 3: Shading the Head
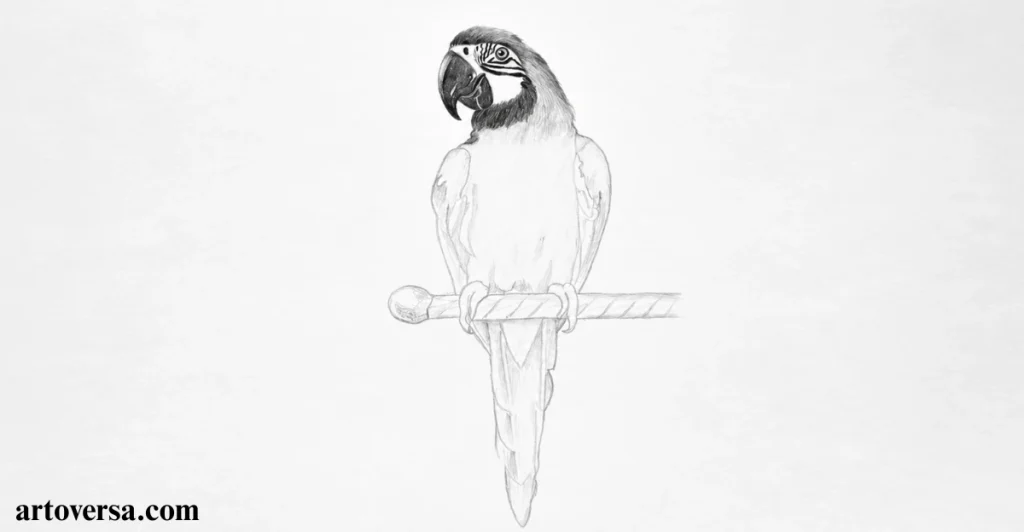
Shade the head one section at a time so each feature blends naturally and brings out the personality of the parrot.
- Begin with the overall head and identify the main focus areas before adding details. Keep the eyes, facial stripes and beak lightly defined so the structure remains easy to adjust.
- Start with The Eye by refining the macaw eye to create a sharp, alert, and intense expression. Darken the pupil, preserve a small highlight, and add a gentle soft shadow around the eye socket so the head gains more depth.
- Once the eye is finished, continue with the Feather Stripes. Study your reference carefully and draw the dark feather lines across the pale facial skin using smooth curved lines. Use a sharp pencil for fine details, then soften selected areas with a soft pencil, 4B, or 6B, keeping light pressure throughout just like on Blue and Yellow Macaws.
- Next, shade The Beak by working from the upper beak to the lower beak. Follow the natural downward curve, build smooth tonal transitions, darken the topside, leave a reflected shine, refine the mouth split line and preserve a subtle highlight for a realistic finish.
- Finally, review the complete shading across the head, making sure the eyes, facial stripes and beak blend together naturally. Compare everything with the reference and make small adjustments to the tonal transitions, highlights and shadows before moving to the next stage.
Common problems and how to overcome them
Many beginners shade the entire head evenly, causing the eyes and beak to lose their impact. Work on one feature at a time and keep checking the reference so the highlights and shadows stay balanced.
I used to treat every part of the head with the same amount of shading, and the parrot looked lifeless. Once I focused on the macaw eye first and then gradually built the facial stripes and beak, the drawing immediately showed much more character and depth.
Step: 4 Shade the Parrot’s Body
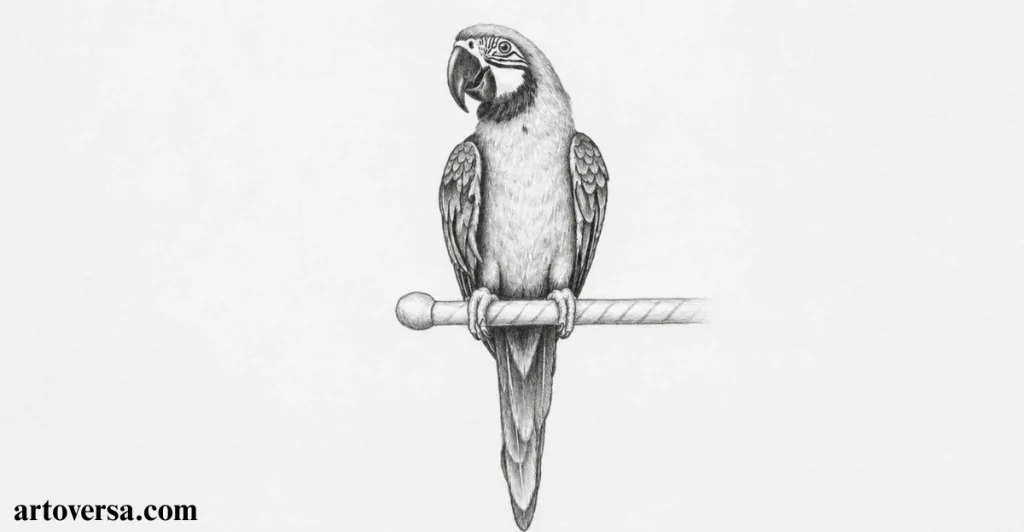
Now that the head is complete, start developing the body by working with the largest feather groups first, then gradually refine the smaller textures for a more natural finish.
- Begin shading the torso before moving into the wing masses. Identify the dark feathered areas first and group them into clear shadow families so the larger darker zones establish the overall body structure.
- Once the main shadows are in place, darken the underside where the wing overlap creates natural depth. Build the feather layers carefully, adding stronger dark values around the lower belly and deeper recesses to increase volume.
- After defining the darker areas, switch to the lighter feather textures across the chest. Use directional strokes that follow the natural feather growth, allowing the softer feathers and fluffier feathers to appear light and airy.
- Next, refine the wings by organizing the ordered feathers into clean layered feathers. Keep the top feather edge slightly brighter so each feather has a natural sense of lift instead of blending into one flat surface.
- Finish by sharpening selected feather outlines and refining the feather edges where light meets shadow. Compare the overall value changes with real birds, using only a few clean lines to separate important feather groups without overworking the texture.
Common problems and how to overcome them:
A common issue is outlining every feather with the same dark line, which makes the body look stiff. Let the light, shadow and value separate most feathers naturally, and only define the important feather edges where needed.
One thing that improved my parrot drawings was stopping the habit of drawing every feather individually. When I began treating the torso and wing masses as larger shapes first, the body looked much softer, and adding the smaller feather textures became far easier and more realistic.
Step: 5 Finalize by Shading the Feet and Metallic Bar
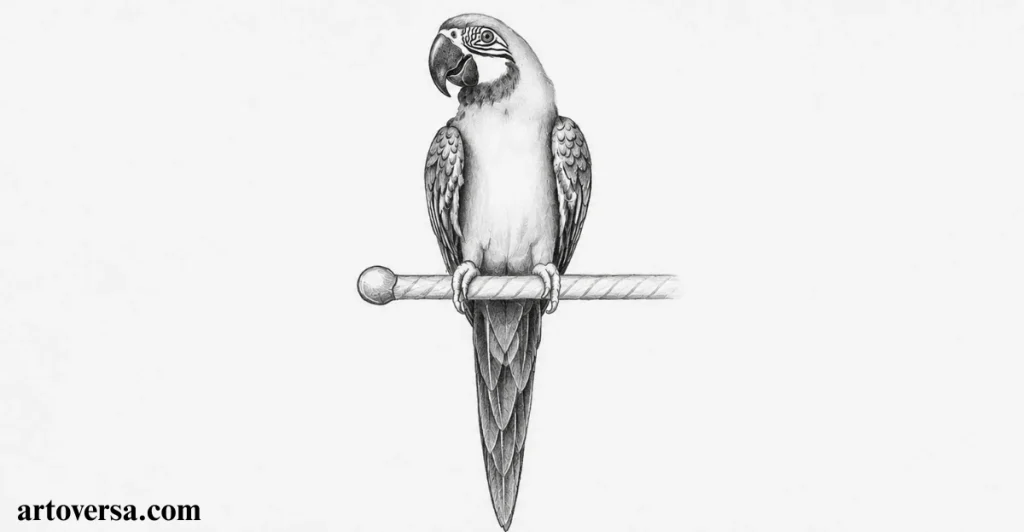
Complete the drawing by refining the feet first, then finish the metallic bar and add the final textures to bring the entire parrot to life.
- Begin with the parrot feet by drawing the two toes forward and two backward correctly to match the zygodactyl foot structure. This natural arrangement helps parrots with gripping branches, climbing, and explains why they are such skilled climbers.
- Once the feet are positioned correctly, refine each talon as it wraps around the metal bar. Darken the pressure points where every claw touches the surface, then add soft contact shadows and subtle texture to create realistic scaly feet.
- Next, shade the metallic bar by preserving cleaner highlights and creating firmer transitions between the light and dark areas. Add a soft cast shadow beneath the feet and build a smooth gradient around the cylindrical bar to give it a polished metal appearance.
- After the bar is complete, soften the breast feathers around the chest area using short tapered strokes and gentle blending. Layer the airy feathers carefully so they blend naturally into the surrounding layered feathers.
- Finish by refining the beak texture, feather texture, feet texture, and metal texture with the appropriate pencil treatment. Preserve small areas of untouched paper to create a natural sparkle in the eye and add a subtle sheen and shine wherever the light catches the surface.
Common problems and how to overcome them:
A common mistake is giving the metallic bar and feet texture the same shading style, making both materials look identical. Keep the metal texture smooth with clean highlights, while using rougher pencil strokes for the scaly feet to separate the two surfaces.
The final stage used to feel unnecessary because I thought the drawing was already finished. After I started refining the contact shadows, adding a soft sheen to the metallic bar, and preserving tiny highlights in the eye, I realized these small finishing touches made the entire parrot look much more realistic.
Step: 6 Shade the Parrot Tail Wings
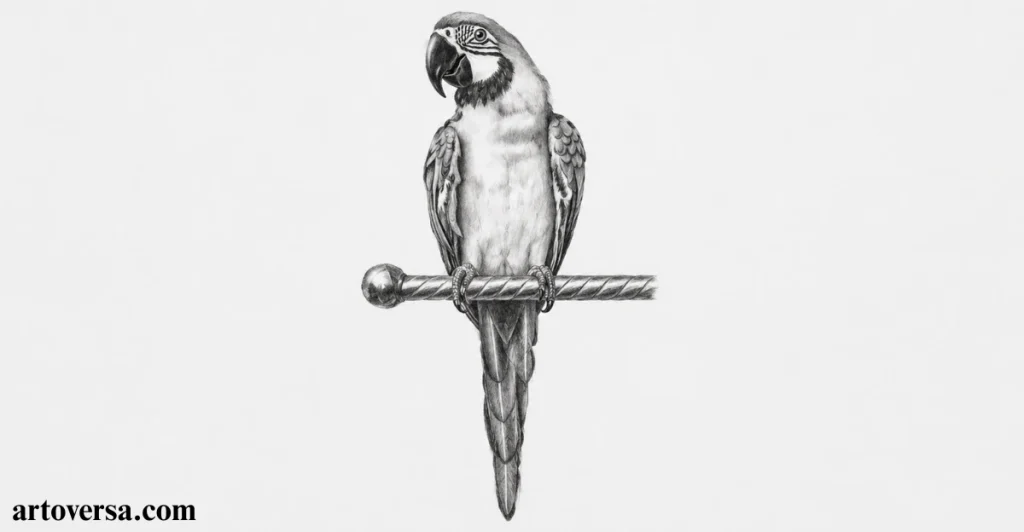
Finish the drawing by shading the tail from the base to the tip, allowing each feather to build naturally on the one before it.
- Begin with the long tail by blocking in the largest tail feathers first. Keep the shape graceful to capture the macaw’s natural elegance, then refine the structured feathers while preserving the look of longer feathers and smoother feathers.
- Once the feather shapes are established, use long controlled pencil strokes from the base toward the tip. Apply the graphite in the same direction as the feather grain so every feather develops a smooth, natural texture.
- After the main texture is complete, define the feather overlap by adding deep shadows between the tail feathers. Leave thin highlights along the feather shaft to improve separation and increase the overall realism.
- Next, strengthen the darkest darks only in the deepest parts of the drawing. Build deeper shadows gradually to improve the overall tonal contrast without making the tail appear too heavy.
- Finally, review the full tail wings and smooth any uneven graphite using controlled controlled strokes. Refine the feather grain, preserve the brightest highlights, and make small shading adjustments until the tail looks balanced and full of realism.
Common problems and how to overcome them:
Many artists use short random strokes across the tail feathers, making the feather grain look broken. Follow the full feather length with controlled strokes and keep the deep shadows only where the feathers overlap.
I used to darken every feather equally, which made the tail look flat despite the extra work. Once I focused on the feather overlap, soft highlights, and gradual tonal contrast, the long tail immediately looked more natural and three-dimensional.
Conclusion
Drawing a realistic parrot is an enjoyable way to improve your sketching and shading skills. By following each step carefully, you can build the body, shape the feathers, and refine the facial features with greater accuracy. Paying attention to feather direction, proportions and shading will make your artwork look more natural and lifelike. Practice each stage patiently and make small improvements as you progress through the drawing. With regular practice and the right techniques, you can confidently create a detailed and realistic parrot drawing.
FAQs
What is the first step in drawing a realistic parrot?
The first step is to create a light sketch using simple shapes to outline the parrot’s head, body, wings, and tail. This basic framework helps maintain proper proportions before adding finer details.
How do I draw realistic parrot feathers?
Draw the feathers in layers using smooth, controlled pencil strokes that follow their natural direction. Gradually add texture and shading to create depth and make the feathers appear more realistic.
Why is the parrot’s beak important in the drawing?
The curved beak is one of the parrot’s most recognizable features and greatly influences its appearance. Taking time to sketch and shade the beak accurately helps give the bird a more lifelike expression.
Which shading techniques work best for a parrot drawing?
Light layering, blending, and gradual tonal shading work well for creating realistic depth and feather texture. Building shadows slowly produces a smoother and more natural-looking result.
How can beginners improve their parrot drawing skills?
Beginners should practice sketching basic shapes, study reference images carefully, and focus on one section of the bird at a time. Regular practice and patience will lead to better proportions and cleaner details.
How can I make my parrot drawing look more realistic?
Pay close attention to the bird’s body proportions, feather overlap, lighting, and shadows throughout the drawing. Refining small details and increasing contrast in the final stages will make the parrot appear more realistic and visually appealing.
Please Write Your Comments