Drawing a Dragon’s Head: Learn How to Draw a Realistic Dragon
Updated: October 8, 2026
16
A realistic dragon’s head begins with its powerful shape and expressive features. The curved horns, strong jaw and detailed scales give the creature a convincing presence on paper. Learning to draw these elements with proper proportions, shading and texture can make a simple sketch look remarkably lifelike. Follow the drawing process to build a detailed dragon’s head from the first outline to the final details and bring your creature to life.
Materials You Need
Having the right drawing materials can make the dragon sketch easier to build and refine. You do not need a large collection of art supplies to create a detailed result. A few basic tools are enough to work through the outline, shading scales and final details.
- Graphite Pencils: Use different pencil grades to create light outlines and deeper shadows. Softer graphite can help with the darker areas of the eye, mouth, and neck.
- Drawing Paper: Choose smooth quality paper that can handle several layers of graphite. It should also allow you to erase and refine small details without damaging the surface.
- Kneaded Eraser: This is useful for lifting graphite and creating small highlights. It works especially well on the snout, brow ridges, scales and eye.
- Regular Eraser: Keep a standard eraser nearby for correcting rough outlines and removing unwanted marks. It can also help clean the drawing before you add the final details.
- Dragon Reference Image: A clear reference can guide the proportions and placement of the eyes, muzzle, jaw, horns and neck. It also helps you understand how the scales and shadows should follow the shape of the head.
How to Draw a Dragon in 7 Easy Steps
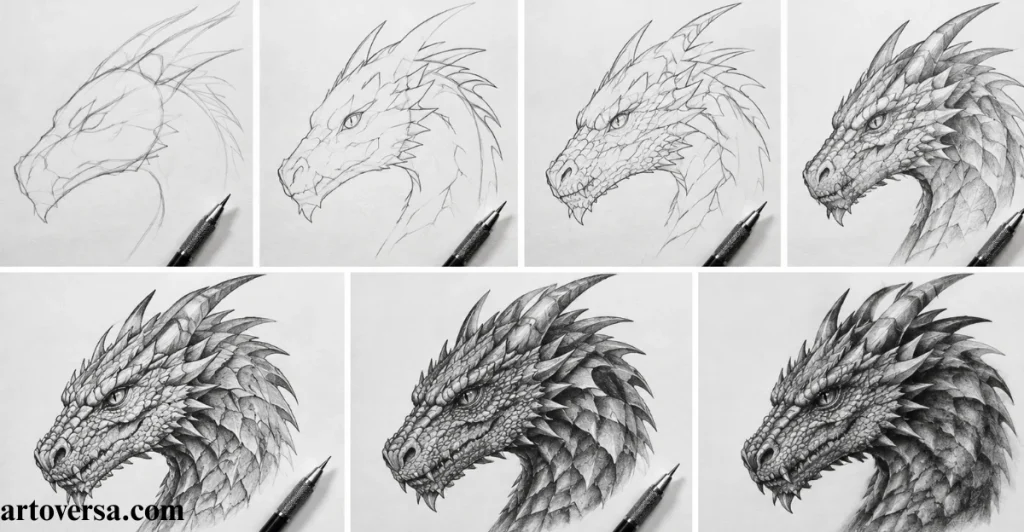
Bring your dragon to life with a pencil and follow these seven easy steps to create a bold and detailed drawing.
Step 1: Rough Sketch
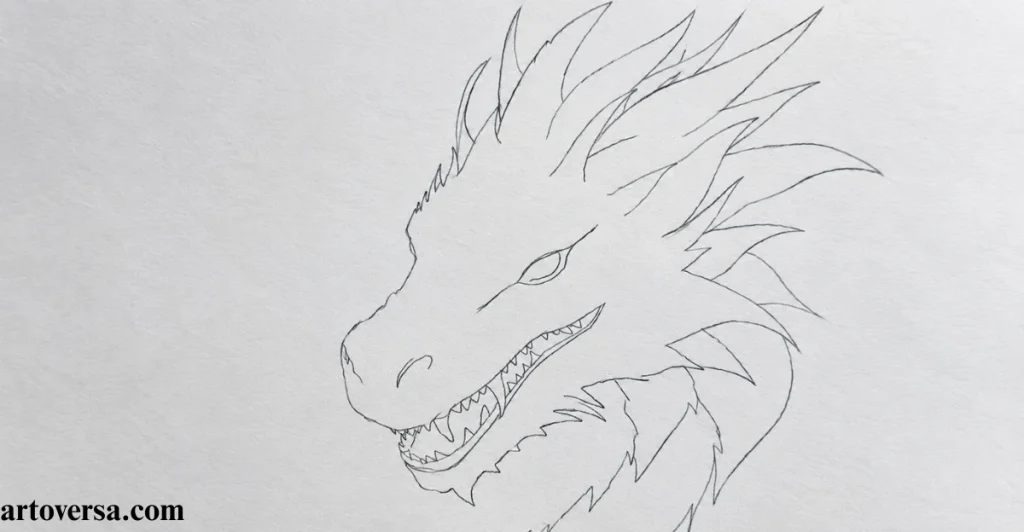
A good rough sketch helps you build the dragon head correctly before getting caught up in small details. Start with light lines to shape the forehead, muzzle, jaw and back of the head while keeping the proportions easy to adjust. Once the basic form feels right, mark the eyes nostrils, mouth teeth and horns so the main features follow the natural angle of the head.
- Start by lightly outlining the head without adding scales. Keep the lines loose so you can change the shape if the proportions do not look right.
- Build the forehead, muzzle, jaw and back of the head with simple strokes. Try to keep these areas connected so the dragon has a solid structure.
- Pay attention to the angle before placing the facial features. A dragon facing slightly toward you will have a different placement for the eyes, nostrils, muzzle, and jaw than a side view.
- Add the eyes, nostrils and mouth with light marks. Keep the teeth simple for now so you can adjust their position without disturbing the rest of the sketch.
- Finish the basic outline by indicating the horns and other major projections. Use simple lines here and save the finer shaping for the next stage.
Common Mistakes and How to Overcome Them
The biggest mistake is adding scales or other small details before checking the head shape. Build the structure first and compare the feature placement from top to bottom so the eyes, nostrils, mouth, and jaw remain properly aligned.
When I started drawing dragon heads, I often spent too much time on the horns and teeth before checking the basic shape. I found that keeping the first lines light gave me more freedom to correct the angle and proportions. Since then, I always establish the head structure before moving into the finer details.
Step 2: Detailed Dragon Sketch
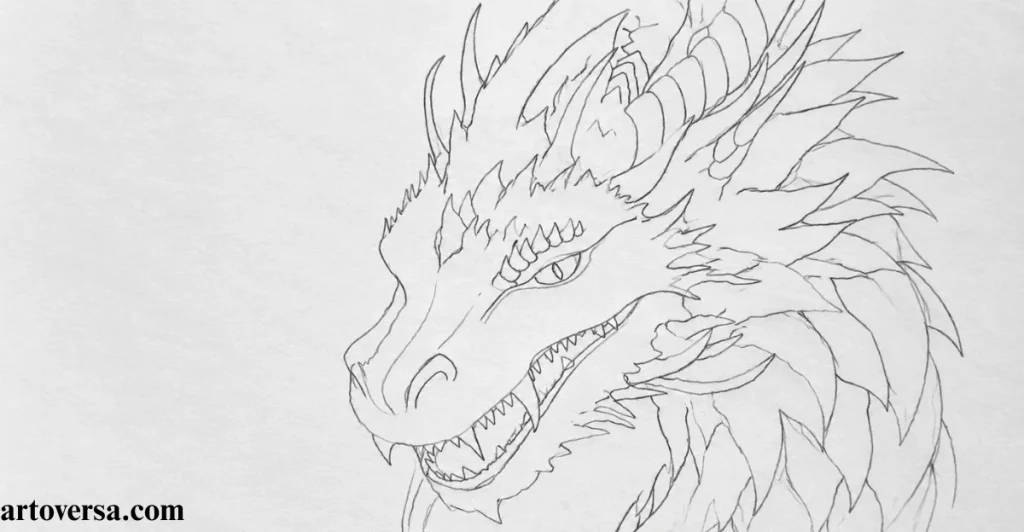
Dragon sketch is where the basic shape starts gaining depth and character. Refine the muzzle, brow, jaw, horns and neck while making each form connect naturally with the next. Keep the structure clear enough to show which surfaces face upward or downward before you move on to shading.
- Refine the muzzle and brow by giving them more volume instead of treating them as flat shapes. Let the brow overlap the eye area to create a stronger sense of depth.
- Shape the upper and lower jaw so the mouth has a solid structure. The surrounding skin should follow the jaw instead of looking like a simple curved line.
- Place the teeth directly into the jaw and vary their size slightly for a more natural fantasy look. Keep their arrangement organized so they still follow the shape of the mouth.
- Work on the eyes by adding the eyelids and nearby facial forms. Use reptile references to guide the eye shape and surrounding scales while keeping the expression strong.
- Refine the horns and ridges so they appear to grow from the skull. Let the scale pattern follow the surface and direction of the underlying bone or muscle.
Sketching the dragon’s brow, muzzle, mouth, and teeth
The brow should appear to protect the eye rather than simply stop beside it. Give the muzzle a rounded form around the nose and mouth. Build the mouth from clear upper and lower jaw shapes and make sure the teeth emerge naturally from the jaw. This keeps the face convincing even when the teeth are exaggerated for a fantasy creature.
Sketching the eyes, horns, and ridges
Add detail around the eyes because the eyelids and surrounding structures can shape much of the dragon’s expression. Reptile references can help with natural eye shapes and facial folds. Then develop the horns, ridges, and other features so they follow the head instead of looking randomly attached. Keep the scale pattern connected to the direction of each surface.
Common Mistakes and How to Overcome Them
A common mistake is adding horns, teeth, or scales without considering the structure underneath. Always build these details around the skull and facial forms so they feel like part of the dragon rather than decorations placed on top.
I would sometimes make the small details look right, but the face still did not feel natural. I noticed that the problem was usually in the basic forms underneath. After I began checking the jaw, muzzle, and brow before adding details, my sketches started looking much more connected and realistic.
Step 3: Shading the Eyes, Nose, and Mouth
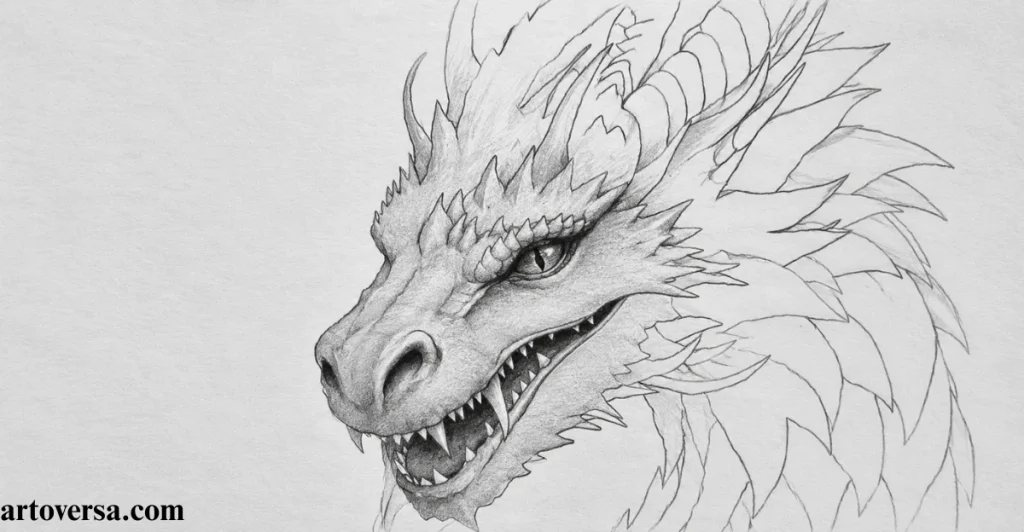
The face starts to feel alive once the eyes, nose and mouth receive their first dark values. These areas naturally create strong contrast so they can guide the rest of the shading as you work across the dragon’s head. Build the tones slowly and use these features as reference points for the lighter and darker areas around them.
- Around the eye, create a balance between light and dark values while leaving a small highlight. Deeper tones around the eyelids and brow can give the dragon a stronger reptilian expression.
- A subtle highlight will keep the eye looking believable. Instead of using a perfectly round white spot, shape the lighter area according to the curve of the eye.
- Within the nostril, push the deepest area darker while keeping some tone on the surrounding nose. This contrast makes the opening appear recessed rather than drawn as a flat black mark.
- Toward the back of the mouth, gradually build deeper shadows and separate the lips, gums, teeth, and nearby skin. Keeping different values between these areas helps each part remain clear.
- Small traces of reflected light can still appear inside dark areas. Use graphite in light layers so you can slowly reach the right value without losing the form.
Shading the eye
Expression begins to take shape around the eye as the darker values settle into the eyelids and brow. Keep the highlight restrained and allow the surrounding structures to carry much of the depth. This approach makes the eye feel more integrated with the dragon’s face.
Shading the dragon’s nostril
The nostril gains depth when the inside is darker than the surface around it. Rather than filling the entire opening with black, deepen the interior and preserve a slight shift in value along the outer nose. This helps the form remain visible.
Shading the mouth
Darkness inside the mouth should become stronger toward the back while the lips, gums, and teeth retain their own values. Gentle changes in tone can reveal the curved surfaces even where the lighting is low. Build everything gradually with graphite and keep an eye on subtle reflected light.
Common Mistakes and How to Overcome Them
It is easy to make the eye highlight too bright or turn every dark area into solid black. Work through several light layers instead and compare the values between the eye, nostril, mouth, and surrounding skin so each feature keeps its own depth.
In my early dragon drawings, I often pressed the pencil too hard when I wanted strong shadows. That made the darker areas difficult to adjust and sometimes flattened the facial forms. After learning to build graphite in layers, I gained much better control and could create deep shadows without losing the details underneath.
Step 4: Uniform Shading to Create Form
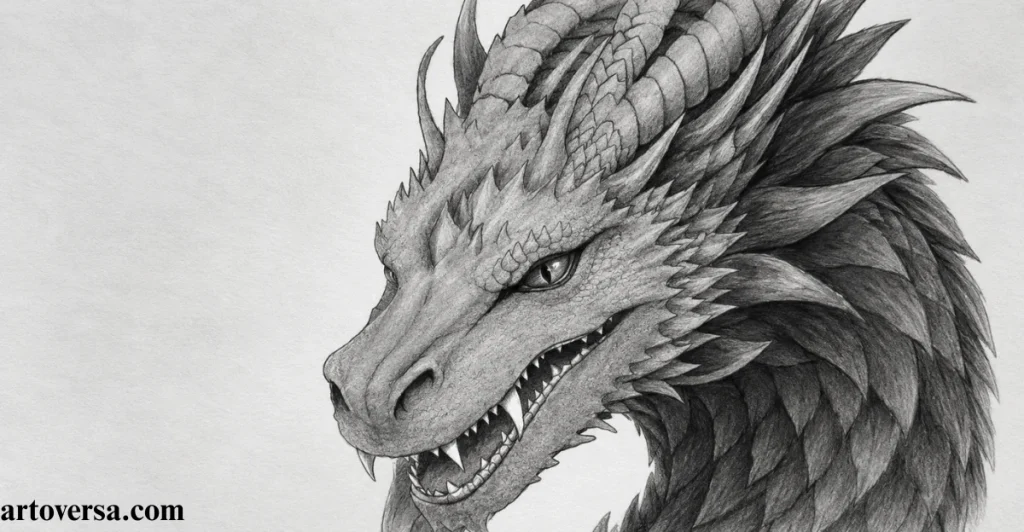
Before bringing in the scales, give the larger parts of the dragon a solid sense of volume. Work across the head, neck, forehead, cheek and muzzle by following how each surface turns toward or away from the light. This stage helps the dragon look three-dimensional and gives you a strong base for the texture that comes later.
- Begin with broad and even shading across the larger areas of the head and neck. Keep the tone soft so the main forms remain easy to adjust.
- Follow the structure of the forehead and cheek as you build the values. Darker areas should appear where the surfaces turn away from the light, while raised forms stay lighter.
- Shape the muzzle with gradual tones that follow its curve. Let the lower part become darker where it turns downward and begins to connect with the jaw.
- Pay attention to the underside of the jaw where the light naturally becomes weaker. A deeper shadow here can help separate the jaw from the neck and add more depth.
- Leave the scales for later even though they are a major feature of a dragon. First, make the head feel like a solid object with clear planes and rounded forms.
Common Mistakes and How to Overcome Them
One thing that can throw off the drawing is adding scales before the larger forms are properly shaded. Keep the texture aside and focus on smooth value changes so the forehead, cheek, muzzle, jaw and neck have a clear three-dimensional structure.
At first, I used to cover a dragon head with scales as soon as the outline was finished. The drawing looked detailed, but the face still felt flat because the larger forms were missing. After I started building the shading first, the texture became much easier to add without losing the shape underneath.
Step 5: Shading the Shadows Around the Neck
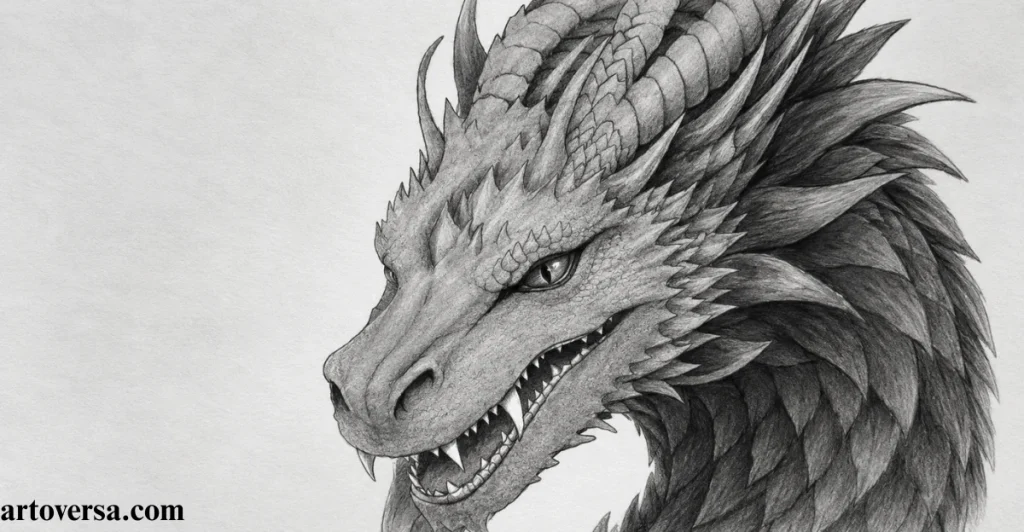
The neck does more than complete the dragon’s silhouette because it gives the head a firm sense of support and depth. Focus on the area where the head meets the neck and build stronger shadows where the forms overlap. From there, carry the darker values through the larger folds while keeping softer transitions farther down the neck.
- Start by studying the point where the head overlaps the neck. A stronger shadow in this area can make the head appear to project forward and separate it from the structure behind.
- Move downward by blocking in the main shadow shapes along the neck. Focus on the larger folds and changes in direction instead of trying to draw every wrinkle.
- Use the folds to suggest movement in the reptilian skin. Let the creases follow the way the neck bends so they support the form rather than appearing as random lines.
- Deepen the area beneath the jaw to give the head more weight. A darker section where the neck passes behind the jaw can also create a stronger feeling of depth.
- Soften the values as the shading moves farther down the neck. This keeps the entire area from becoming a flat black column while allowing the deepest shadows to support the structure.
Common Mistakes and How to Overcome Them
One common problem is making the whole neck equally dark instead of using shadows to explain its structure. Keep the deepest values near the overlapping forms and jaw while allowing lighter transitions across the rest of the neck.
One thing I learned while working on dragon drawings was that the neck can easily lose its shape when the shadows are too strong. I started leaving some lighter areas between the darker folds and noticed that the neck looked more rounded. This also made the shadow under the jaw feel deeper without making the whole neck too dark.
Step 6: Shading the Scales on the Face
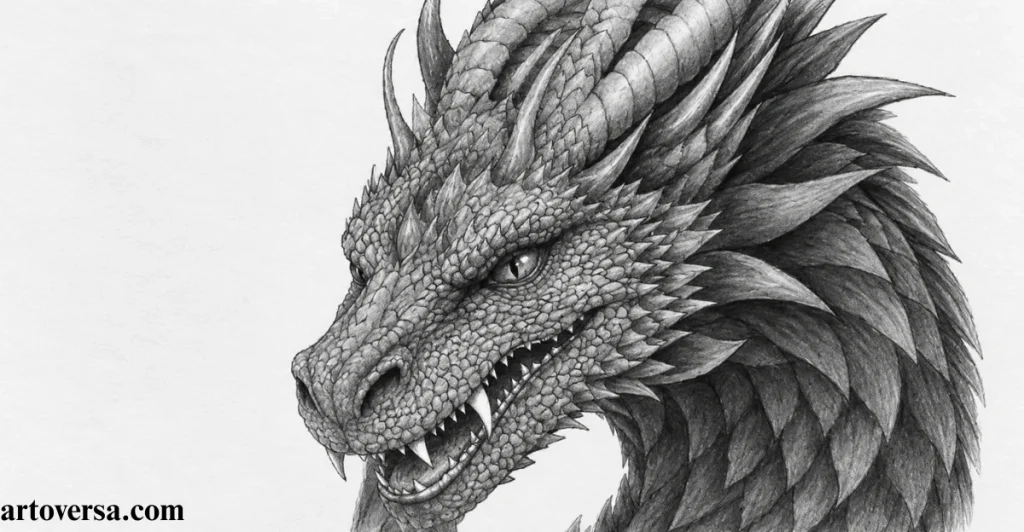
This is where the dragon’s face starts gaining its true texture and character. The scales should work with the shape of the face rather than sitting on top like a repeated pattern. Keep their size and direction varied while using light and shadow to make the texture follow the eye, muzzle cheek and other curved surfaces.
- Different scales should have different sizes and shapes instead of forming a perfectly repeated pattern. Near the eyes, nostrils, and skin folds, they can become smaller and more closely arranged.
- Around the eye, let the scales follow the curve of the brow and eyelid. Across the muzzle, allow them to wrap around the rounded snout so the surface keeps its volume.
- Along the cheek, the scale direction can shift as the form turns. This change helps the texture follow the three-dimensional structure instead of looking like a flat design.
- More detail does not always mean outlining every scale. Pick certain edges and add small crescent-shaped shadows while allowing the main shading to remain visible underneath.
- Light should affect each scale according to its position. A lighter upper surface with a darker lower edge can suggest depth, while the narrow shadows between scales make the pattern easier to read.
Common Mistakes and How to Overcome Them
A repeated scale pattern can quickly make the dragon look artificial. Avoid giving every scale the same outline and darkness. Let some edges fade into the surrounding shading and use stronger details only around important areas such as the eye and face.
I tried to give every single one the same amount of detail. The face became busy, and the actual form was difficult to see. After changing the scale sizes and allowing some edges to disappear into the shadows, I found that the texture looked far more natural.
Step 7: Finalize the Dragon Drawing
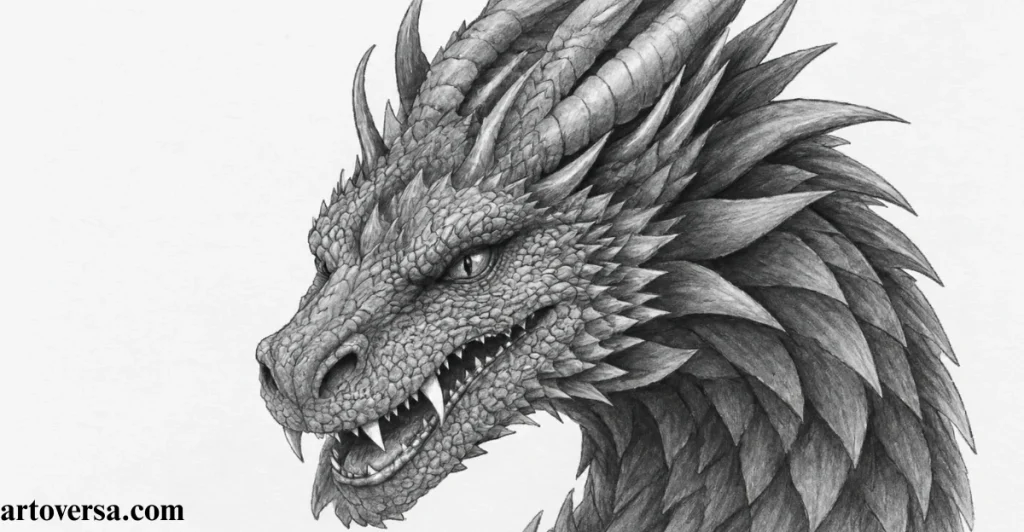
At this stage, the dragon drawing should already look clear and well structured. The final work is not about adding detail everywhere. Instead, focus on proportions and values while making small changes that improve the overall realism.
- Take a fresh look at the complete drawing from a little distance. You can also turn the paper upside down to spot proportion problems that may not be obvious up close.
- Use the reference to check the position of the eyes, muzzle, jaw, horns, and neck. Make small corrections if any feature feels too large or slightly out of place.
- Look closely at the darkest areas around the eye, nostril, mouth, and deep neck shadows. Keep some shadows softer so the drawing has a clear range of values.
- Bring back small highlights with a kneaded eraser where the light hits the form. The snout, brow ridges, selected scales, and parts of the eye can all benefit from subtle highlights.
- Choose only a few scales to sharpen instead of refining the entire face again. Strong details in important areas can make the softer parts of the drawing feel more detailed.
Common Mistakes and How to Overcome Them
Adding too much detail is one mistake that can weaken the final dragon drawing. Making every scale sharp or every shadow dark can make the face look flat and crowded. Keep the strongest details where you want the viewer to look first.
One lesson I picked up from finishing dragon sketches is that knowing when to stop is just as important as knowing what to add. I used to keep working on small scales even after the drawing looked complete. These days I check the values and proportions first, then make only the changes that actually improve the final result.
Conclusion
Drawing a realistic dragon’s head is a creative process that becomes easier when you take each stage one step at a time. The rough sketch gives you the right foundation and helps you place the main features before adding complex details. As you develop the eyes, muzzle, jaw, horns and neck, the dragon slowly begins to take on a strong personality. Careful shading then adds depth and helps the face look more solid and three-dimensional. Adding scales with different shapes and directions gives the skin a natural texture while keeping the main forms clear. Small highlights and deeper shadows can make important areas stand out and give the drawing a more realistic finish.
FAQs
What makes a dragon’s head look realistic?
A realistic dragon head depends on good proportions and clear facial structure. Focus on the shape of the eyes, muzzle, jaw, horns and neck before adding detailed scales and shading.
Which drawing techniques help create better dragon details?
Careful shading and controlled pencil strokes can make the drawing look more lifelike. Use darker values for deep areas and softer shading on raised surfaces. This creates depth without making the entire face too dark.
Can beginners create a detailed dragon drawing?
Beginners can create a detailed dragon drawing by working through each stage slowly. A light rough sketch makes it easier to correct mistakes before moving on to shading and scales.
What should I focus on when drawing dragon scales?
Dragon scales should follow the shape of the head rather than forming a repeated pattern. Vary their size and direction across the face. Keep some scales soft so the important areas receive more attention.
How much time does a realistic dragon drawing take?
The time depends on the level of detail and your drawing experience. A simple sketch may take a few hours, while a highly detailed dragon head can take much longer. Patience is important when working on shading and individual scales.
Please Write Your Comments