Easy Nose Drawing Tutorial: Master the Front View Step by Step
Updated: October 12, 2026
4
Drawing a nose from the front can feel challenging when you are learning to create realistic facial features, especially when getting the proportions, shading and shape right. The good news is that you do not need advanced drawing skills to get started. With a few simple guidelines and the right techniques you can learn to sketch a nose using basic shapes, light lines, and gradual shading. These two simple methods will help you understand the structure of the nose and create a neat balanced drawing with confidence. Grab your pencil and paper, and follow the steps to practice your front-view nose drawing.
Table of Contents
How to Draw a Nose Step by Step
Follow the next step-by-step guide to learn how to sketch, shade and add natural highlights for a lifelike result.
Step 1: Start with a circle
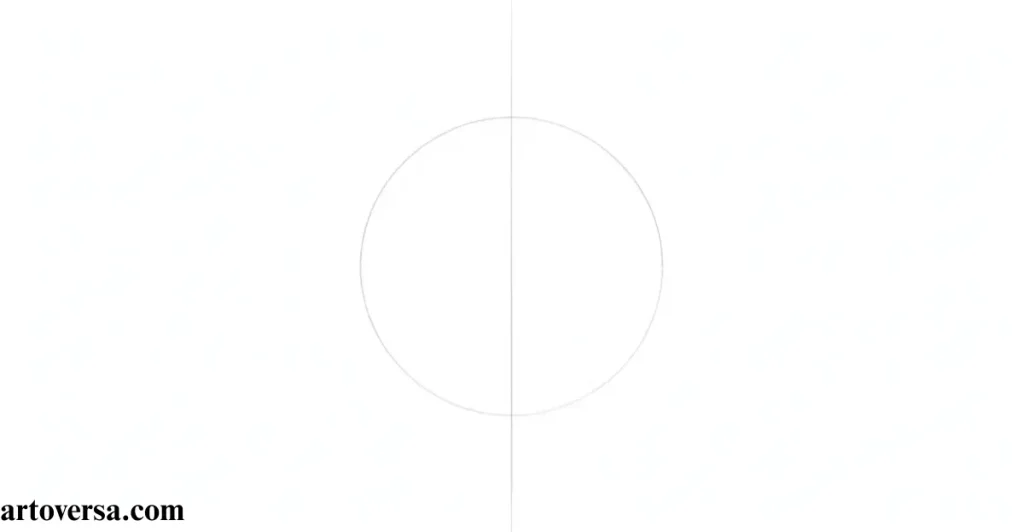
Begin your Nose drawing by sketching a light Circle shape in the center of your paper. This circle will represent the Ball of the nose and help you understand the basic proportions before adding more details.
- Use Basic shapes to create the foundation of your nose sketch. Keep the circle small and simple because it will guide the overall size and position of the nose.
- Add two Curved lines above the circle to outline the Bridge of the nose. These lines should gently move upward and help connect the nose tip to the area between the eyes.
- Maintain Light pencil strokes while drawing the first outline. Soft lines are easier to adjust and prevent unwanted dark marks from affecting your final drawing.
- Observe the width of the circle and compare it with the bridge. This step helps your Front view nose drawing look balanced instead of too wide or too narrow.
- Keep the Nose sketch simple at this stage rather than adding nostrils or shadows immediately. A clear outline gives you a better guide for adding details in the next steps.
- Adjust the Ball of the nose with small curved marks if the circle looks too round. A natural nose usually has a soft, uneven shape rather than a perfectly circular outline.
- Check the Curved lines on both sides of the bridge to make sure they look balanced. They do not need to be identical, but they should create a natural front-facing structure.
- Lightly refine the Nose drawing by checking the Circle shape and Bridge of the nose together. Keep the Curved lines smooth and use Light pencil strokes to correct uneven areas.
- Make sure the Ball of the nose and Bridge of the nose look balanced in your Nose sketch. Draw gentle Curved lines to create a smooth and natural outline.
- Clean your Front view nose drawing by removing extra marks with an eraser. Keep the Basic shapes light so you can easily add details in the next step.
In my drawing practice, I have found that starting with a light circle makes nose sketching much easier and more accurate. I prefer using an H or HB pencil because it helps me create smooth outlines without making dark marks on the paper. I carefully check the Ball of the nose and Bridge of the nose to maintain balanced proportions. I also use gentle curved lines to give the nose a natural shape.
Step 2: Draw simple guidelines for the nose shape
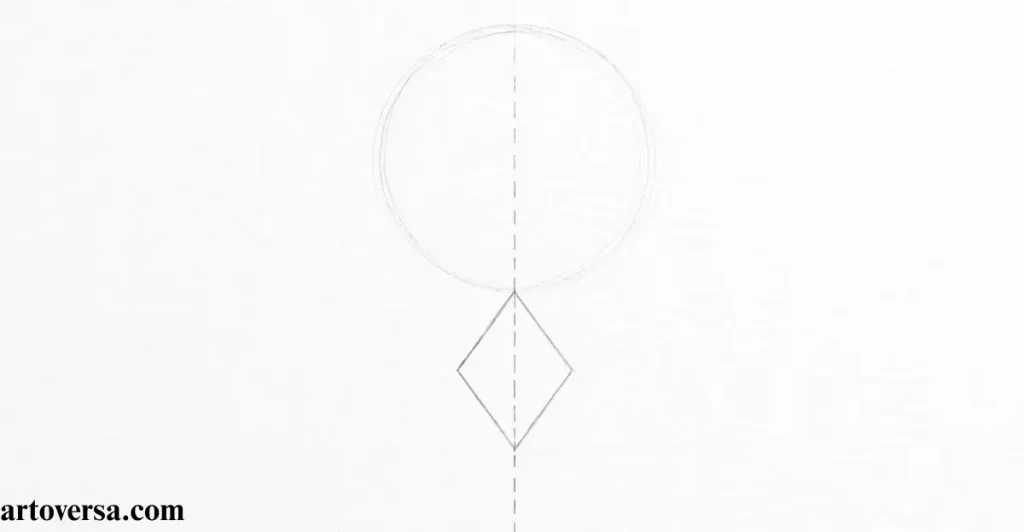
Keep practicing these simple guidelines to improve your nose drawing. Move to the next step and add details for a more realistic look
- Draw a light horizontal line through the middle of the circle to divide the nose area evenly. This helps you position the nose tip and nostrils correctly.
- Keep the guideline soft and straight so you can erase it easily later. Avoid pressing too hard because dark marks can affect your final drawing.
- Add a diamond-like shape around the center line to guide the nose tip. Keep the corners gentle to create a natural-looking structure.
- Use light pencil strokes to sketch the basic nose shape without making dark outlines. This makes correcting the drawing easier as you progress.
- Mark the nostrils on both sides of the nose tip using small, curved lines. Keep their placement balanced to create a natural front view.
- Check the middle of the circle to ensure the horizontal guideline passes through the correct position. This helps maintain balanced proportions on both sides.
- Connect the diamond-like shape to the existing nose outline with smooth curves. Avoid sharp corners to keep the nose shape soft and natural.
- Adjust the nose drawing by checking the width and position of both nostrils. Make small corrections if one side looks wider than the other.
- Erase unnecessary guidelines carefully while keeping the main outline visible. This prepares your sketch for the next drawing stage.
- Review your nose sketch and check the nose tip, horizontal line, and nostril placement. Make final adjustments before adding more details and shading.
When sketching a nose, I usually begin with simple guidelines to keep the shape clear and well-proportioned. Using a light pencil helps me make changes without leaving dark marks on the paper. I carefully compare the nose tip and nostrils to maintain a natural appearance. Removing extra lines at the right time gives the finished sketch a cleaner look.
Step 3: Shade around the nose bridge and tip
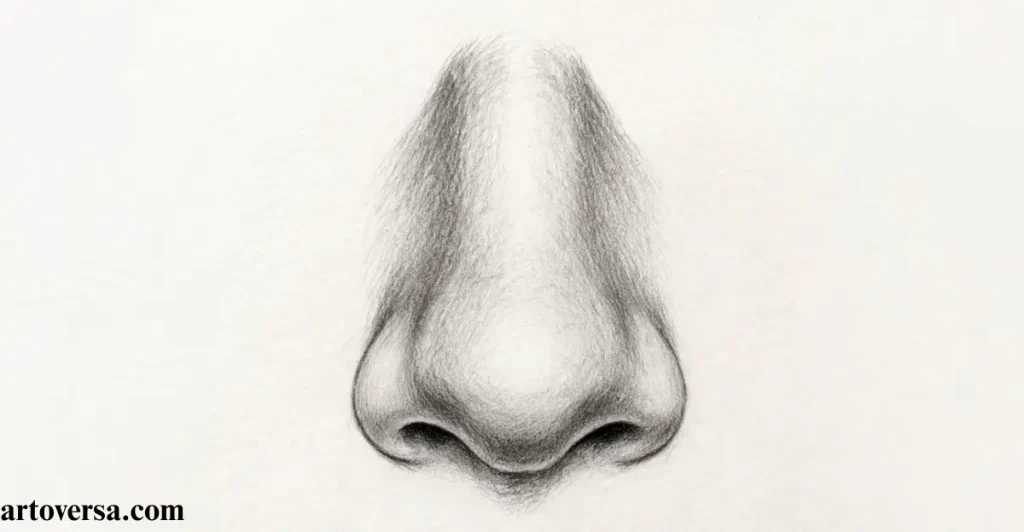
Keep the shading light at first and gradually build darker tones around the bridge and tip. Follow these simple steps to create a natural nose shape with balanced shadows.
- Shade lightly around the outer bridge using soft pencil strokes. This defines the nose structure and nose outline while keeping the facial features natural.
- Add thicker shading near the upper bridge, where it connects with the brow bones. This improves nose bridge shading and creates a natural nose contour with balanced light and dark tones.
- Apply inner circle shading with gentle curved lines to shape the tip. Follow the circular guidelines and use smooth shading to improve the nose shape and nose definition.
- Observe the brow bone connection and upper nose area while blending the bridge transition. Follow the facial structure and nose anatomy to maintain natural contours and realistic proportions.
- Follow the shading guidelines from your preliminary sketch and use gentle blending techniques. Build gradual shading layers to improve drawing accuracy while keeping the important pencil guidelines visible.
- Add darker pencil strokes to improve tonal contrast and shadow depth. Keep the light areas clean and deepen the dark areas carefully for realistic graphite shading and natural nose details.
- Shade the outer part of the bridge and the inner part of the circle to create a long U-shaped shading pattern. Keep the nose edges soft and refine the contour lines for a natural nose form.
- Apply thick shading at the top where the upper bridge shadow meets the brow bone shadows. Follow the light direction to create facial shadows, depth and dimension, and balanced tonal variation.
- Practice simple nose drawing methods with a clear nose front view and step-by-step nose sketch. Check facial proportions and use different nose drawing techniques to drawing fundamentals.
- Finish with smooth shading and gentle shadow blending around the bridge and tip. Refine the nose contour and maintain shading consistency for a clean, finished nose sketch.
While drawing a nose, I pay special attention to how the light falls on the bridge and tip. I build the shadows slowly, keeping the lighter areas clear for a natural effect. Soft blending helps me avoid sharp edges and maintain smooth transitions. I also compare both sides to keep the shape balanced. With a few careful adjustments, the nose looks more defined and realistic.
Step 4: Draw the nostrils
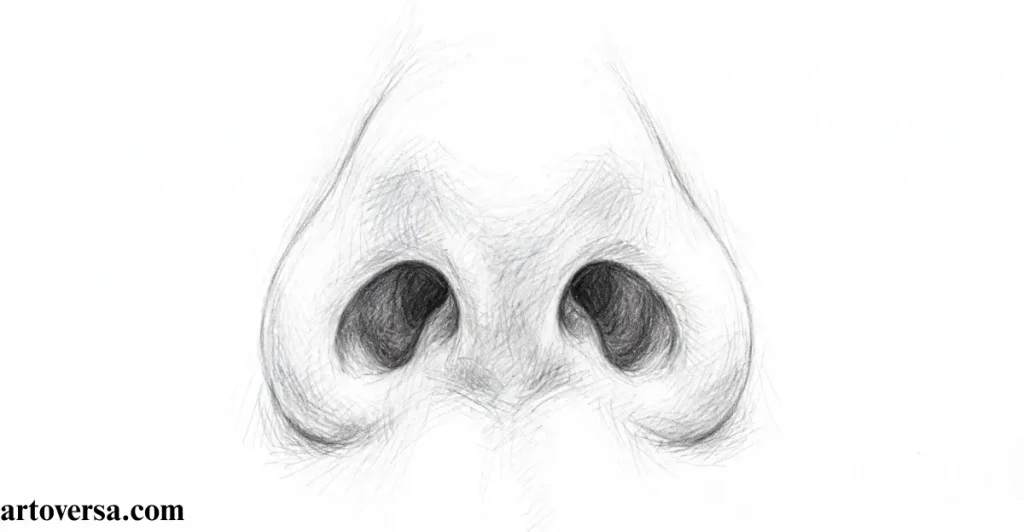
Follow the diamond shape to create the nostrils and bring your nose sketch closer to a realistic look. Keep the lines light so you can make corrections easily.
- When drawing nostrils, I start with light guidelines and shape each curve slowly. I compare both sides to keep the nostrils balanced. This makes the sketch easier to correct.
- Follow the nose tip to guide nostril placement around the diamond-shaped guide. Check nose proportions and nose anatomy for a natural front-facing nose and basic nose shape.
- Create the nostrils formation with gentle curved lines along the nose edges. Maintain a natural nostril shape and nose contour using soft pencil strokes.
- Keep the natural curves smooth to improve nose tip definition and symmetrical placement. Compare both sides to maintain drawing accuracy.
- Use the diamond shape guide to check nostril positioning around the center line and horizontal guideline. Maintain balanced proportionsand facial symmetry while checking nose width.
- Begin with light pencil strokes during the preliminary sketch and follow a careful drawing process. Keep soft guidelines visible while practicing the nose structure and basic drawing fundamentals.
- Improve nose definition by refining nostril details and checking facial proportions. Use steady pencil control and smooth curves to create a clean outline and natural appearance.
- Shape the inner nostril edges and outer nostril curves carefully. Keep the nostril openings clear and add light nose tip shading to define the nose base and maintain a balanced shape.
- Focus on connecting diamond corners to form clear nostril outlines and natural curved shapes. Use accurate placement to improve nose sketching and maintain symmetrical drawing.
- Check your drawing progress and refine the final nostril shape by following the diamond guide.use smooth pencil lines for a finished nose sketch with a realistic nose appearance.
During my drawing practice, I find that sketching the nostrils with light pencil strokes makes the process easier. I first follow the diamond guide and carefully mark the nostril positions. Comparing both sides helps me maintain balanced proportions and natural curves. I also check the nose tip and outline before darkening any lines. Small corrections improve the overall shape and make the drawing look more realistic.
Step 5: Shade the nostrils
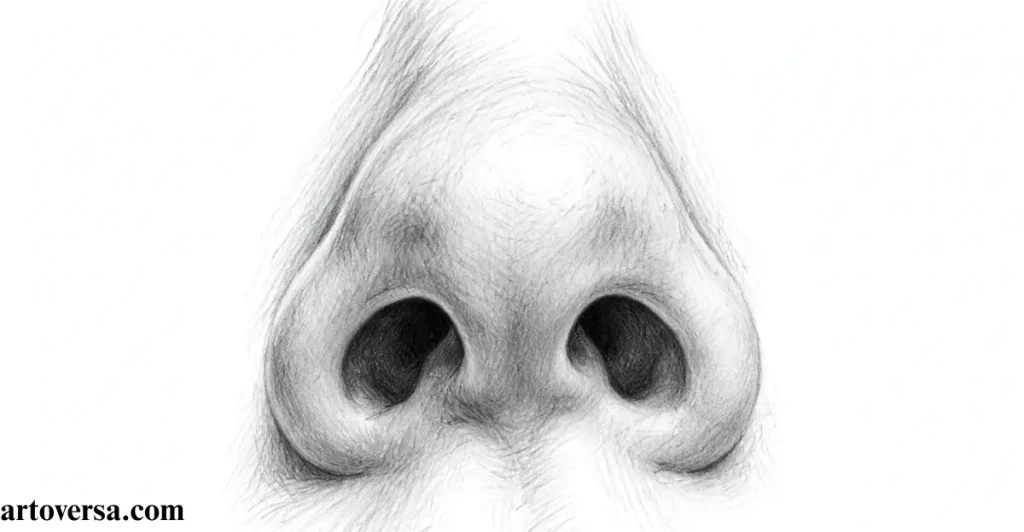
Keep practicing your pencil shading, experiment with light and dark tones, and refine each detail to create a smooth, realistic nose drawing.
- Shade the nostrils in your nose drawing using pencil shading. Keep untouched areas for highlighting and create light and dark tones for a realistic nose.
- Add nose shadows around the nostril openings with soft pencil strokes. Keep the nose tip light for a natural appearance and realistic shading.
- Use a Graphite pencil to add shadow depth near the nostril edges. Apply light pressure first, then darken selected areas.
- Practice Highlight preservation by leaving untouched paper for reflected light. Use an eraser technique to restore nose tip highlights.
- Shade the Inner nostrils and define outer curves with dark shadows. Use pencil layering around the nose base to maintain facial proportions.
- Study the Front view and nose anatomy before shaping the nostril shape. Check shadow placement and realistic proportions.
- Begin with Light pencil strokes, then add dark graphite. Create soft shadows and preserve highlight spaces in your nose sketch.
- Follow the Nose contour lines to create nostril depth. Observe the light source and use smooth blending for a natural nose shape.
- Continue Shading practice by refining nostril details and untouched highlights. Control pencil pressure to improve facial symmetry.
- Finish the Final shading by darkening nostril shadows and preserving highlights. Refine the nose tip definition for a finished nose drawing.
In my drawing practice, I find that shading the nostrils slowly gives better results. I start with light pencil strokes and gradually add darker tones. Leaving small areas untouched helps me create natural highlights. I also compare both nostrils to keep their shapes balanced. Soft blending makes the nose look smoother and more realistic. With regular practice, I have learned to control pencil pressure and improve shading details.
Step 6: Shape the nose
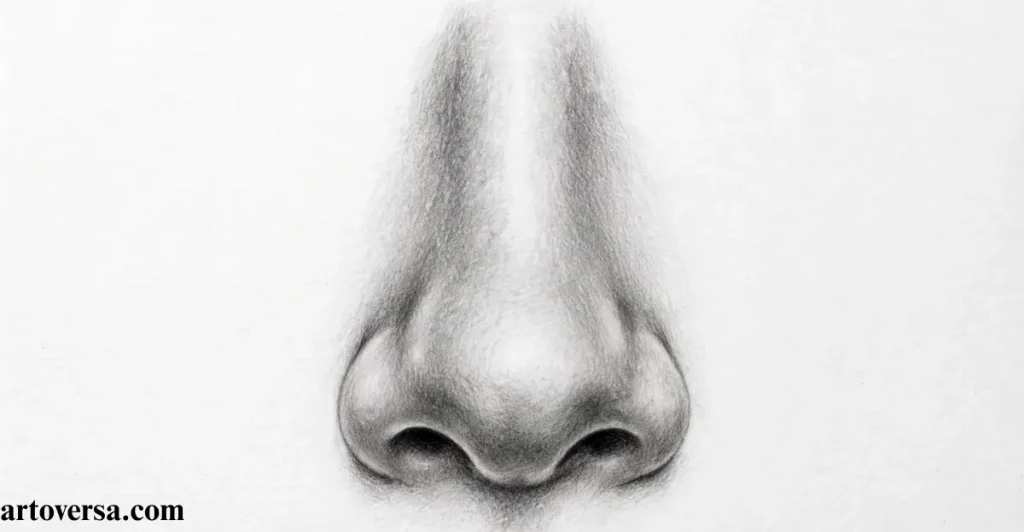
Keep practicing the nose bridge and tip with light pencil strokes to improve your drawing skills.
Add soft shading and highlights to create a natural, balanced, and realistic nose.
- Sketch the nose bridge and nose ball to create the nose contour and nose shape. Use drawing guidelines to keep the front-facing nose balanced.
- Add Bridge shading around the ball of the nose using curved lines. Follow the nose outline and facial proportions for a realistic nose drawing.
- Use Circle shading at the top of the circle to create a pointed nose. Adjust shadow placement and dark tones with gentle pencil pressure.
- Shade the Middle of the circle for a flatter nose shape. Use soft shading and tonal contrast to maintain natural curves and realistic proportions.
- Use an Eraser technique to dab excess graphite and remove visible lines. Protect highlight areas for a clean sketch and clear nose details.
- Choose a Graphite pencil and use light strokes to build shadow depth. Define the ball contour with smooth transitions and balanced shading.
- Apply Nose tip shading along the bridge curvature to create a rounded shape. Follow the light source and shadow direction for realistic shading.
- Correct Excess shading with eraser dabbing and soften pencil marks. Preserve highlights to refine the nose bridge shape and smooth contours.
- For Beginner drawing, follow a step-by-step nose sketch using basic shapes and a circular guide. Practice bridge construction and improve your pencil technique.
- Refine the Final nose contour and refined bridge while shaping the rounded nose tip. Remove erased guidelines and use smooth pencil lines for a realistic nose appearance.
In my drawing practice, I start by sketching the nose bridge and ball with light pencil strokes. I find that simple shapes help me maintain the correct proportions. I add shading slowly to create depth and a natural appearance. Using an eraser helps me remove extra lines and restore highlights. I also check the nose shape from both sides to keep it balanced. With regular practice, I have improved my shading and contouring skills.
Step 7: Blend your shading
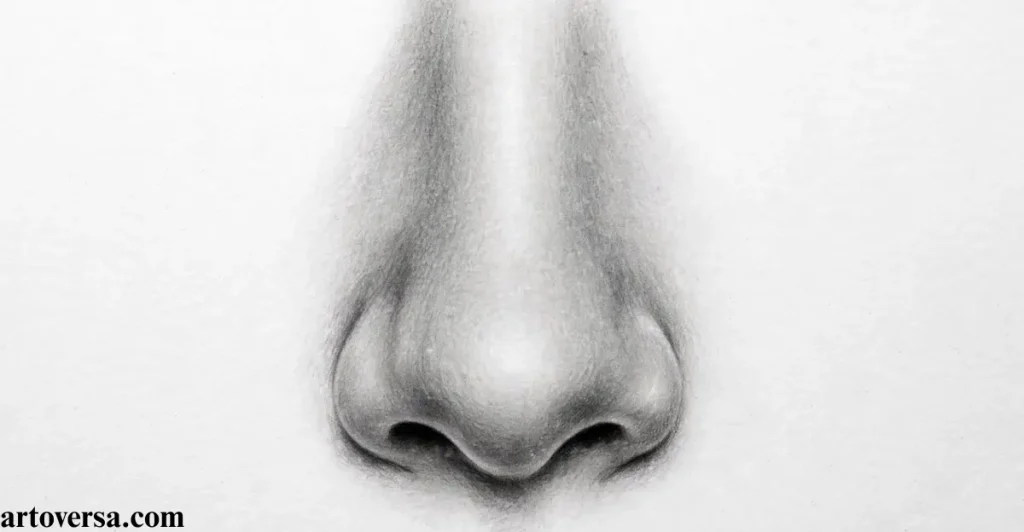
Practice gentle blending and highlight restoration to make your nose drawing smoother and more realistic.
- Start with a Blending stump and blending technique to create soft skin texture and smooth shading. This pencil blending gives your nose drawing a realistic nose with a soft appearance.
- Use a Kneaded eraser for touch-ups around highlighted areas. This eraser technique supports highlight restoration, improves light reflection, and keeps nose highlights clear.
- Experiment with Diamond shapes and circles to create different nose shapes. These basic geometric shapes help maintain nose structure, nose proportions, and a clean nose outline.
- Try Shading experiments for a longer nose, flatter nose, or defined nose. Adjust shadow placement and tonal contrast while maintaining realistic proportions and pencil control.
- Practice Blending stump use with gentle blending to create smooth transitions and soft tones. Improve skin texture, natural appearance, and shading details.
- Revisit Highlighted areas with a kneaded eraser to restore light tones and preserved highlights. Keep bright spots near the nose tip for better shading balance and drawing accuracy.
- Refine your Nose sketch using a diamond guide or circular guide. This shape experimentation improves nose design, facial anatomy, and nose construction for a front-facing nose.
- Watch a Video tutorial for a drawing demonstration and step-by-step guidance. An alternative nose example may offer extra drawing tips and improve your nose shading method.
- Continue Nose refinement through the blending process to create smooth contours and soft shading. Improve nose definition with natural curves for a finished drawing.
- Apply Final touch-ups through blending and shading for nose shape refinement. Use graphite blending and highlight preservation to achieve a realistic nose appearance and completed nose sketch.
In my drawing practice, I have learned that blending is an important step in creating a realistic nose. I use a blending stump gently to soften dark pencil marks and create smooth transitions between light and shadow. I also use a kneaded eraser to restore highlights around the nose tip and other bright areas. While shading, I check both sides of the nose to keep the shadows balanced and the shape natural.
Conclusion
Learning how to draw a nose from the front becomes much easier when you break the process into simple steps and focus on the basic structure. Both methods can help you understand nose proportions shape the nostrils and use light shading to create a more natural appearance. Start with gentle guidelines avoid making dark lines too early and gradually add shadows to give your drawing depth and dimension. With regular practice you will become more comfortable adjusting the width defining the tip and creating realistic facial features. Try both techniques to discover which one works best for your drawing style and keep practicing to improve your confidence and results.
FAQS
What is the easiest way to draw a nose from the front?
Start with light guidelines to measure nose width and nose length. Sketch a basic shape, then add the nose tip, nostrils, and nose outline. Use soft shading to balance the facial features and complete your pencil sketch with the right proportion guide and drawing technique for beginners.
Which pencils are best for drawing a nose?
Use an HB pencil for outlines and a 2B pencil for basic shading and darker shadows. A kneaded eraser helps with correcting marks and restoring highlights. Choose suitable drawing tools, use light pencil strokes, and control shadow depth with a gentle eraser technique.
How can I make my nose drawing look realistic?
For a realistic nose drawing, maintain accurate nose proportions and a natural nose shape. Add soft shadows along the nose sides and nostrils. Use gentle blending, smooth transitions, and tonal contrast between light areas and dark areas for a realistic appearance.
Where should I draw the nostrils?
Draw the nostril placement near the bottom of the nose, using small curved shapes. Start with light sketching, check the nose base and nose structure, then darken gradually. Keep the nostril shape balanced with controlled curved lines and suitable shading details.
What is the best way to shade a nose?
Start nose shading with a light graphite layer and gradually add darker tones around the nostrils and nose sides. Preserve highlighted areas and light tones. Use pencil pressure, smooth shading, and tonal variation to create realistic nose contours and a rounded appearance.
Which method should beginners use?
The beginner drawing method using simple guidelines and basic shapes is easiest. Follow nose construction to maintain nose proportions and drawing accuracy. Create a basic sketch, refine the nose outline, and add details and shading for an easy nose drawing.
How do I correct mistakes while drawing a nose?
Use a regular eraser for unwanted lines and a kneaded eraser for lifting graphite. Apply gentle erasing to protect the paper and remove pencil marks. Careful shading correction, highlight restoration, and graphite removal help maintain a clean sketch.
When should I practice drawing noses?
Spend 10–15 minutes on daily drawing practice using reference images and different nose shapes. Regular nose drawing exercises improve pencil control, shading skills, and facial anatomy. Consistent beginner practice develops observational drawing, drawing consistency, and realistic nose sketches.
Please Write Your Comments