44 Helpful Drawing Cheat Sheets Every Artist Should Bookmark
Updated: September 24, 2026
16
Every artist needs a good reference when learning a new skill or trying to improve an existing one. These 44 helpful drawing cheat sheets offer simple guidance for faces, figures, hands, poses and everyday subjects. They can make tricky details easier to understand while helping you practice with more confidence. Beginners can use them to build strong basics, while experienced artists can keep them nearby for quick inspiration. Bookmark this collection and return to it whenever you need a useful reference for your next drawing.
Table of Contents
Part 1: Drawing Foundations
Explore these essential foundation guides and learn simple techniques that can make your sketches cleaner, more balanced and more confident.
Step 1: Graphite Pencil Grades Cheat Sheet
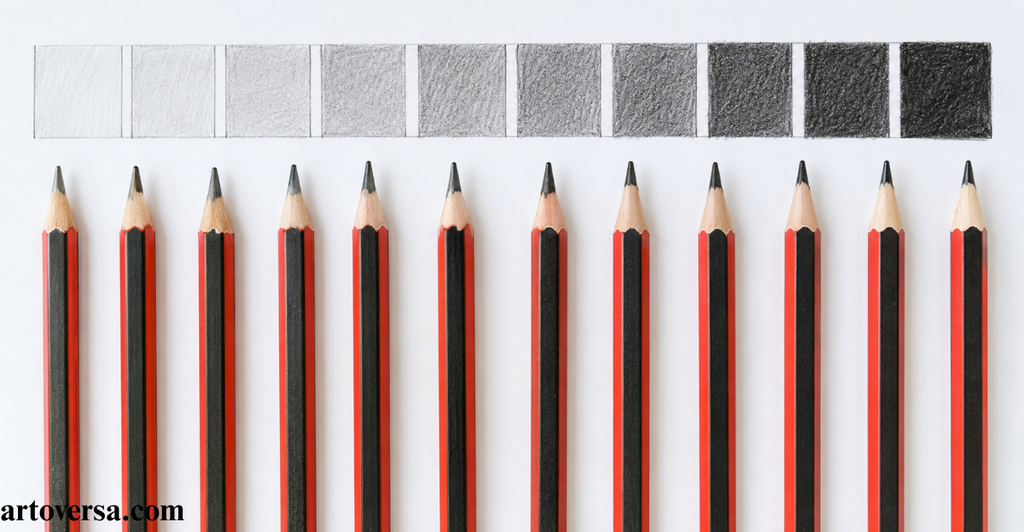
Test a few graphite pencil grades before starting your artwork to discover how each one changes your sketching and shading results.
- Start with 4H to 9H pencils when making a technical drawing or adding extremely light guidelines. Their harder cores produce fine lines that stay clean and are easy to erase.
- Pick 2H to H pencils for construction sketches and clean outlines before building darker values. These grades help you shape the drawing with better accuracy and control.
- Keep an HB pencil ready for everyday sketching and switch to B for general shading. This pairing creates smooth transitions while keeping your lines clear and balanced.
- Build richer values and line work with 2B, deepen deep shadows using 4B, and finish with 6B for strong contrast and expressive drawings. Each softer grade adds more depth without damaging the paper.
- Save 8B to 9B for the darkest values and finishing touches instead of pressing harder with lighter pencils. Soft pencils contain more graphite, while hard pencils contain more clay, making it easier to control tone with the right grade.
Common problems and how to overcome them
A common mistake is trying to create dark shadows by pressing harder with an HB pencil. Heavy pressure can damage the paper and leave shiny graphite marks instead of rich tones. Switch to a softer pencil and let the pencil grade create the darkness naturally.
When I first started, I used only an HB pencil because I thought changing grades would not make much difference. After testing 2B, 4B, and 6B, I found it much easier to create smooth shading, stronger contrast, and cleaner drawings without pressing hard.
Step 2: Paper Surface Cheat Sheet
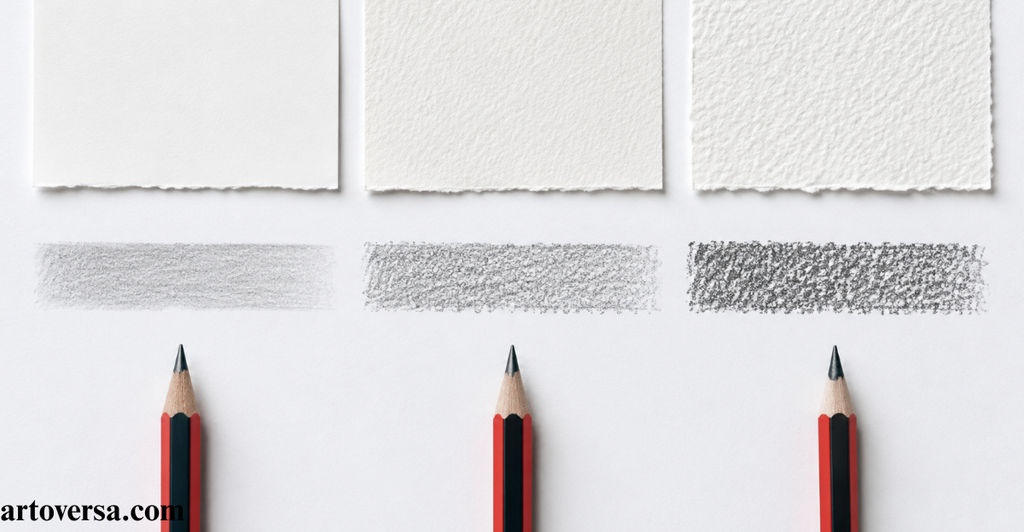
Compare different paper surface types with the same pencil to see how the texture changes with every stroke and shaded area.
- Choose Smooth (Hot Press) paper when working on detailed realism or portraits. Its fine paper’s tooth lets the pencil glide easily while producing crisp lines and smooth blending.
- Try Medium Tooth (Cold Press) for general drawing because it offers a balanced surface for sketching, shading, and learning how graphite reacts on quality paper.
- Explore Rough paper whenever your goal is adding texture or creating expressive work. The stronger surface grips more graphite, making every mark appear bolder and more textured.
- Pick Bristol Board for fine details and illustration where clean edges and sharp pencil work matter most. The smooth finish supports careful line control without unwanted texture.
- Consider Mixed Media paper when combining graphite with ink or colored pencil in one artwork. A good quality sketchbook with medium tooth also provides enough flexibility for daily practice without needing expensive paper.
Common problems and how to overcome them
Using Rough paper for portraits often makes smooth skin difficult because the graphite settles into the deeper texture. Match the paper surface to the drawing style before starting. Test a small shaded area first to avoid unwanted results.
Working on different paper types completely changed the way shading and blending looked in my sketches. Testing the same sphere on smooth and textured paper made it much easier to understand how the paper’s tooth affects every graphite stroke.
Step 3: Pencil Grip Cheat Sheet
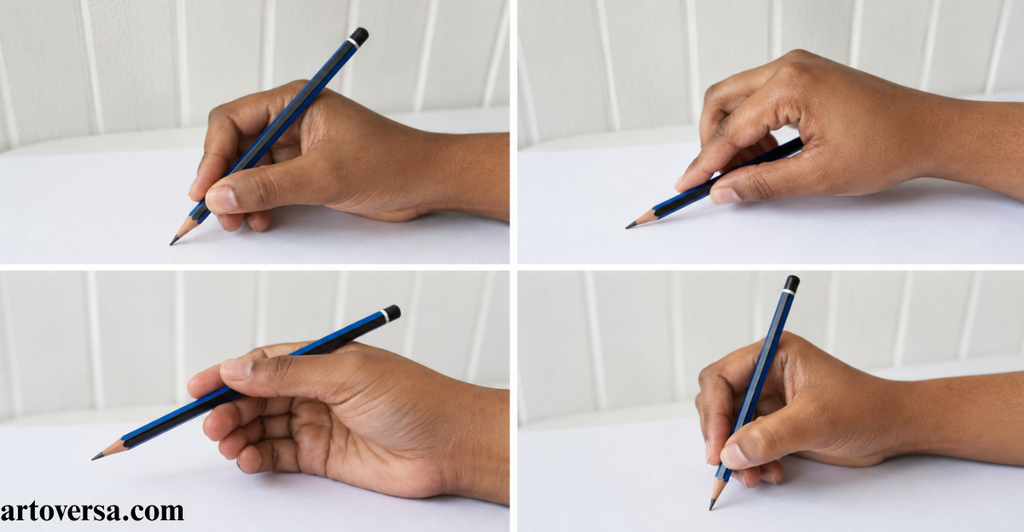
Practice each pencil grip for a few minutes to discover which hand position gives you the best control for different drawing techniques.
- Hold the pencil with a Writing Grip when drawing small features, sharp edges and precise outlines. This position offers steady control for detail work without affecting accuracy.
- Switch to an Overhand Grip for broad shading, loose sketches, and expressive marks. Drawing from the shoulder instead of the wrist creates smoother movements across larger areas.
- Move your fingers farther back with an Extended Grip to produce lighter strokes and reduce heavy pressure. This simple adjustment helps prevent overworking the drawing during the early stages.
- Try an Underhand Grip while creating large gestures and smooth, flowing lines. The relaxed hand position keeps long strokes consistent and improves the overall rhythm of the sketch.
- Change between different Common Pencil Grips instead of using only one throughout the drawing. Using the right Pencil Grip and Hand Position at the right moment improves comfort, control, and line quality during longer drawing sessions.
Common problems and how to overcome them
Keeping the pencil too close to the tip for the entire drawing often leads to adding details too early and limits natural arm movement. Switch grips as the drawing develops to improve control and keep the sketch balanced.
Trying different Pencil Grip styles completely changed the way long sketches felt on the page. Changing the Hand Position based on the stage of the drawing made shading smoother, lines cleaner, and the overall process much more comfortable.
Step 4: Pencil Pressure Cheat Sheet
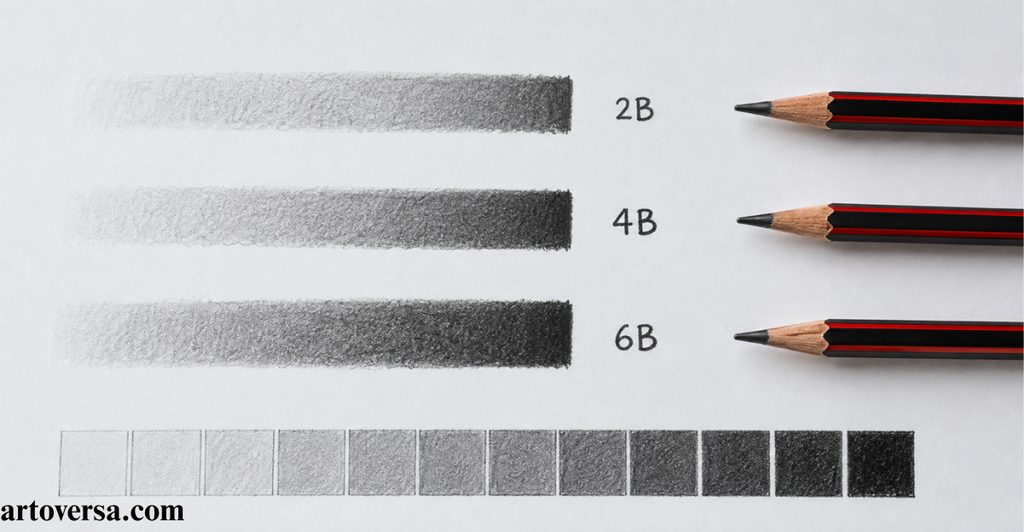
Control your pencil pressure with slow, steady layers to create smoother shading and stronger depth in every drawing.
- Start with Very Light pressure to create barely visible construction lines that are easy to adjust. Gentle strokes help build a clean foundation without leaving unwanted marks.
- Apply Light pressure to produce a soft gray tone during initial shading. Thin layers make it easier to blend values and refine the drawing as it develops.
- Increase to Medium pressure when adding midtone values and developing form. This stage connects highlights and shadows while giving the subject a more realistic shape.
- Use Heavy pressure for dark gray core shadows after the main forms are established. Build the darkness gradually instead of forcing it with a single stroke.
- Reserve Maximum pressure for rich black final accents only to complete the strongest details. Think of the Pressure Scale like a volume knob and build values step by step for smoother gradients.
Common problems and how to overcome them
Pressing with Maximum pressure too early makes corrections difficult and reduces the full value range of the drawing. Build tones from light to dark using controlled layers instead of heavy strokes. This approach creates cleaner shading and leaves room for adjustments.
Learning to control pencil pressure made the biggest difference in the quality of my graphite drawings. Treating the Pressure Scale as a gradual transition instead of jumping to dark tones produced smoother gradients, stronger contrast, and a much more polished finish.
Step 5: Line Weight Cheat Sheet
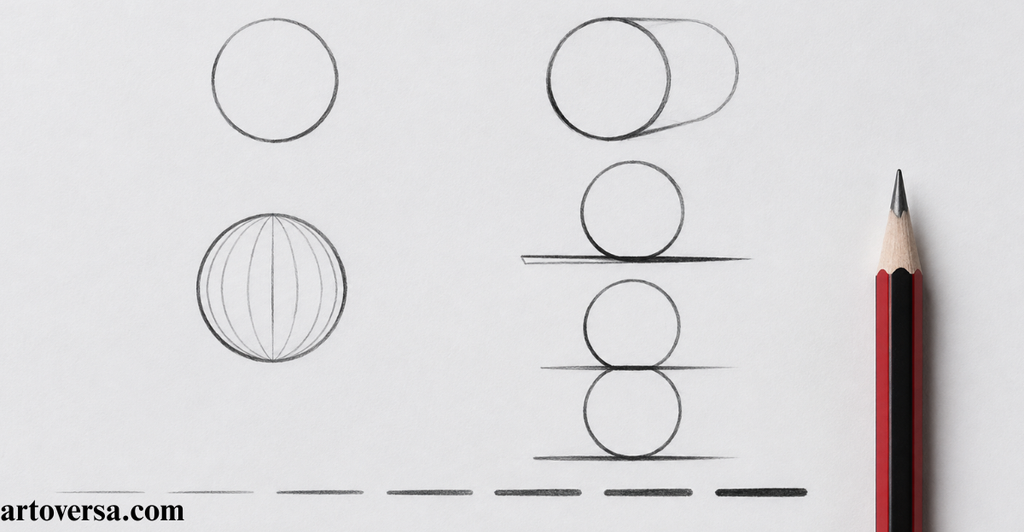
Adjust your line weight with purpose to create depth and guide the viewer’s eye before adding any shading.
- Make foreground objects stand out by using thicker lines around the most visible edges. This simple change gives the subject more presence and separates it from the background.
- Strengthen areas hidden behind another object and important contours with slightly darker strokes. Varying line thickness helps overlapping shapes look more convincing.
- Add thicker lines around deep shadows instead of outlining the entire drawing. Controlled changes in line weight create stronger form while keeping the sketch clean.
- Draw distant objects, brightly lit edges, fine details and delicate textures with thinner lines. Softer edges make light areas feel more open and realistic without extra shading.
- Let some edges fade naturally instead of outlining every shape equally. Allowing certain lines to disappear where light hits the surface creates a smoother transition and a more realistic drawing.
Common problems and how to overcome them
Using the same dark outline around every object makes the drawing appear flat and removes the sense of depth. Change the line weight according to light, distance, and overlap to create a more believable result.
Changing line weight completely transformed the way my sketches looked before any shading was added. Varying thick and thin lines around the subject created stronger depth, clearer focus, and a much more realistic appearance with very little extra effort.
Step 6: Basic Shapes Cheat Sheet
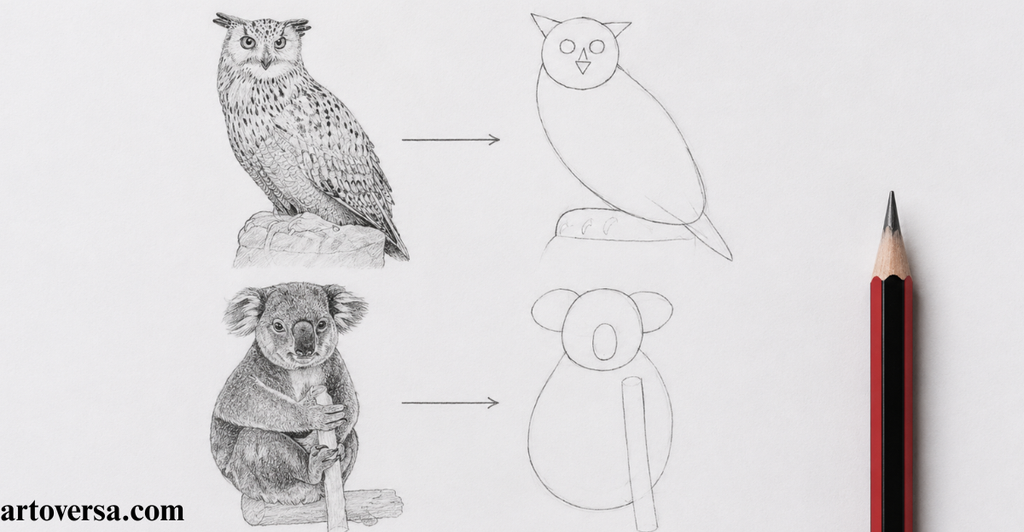
Break every subject into basic shapes first and the rest of the drawing will become much easier to build.
- Use spheres, circles, boxes, cubes, cylinders, cones, prisms, and teardrops to map out the main structure. Simple forms make the drawing easier to adjust before adding details.
- Think about the subject in parts instead of one complete object. The Head works well as a Sphere and jaw block, while the Bird is easier to build with Ovals and cones.
- Large objects become easier to understand after breaking them into simple forms. A Tree is made from a Cylinder and a sphere and a Car is easier to construct with Boxes and cylinders.
- Everyday subjects follow the same idea. Sketch the Cat with Spheres and cylinders. Build the Cup from a Cylinder and shape the Mushroom with a Dome and cylinder.
- Follow the Common Shape Breakdown before adding details. This method improves proportion, perspective, and lighting. Even a Rose becomes easier after blocking in a Spiral and overlapping ovals.
Common problems and how to overcome them
Many drawings lose their balance because the overall structure is skipped. Build the large forms first and check the proportions before adding details. This keeps corrections simple and improves accuracy.
Breaking every subject into basic shapes completely changed the way complex drawings came together. Looking at forms instead of details made proportion, perspective, and lighting much easier to control from the very first sketch.
Step 7: Construction Lines Cheat Sheet
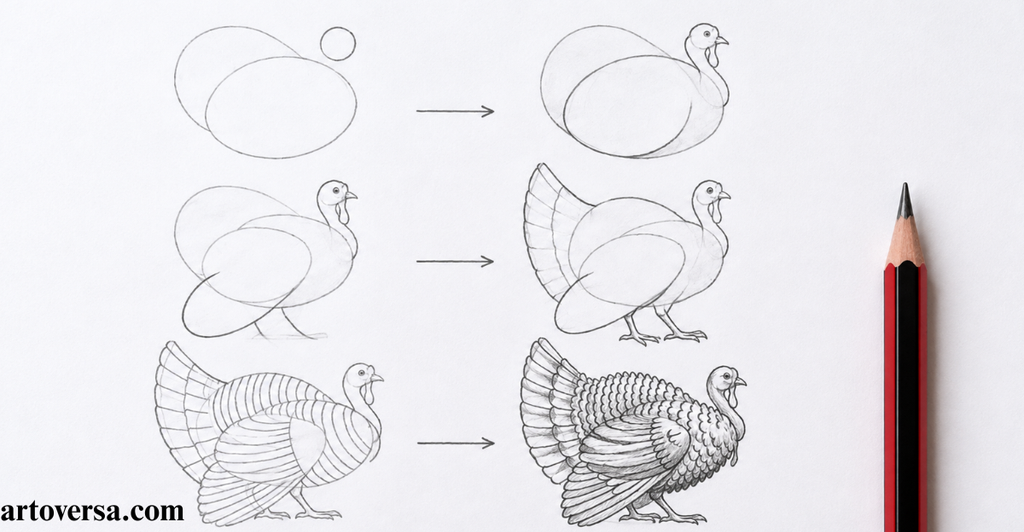
Draw construction lines first to build accurate proportions before adding clean outlines and details.
- Treat construction lines as the hidden framework of your drawing. Light guidelines help place every shape correctly before the final sketch takes form.
- Focus on placement and proportion instead of details during the first stage. Simple lines make it much easier to adjust the drawing without starting over.
- Keep every guideline soft enough to erase easily once the structure is complete. Clean corrections are much easier when the early marks stay light.
- Draw long confident strokes instead of scratching the paper with short hesitant marks. Smooth lines create a stronger framework and improve the overall flow of the sketch.
- Remember that construction lines are only a planning tool. They do not need to look perfect because their purpose is to guide the forms into the correct position before darker outlines are added.
Common problems and how to overcome them
Pressing too hard during the construction stage makes guidelines difficult to erase and often leads to fixing details before checking the overall proportion. Use light strokes first and review the structure before making any line permanent.
Learning to trust construction lines completely changed the way my drawings came together. Spending a little more time on placement and proportion reduced mistakes, kept the sketch cleaner, and made the final details much easier to add.
Conclusion
These drawing cheat sheets are a helpful way to build stronger skills and feel more confident with every sketch. From choosing the right pencil and paper to controlling pressure and line weight each tip can make drawing feel much easier. Learning basic shapes and construction lines also helps you understand form and proportion before moving into details. Keep these references nearby whenever you need a quick reminder or feel stuck during a drawing. As you practice more, you will create cleaner lines, smoother shading and better balanced artwork. Most importantly, keep experimenting and let every sketch help you grow into a more confident artist.
FAQs
Which graphite pencil grade is best for beginners?
An HB pencil is a great starting point for everyday sketching and basic shading. As your skills improve, you can add softer grades like 2B and 4B for darker values.
What type of paper is best for pencil drawing?
Smooth paper works well for detailed drawings and realistic portraits. Medium-tooth paper is more versatile for everyday sketching and shading, while rough paper is better for visible texture.
Why is pencil pressure important in drawing?
Pencil pressure controls how light or dark your marks appear on the page. Learning to build values gradually helps create smoother shading and gives you more control over highlights and shadows.
How do basic shapes help with drawing?
Basic shapes make complex subjects much easier to understand and draw. Starting with simple forms like spheres, cylinders, boxes and cones helps you get the proportions, perspective and overall structure right before adding details.
Why should artists use construction lines?
Construction lines help you place forms correctly before adding details or darker outlines. Keeping them light makes corrections easier and helps create a more balanced final drawing.
Please Write Your Comments