A Beginner’s Guide to Drawing an Elephant Step by Step
Updated: September 15, 2026
26
Drawing an elephant is an excellent way to build your observation skills while learning to sketch realistic animal anatomy, proportions, and texture. With its powerful body, long trunk, broad ears and distinctive wrinkles an elephant offers artists the opportunity to practice both simple construction techniques and detailed shading. Whether you’re picking up a pencil for the first time or refining your wildlife drawing skills, this step-by-step guide will help you create a lifelike elephant with confidence. By following each stage carefully, you’ll develop a solid foundation and learn techniques that can be applied to many other animal drawings as well.
Table of Contents
Why Learn to Draw an Elephant?
Learning to draw an elephant helps you understand animal anatomy, body proportions, and realistic shading while improving your overall sketching skills. Its unique features, including the trunk, tusks, large ears, and textured skin, provide excellent practice for creating depth, form, and fine details. As you work through each step, you’ll also strengthen your observation, line control, and confidence, making it easier to draw other wildlife and realistic animals in the future.
Materials You’ll Need
Before you begin, gather a few basic drawing tools to make the sketching process easier and more enjoyable. You don’t need expensive supplies; just a few quality materials will help you create accurate proportions, realistic textures, and smooth shading.
- Graphite Pencils (HB, 2B, and 4B): Use an HB pencil for lightly sketching the basic construction shapes, a 2B pencil for refining the outline, and a 4B pencil for adding deep shadows, wrinkles, and fine details.
- Drawing Paper: Choose smooth or medium-textured sketch paper that allows you to blend graphite easily while maintaining crisp details.
- Kneaded Eraser: Ideal for lifting graphite, creating subtle highlights, and correcting mistakes without damaging the surface of the paper.
- Blending Stump: Helps blend pencil strokes smoothly to create soft transitions, realistic skin texture, and natural-looking shadows.
- Pencil Sharpener: A well-sharpened pencil gives you better control when drawing delicate details such as the eyes, tusks, trunk wrinkles, and toenails.
- Reference Photo: Keep a clear photo of an elephant nearby to study its anatomy, body proportions, skin folds, lighting, and overall posture as you draw.
With these materials ready, you’ll be well prepared to sketch an elephant confidently and build a realistic drawing step by step.
How to Draw a Realistic Elephant Step by Step
With your materials ready and a basic understanding of elephant anatomy, you’re ready to start drawing. Follow these ten simple steps to sketch the body, refine the details, and add realistic shading for a lifelike elephant illustration.
Step 1 – Sketch the Basic Construction Shapes
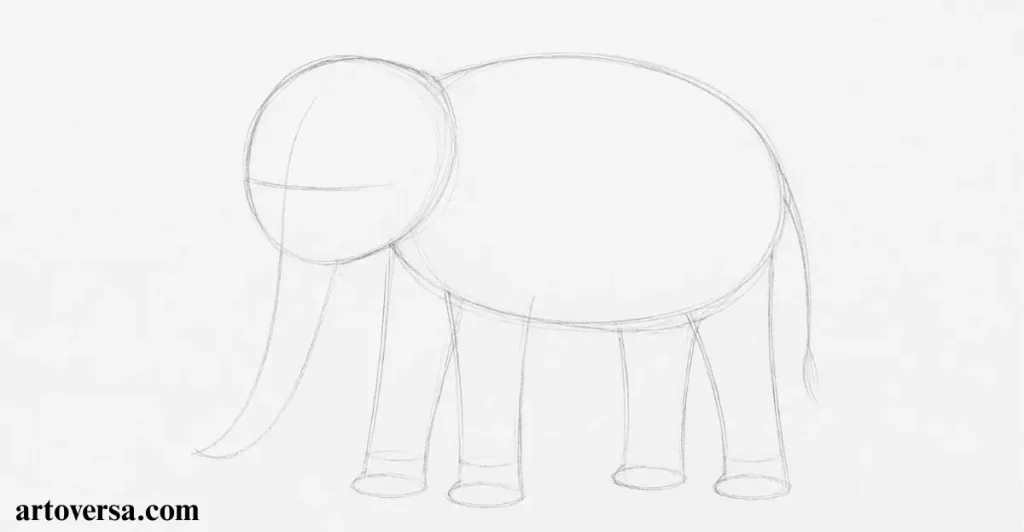
These simple construction shapes provide the foundation for a realistic and well-proportioned elephant drawing.
- Lightly sketch a large bean-shaped or rounded oval to establish the elephant’s main body.
- Add a slightly smaller oval in front of the body to mark the head, making sure it overlaps naturally at the neck.
- Draw a long, gently curved guideline extending from the head to indicate the direction and length of the trunk.
- Use simple straight and curved guidelines to position the four legs and lightly mark the tail.
- Check the overall proportions before moving on, keeping every construction line soft and easy to erase.
Common Problems and How to Overcome Them
Many beginners make the body too small, the head too large, or place the legs unevenly, resulting in unrealistic proportions. Use light construction lines and compare the size of each shape before moving on to the next step, making adjustments until the overall structure looks balanced.
One pattern I’ve observed while guiding new artists is that they often focus on the trunk, tusks, or wrinkles before establishing the elephant’s basic form. Once they learnt to spend more time on simple construction shapes, their drawings became more proportionate, realistic, and much easier to refine. A strong foundation at this stage will make every step that follows smoother and more enjoyable.
Step 2 – Outline the Elephant’s Body and Head
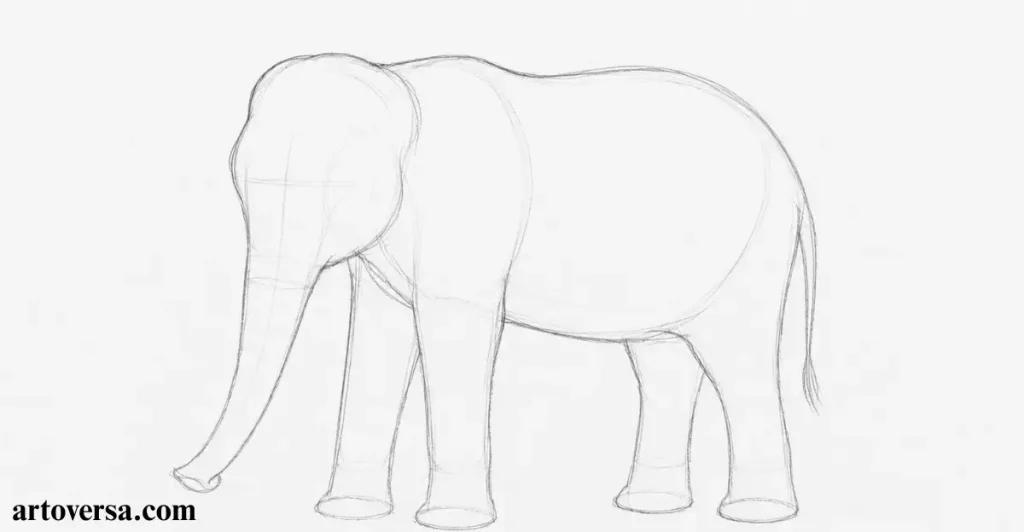
The overall form is now established, making it easier to refine the elephant’s distinctive features in the next step.
- Use your construction shapes as a guide to sketch the elephant’s overall body outline with smooth, confident strokes.
- Refine the shape of the head, giving it a broad forehead and a gentle curve where it meets the trunk.
- Connect the neck naturally to the shoulders and back, creating the elephant’s powerful silhouette.
- Shape the chest, belly, and hindquarters, paying attention to the elephant’s sturdy proportions.
- Keep the lines light and make small adjustments until the body looks balanced from head to tail.
Common Problems and How to Overcome Them
A common mistake is outlining the body too early with dark, permanent lines or making the back and belly too flat. Build the outline gradually, compare the proportions as you work, and use light strokes so you can easily correct the shape before adding details.
One thing I’ve consistently noticed while helping beginners is that they often try to perfect one area before checking the overall body shape. When they step back occasionally and compare the head, body, and legs as a whole, their drawings become much more balanced and realistic. Taking a few extra moments to refine the outline now will make the remaining steps much easier.
Step 3 – Draw the Trunk, Tusks and Facial Features
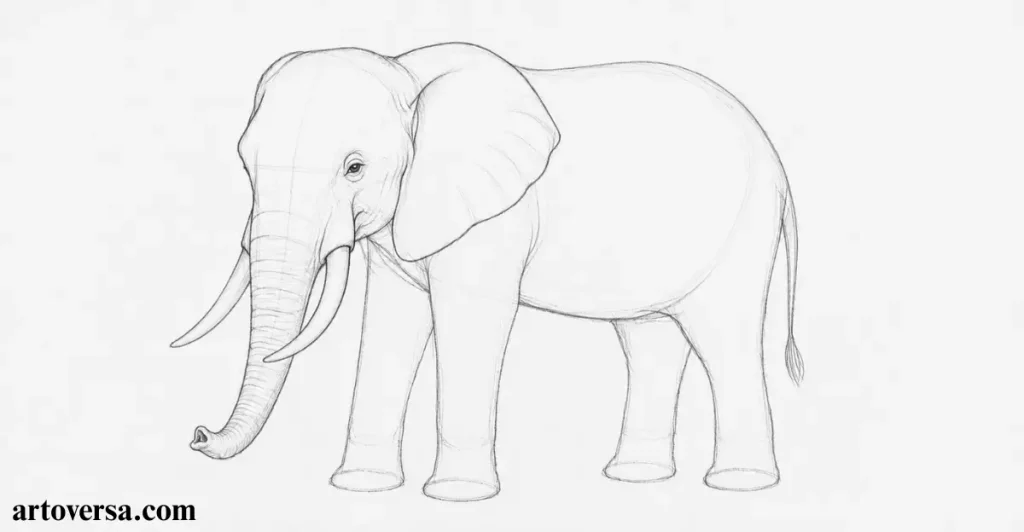
The elephant’s personality is beginning to emerge, and the remaining body details will complete its overall structure.
- Refine the trunk by following your guideline, giving it a natural taper as it extends downward and adding gentle curves to show its flexibility.
- Draw the tusks emerging from either side of the trunk’s base, keeping them smooth, symmetrical, and slightly curved.
- Sketch the large ear, allowing it to flow naturally from the side of the head with soft, rounded edges.
- Add the eye just above the trunk, then lightly draw the mouth line and any visible facial folds.
- Refine the forehead and cheeks, making small adjustments until the elephant’s face looks balanced and expressive.
Common Problems and How to Overcome Them
Many beginners make the trunk too straight or draw the tusks too long and thick, causing the face to look unnatural. Study your reference photo carefully, keep the trunk flowing with gentle curves, and ensure the tusks are proportional to the head.
One pattern I’ve observed while guiding new artists is that they often spend too much time perfecting the trunk before checking the rest of the face. Once they learned to develop the trunk, tusks, ears, and eyes together, their elephant drawings looked far more natural and well-proportioned. Building the facial features as a complete unit creates a more realistic result.
Step 4 – Sketch the Legs, Feet and Tail
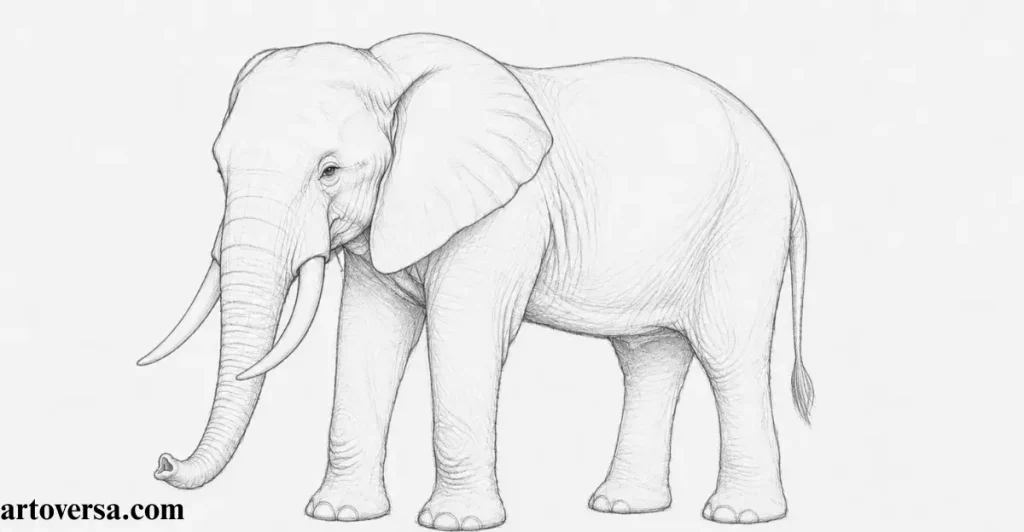
The full outline is now complete, giving you a solid framework to refine and enhance with realistic details.
- Refine the front and hind legs using your construction lines, keeping them thick, sturdy, and evenly proportioned.
- Shape each foot with a broad, rounded base, then lightly indicate the toenails along the front edge.
- Define the joints with gentle curves instead of sharp angles to create a natural, weight-bearing stance.
- Draw the tail extending from the rear of the body, finishing it with a small tuft of hair at the tip.
- Compare the length and position of all four legs to ensure the elephant appears balanced and standing naturally.
Common Problems and How to Overcome Them
A common mistake is making the legs too thin or uneven in length, which can make the elephant look unstable. Keep the legs cylindrical and strong, check that the feet align naturally with the body, and compare each leg before refining the outline.
While reviewing students’ sketches, I often found that the legs looked correct individually but didn’t work well together. Encouraging them to compare all four legs before adding details helped them create a stronger stance and a much more realistic elephant. Spending a little extra time on balance at this stage makes a noticeable difference in the finished drawing.
Step 5 – Refine the Body Shape and Skin Folds
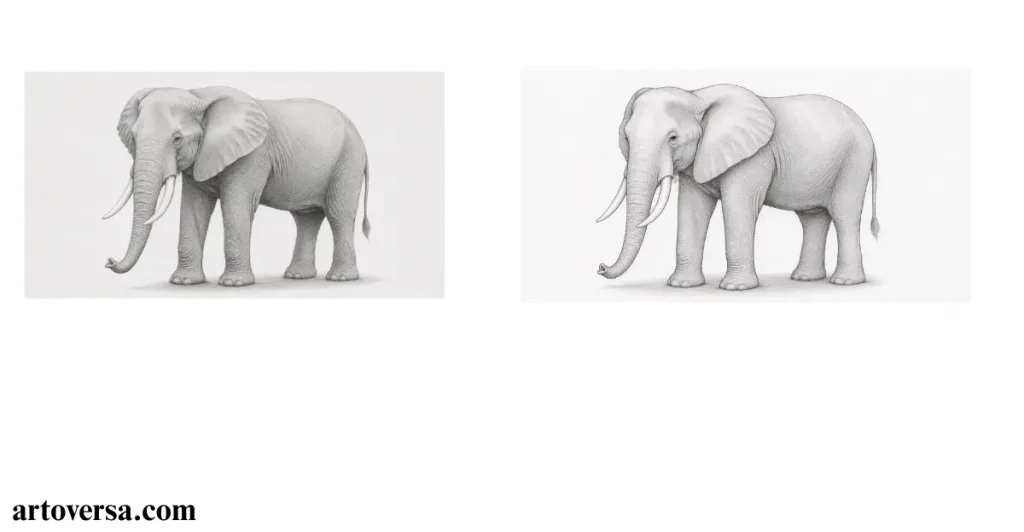
Your sketch is becoming more natural, and cleaning the line art will prepare it for smooth graphite shading.
- Smooth the outline of the elephant by refining the curves of the back, chest, belly, and hindquarters.
- Add gentle skin folds around the neck, shoulders, trunk, knees, and elbows where the skin naturally creases.
- Draw a few wrinkles around the joints and along the trunk to suggest the elephant’s thick, textured skin.
- Keep the folds varied in length and direction, avoiding evenly spaced or repetitive lines.
- Erase any unnecessary construction lines while preserving the clean outline of the body.
Common Problems and How to Overcome Them
Many beginners add too many wrinkles too early, making the elephant look cluttered and unrealistic. Start with only the major skin folds, then gradually build the texture in later steps. Remember that wrinkles should follow the body’s form rather than cover every surface.
One exercise that has helped many new artists is studying reference photos before drawing the wrinkles. After they began observing where the skin naturally folds around moving joints and the trunk, their drawings gained much more depth and realism without relying on excessive detail.
Step 6 – Clean the Line Art
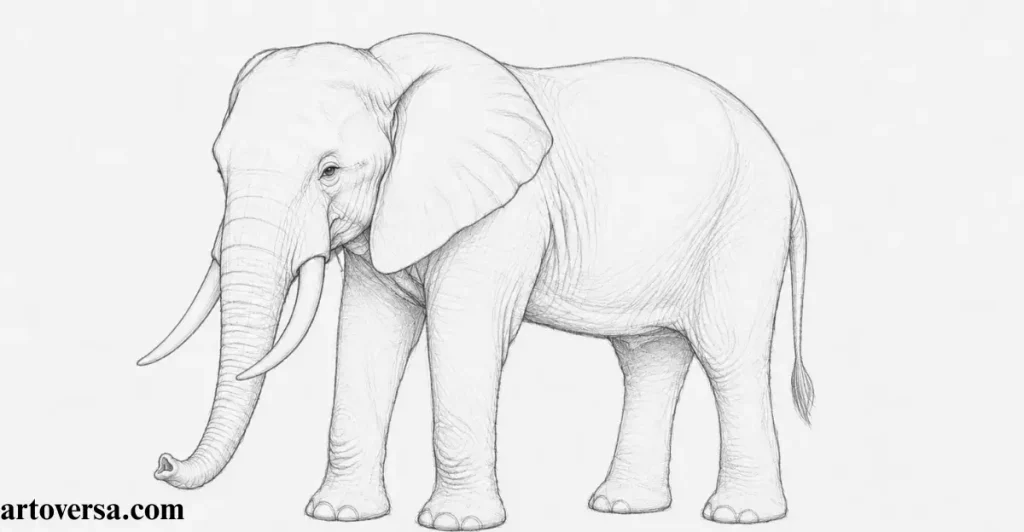
A clean outline makes the shading process much easier and helps every detail stand out more clearly.
- Go over the final outline with smooth, confident pencil strokes, keeping the edges clean and well-defined.
- Erase any remaining construction lines that are no longer needed, taking care not to remove important details.
- Refine the outline of the trunk, ears, tusks, legs, and tail to give each feature a crisp, natural appearance.
- Strengthen the main contours slightly while keeping smaller details light and delicate.
- Check the entire drawing for symmetry, proportions, and smooth transitions before moving on to shading.
Common Problems and How to Overcome Them
Many beginners darken every line equally, causing the drawing to appear flat and stiff. Instead, emphasise the main outer contours while keeping interior lines softer. This creates a cleaner sketch and prepares the drawing for realistic shading.
A simple habit that consistently improves line art is taking a short break before the final cleanup. Looking at the drawing with fresh eyes makes it easier to spot uneven curves, unnecessary guidelines, or small proportion issues that are often overlooked during the sketching process.
Step 7 – Apply the Base Shading
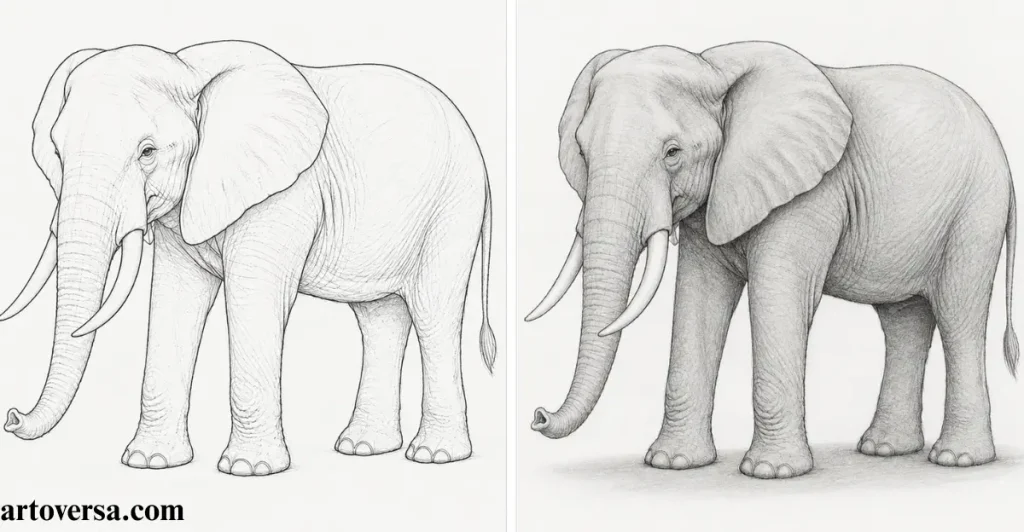
The first layer of graphite establishes the overall form and creates a strong base for deeper values.
- Begin shading the entire elephant with a light, even layer of graphite using a 2B pencil.
- Keep your pencil strokes soft and follow the direction of the body to create a smooth, natural appearance.
- Leave the areas that catch the most light, such as the top of the back, forehead, and parts of the trunk, slightly lighter.
- Use a blending stump to soften the graphite and remove any harsh pencil marks.
- Build the tone gradually instead of pressing hard, creating a solid foundation for deeper shadows in the next step.
Common Problems and How to Overcome Them
A common mistake is applying heavy shading too early, making it difficult to create depth later. Start with light layers of graphite and slowly increase the value where needed. This gives you greater control and results in smoother, more realistic shading.
Many artists notice a significant improvement once they stop trying to achieve the final darkness in a single layer. Gradually building the graphite produces softer transitions, richer tones, and a much more lifelike elephant with realistic depth and form.
Step 8 – Build Shadows and Midtones
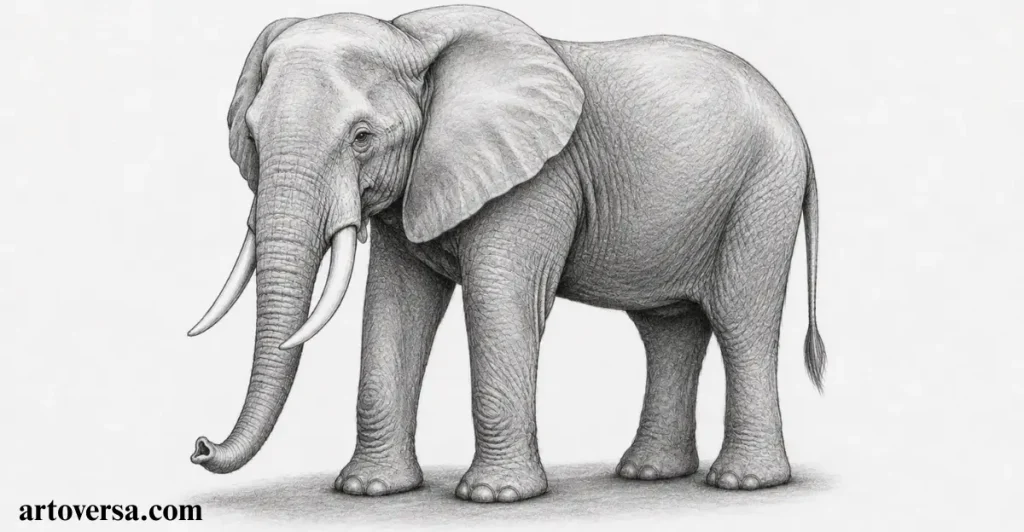
The added contrast gives the elephant greater depth, leaving only the finer textures and details to complete.
- Deepen the shadows beneath the belly, around the legs, under the trunk, and behind the ears using a 4B pencil.
- Gradually build the midtones across the body, blending them smoothly into the lighter areas.
- Darken the skin folds, wrinkles, and joints to emphasise the elephant’s form and texture.
- Blend the graphite carefully to create soft transitions while preserving the overall shape of the body.
- Continue comparing the light and dark values until the elephant appears solid and three-dimensional.
Common Problems and How to Overcome Them
Many beginners create harsh transitions between light and dark areas, making the drawing look flat or patchy. Build the shadows in several light layers and blend them gradually to achieve smooth, realistic value changes.
One technique that produces more natural results is squinting at your reference photo while shading. This helps you see the larger shadow shapes instead of getting distracted by small details, making it much easier to place midtones and dark values accurately.
Step 9 – Add Skin Texture and Fine Details
Every small detail brings the elephant closer to a lifelike appearance, setting the stage for the final finishing touches.
- Add fine wrinkles and skin texture across the trunk, ears, neck, and legs using short, controlled pencil strokes.
- Refine the eye, tusks, toenails, and tail tuft with careful details to bring the elephant to life.
- Vary the length and direction of the wrinkles so they follow the natural curves of the body.
- Strengthen a few of the darkest shadows to increase depth and make the details stand out.
- Blend only where necessary, keeping the skin texture crisp and visible.
Common Problems and How to Overcome Them
A common mistake is covering the entire elephant with evenly spaced wrinkles, which can make the skin look artificial. Concentrate the texture around the trunk, joints, ears, and areas where the skin naturally folds, leaving smoother surfaces in between.
Many developing artists achieve better results once they realize that texture should support the form rather than overpower it. By adding details gradually and only where they naturally occur, the elephant looks more realistic without becoming overly busy.
Step 10 – Finish with Highlights and Final Touches
Your realistic elephant drawing is now complete, and each new sketch will help strengthen your observation and drawing skills.
- Use a kneaded eraser to lift subtle highlights on the trunk, tusks, forehead, ears, and the top of the back where light naturally falls.
- Refine the darkest shadows to increase contrast and give the elephant greater depth and dimension.
- Make any final adjustments to the outline, wrinkles, and facial features, ensuring every detail looks clean and well-balanced.
- Remove any remaining smudges or stray construction marks to give the drawing a polished appearance.
- Compare your finished sketch with the reference photo and make small refinements until you’re satisfied with the overall result.
Common Problems and How to Overcome Them
Many beginners skip the final review and miss small issues with proportions, shading, or uneven details. Take a few minutes to inspect your drawing carefully, making subtle corrections that enhance the overall realism without overworking the sketch.
A practice that consistently leads to stronger artwork is setting the drawing aside for a short while before making the final adjustments. Looking at it with fresh eyes often reveals small improvements that make the finished elephant appear cleaner, more balanced, and more realistic.
Professional Drawing Tips
Whether you’re drawing your first elephant or refining your wildlife art skills, these professional techniques will help you create a more realistic and confident sketch.
- Start with Simple Shapes: Build the elephant using basic construction shapes before adding details. A strong foundation makes the entire drawing more accurate.
- Study the Anatomy: Observe how the trunk, ears, legs, and body connect. Understanding the elephant’s structure helps you draw natural proportions and believable poses.
- Work from General to Specific: Sketch the overall form first, then gradually refine the facial features, skin folds, and fine textures instead of focusing on one area too early.
- Build Shading in Layers: Apply light layers of graphite and slowly deepen the values. This creates smooth transitions and gives the elephant a realistic three-dimensional appearance.
- Use a High-Quality Reference Photo: A clear reference image helps you understand lighting, anatomy, wrinkles, and proportions, resulting in a more accurate and lifelike drawing.
- Step Back and Evaluate Often: Take short breaks and view your drawing from a distance to spot proportion issues, uneven shading, or details that need refinement before finishing.
How to Draw Different Types of Elephants
Elephants vary in appearance depending on their species, so understanding their unique characteristics can make your drawings more accurate and realistic. While the basic drawing process remains the same, adjusting features such as the ears, tusks, body shape, and proportions will help you capture the distinctive look of each type.
African Elephant
The African elephant is the largest elephant species and is recognized by its massive ears, long curved tusks, and slightly concave back. Focus on drawing its broad head, thick trunk, and large fan-shaped ears to create a powerful and realistic appearance.
Asian Elephant
Asian elephants have smaller, rounded ears, a more domed forehead, and a smoother back than African elephants. Their tusks are often shorter or may be absent in many females, making softer facial features and compact proportions important for an accurate sketch.
African Forest Elephant
The African forest elephant is smaller and more compact than the African bush elephant. It has rounded ears, straighter and thinner tusks, and a slimmer body. Keep the proportions lighter while preserving the characteristic elephant features.
Baby Elephant
A baby elephant has a rounder body, shorter legs, a smaller trunk, and oversized ears compared to its body. Emphasize its playful proportions, soft facial features, and curious expression to create a charming and lifelike drawing.
Conclusion
Drawing an elephant is a rewarding way to improve your understanding of animal anatomy, proportions, texture, and realistic shading. By following each step carefully and practicing with patience, you’ll develop the skills needed to create a lifelike and well-balanced sketch. Remember that every drawing is an opportunity to learn, so don’t be discouraged by small mistakes. Keep observing reference photos, refining your techniques, and experimenting with different elephant poses and species. With consistent practice, you’ll gain the confidence to draw realistic wildlife and continue growing as an artist.
FAQs
How do you draw an elephant step by step?
Start by sketching simple construction shapes to establish the body and head. Gradually refine the outline, add the trunk, ears, tusks, legs, and tail, then finish with realistic skin texture, shading, and highlights.
Is drawing an elephant easy for beginners?
Yes. By breaking the drawing into simple steps and focusing on basic shapes before adding details, beginners can create a realistic elephant with practice and patience.
What materials do I need to draw an elephant?
You’ll need an HB pencil, 2B and 4B graphite pencils, drawing paper, a kneaded eraser, a blending stump, a pencil sharpener, and a clear reference photo.
How do you make an elephant drawing look realistic?
Pay attention to accurate body proportions, natural skin folds, realistic wrinkles, smooth shading, and proper lighting. Using reference photos also helps improve realism.
Please Write Your Comments