Learn How to Draw a Realistic Lion Step by Step
Updated: September 12, 2026
29
Lions are known for their strength, majestic mane and powerful presence making them one of the most impressive animals to draw. However creating a realistic lion can be challenging because of its detailed fur facial proportions and realistic shading. With the right techniques and a step-by-step approach, the process becomes much easier to understand. Follow the guide below to learn each stage and create a lifelike lion drawing with confidence.
Table of Contents
Step:1 Sketching the basic structure of a lion
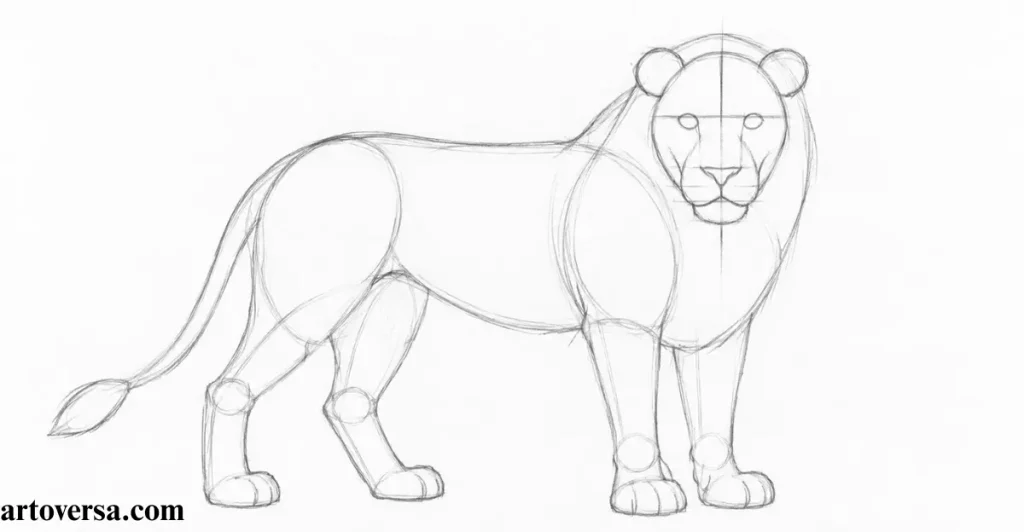
Build the lion structure with simple shapes first because a strong foundation drawing makes the entire sketch easier to refine later.
- Begin with basic sketching by breaking the complex subject into recognizable shapes, using an oval head and triangle nose to create a clean construction sketch for the lion head.
- Improve realistic results by using the grid method or freehand sketching, while carefully studying a reference image to strengthen subject study, better drawing technique, improved sketch accuracy and sharper observation skills.
- Focus on feature placement using careful pencil estimation to maintain accurate facial proportions on a side-facing lion, while using vertical guidelines for proper face alignment, balanced composition, and controlled asymmetry.
- Sketch the mouth outline, adjust the nose placement, position the eye locations, define the face boundary, outline the mane outline, and complete the body outline to strengthen the overall structural sketch and major facial features.
- Keep every line soft with light pencil strokes using a 4H pencil or H pencil so sketch correction and erasing mistakes remain easy while improving drawing confidence, producing a cleaner realistic lion sketch, stronger clean construction, and smoother sketch refinement.
Common problems and how to overcome them
Many artists become too focused on the lion head and forget the overall balanced composition, causing the face alignment to shift before they notice it. Another common mistake is using heavy light pencil strokes, making sketch correction much harder later. Keep checking the vertical guidelines regularly and build the construction sketch lightly so adjustments remain simple throughout the drawing.
One habit that completely changed my freehand sketching was spending extra time checking the feature placement before adding any details. Earlier, I believed fixing mistakes later would be easier, but the incorrect facial proportions kept affecting the entire drawing. After slowing down and using softer 4H pencil construction lines, my realistic lion sketch became much cleaner and I rarely needed major corrections once the structure was complete.
Step: 2 Sketching the facial features
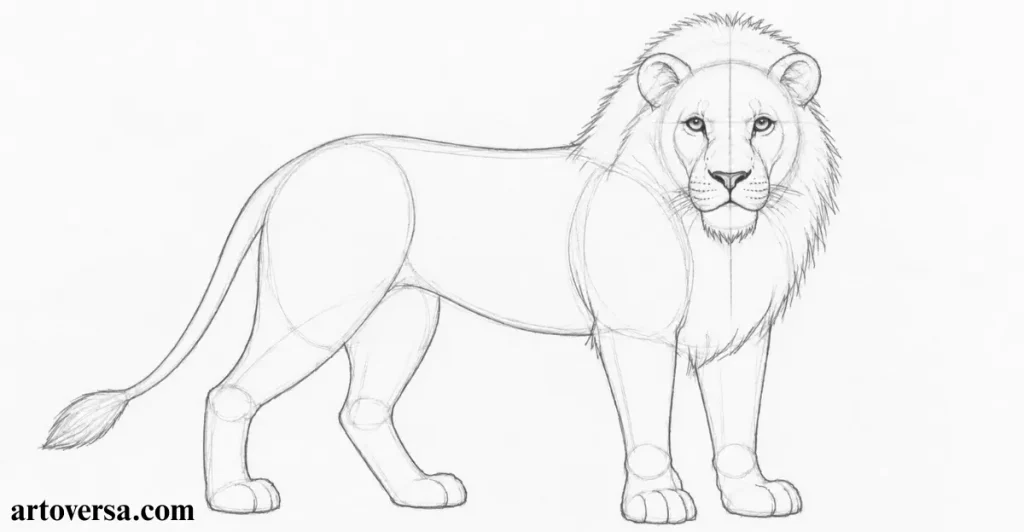
Learn how to sketch realistic lion facial features with accurate proportions and confident pencil strokes.
- Draw almond-shaped eyes first, then refine the eye sketch around the bridge of the nose. Shape the lion nose using a triangle nose with soft tapered corners to improve the overall facial structure and realistic features.
- Sketch the mouth shape like a wide wine glass, keeping the nose and mouth connected with correct facial proportions, a clean mouth outline, natural lion expression, and proper feature alignment.
- Continue the mane refinement using smooth curved lines to create a natural flowing mane, improve the mane texture, strengthen the sketch refinement, and complete a cleaner detailed outline with soft natural curves.
- Keep the light sketching visible while refining defined lines, maintaining clear boundaries, cleaner clean outlines proper sketch preparation a solid shading foundation and accurate construction lines.
- Check all facial details carefully to improve the realistic lion face, maintain feature accuracy, strengthen the refined sketch, increase drawing precision, follow correct facial anatomy and complete the completed facial structure.
Common problems and how to overcome them:
A common mistake is adjusting one feature without checking the overall facial proportions, which affects the feature alignment. Keep the construction lines light and compare each feature before refining the final outline.
I used to focus only on the almond-shaped eyes, but the sketch looked unbalanced because I ignored the nose and mouth placement. Once I checked the full facial structure together, my realistic lion face improved noticeably.
Step: 3 Sketching all the lion’s details
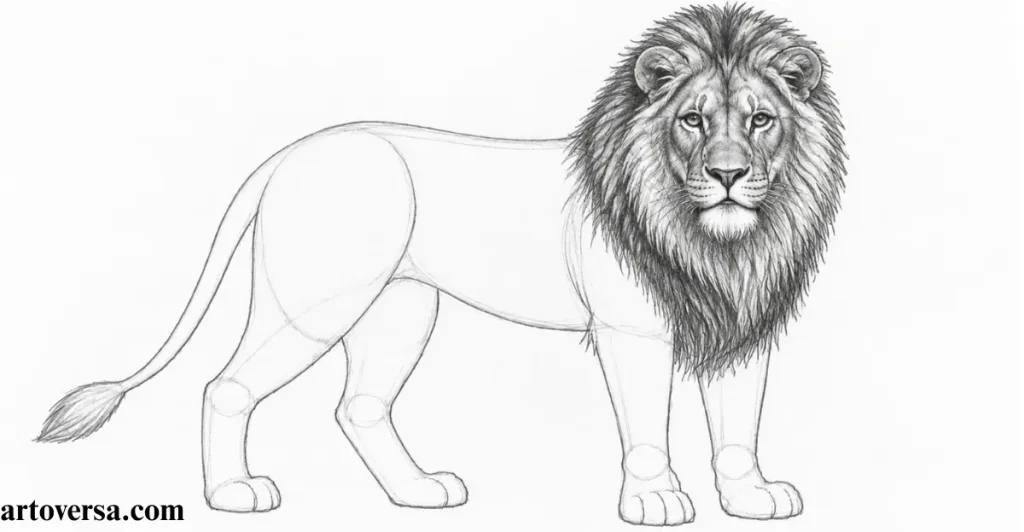
Complete the lion details carefully so every refined line strengthens the realistic structure before moving into the final shading preparation.
- Refine the well-defined lines around the full sketch while keeping clear boundaries to strengthen the sketch foundation, improve drawing refinement, and maintain the overall realistic structure.
- Clean the light pencil sketch by removing unnecessary erased lines through careful partial erasing, creating a clean sketch with better shading readiness, smoother construction cleanup, and cleaner smooth outlines.
- Refine the lion eyes by preserving subtle highlights, balanced shadows, soft reflections, sharper facial details, stronger mane definition, improved realistic expression, and better feature refinement.
- Review the full shading process using the image rendering as a guide, making sure all important details, the subject identity, realistic artwork, detailed features and overall drawing realism are ready for shading.
- Inspect the complete lion sketch carefully to improve the realistic sketch, review the overall sketch quality, complete the step review ensure shading success make any necessary drawing correction, and prepare the finished illustration through final sketch improvement.
Common problems and how to overcome them
Many artists start shading before checking the complete lion sketch, which makes small mistakes harder to fix later. Spend a few extra moments reviewing the sketch quality and make any drawing correction before moving on.
I used to skip this final review because the sketch already looked finished to me. After making it a habit to check the lion details one last time, I started noticing small improvements that made the final realistic artwork look much cleaner
Step: 4 Basic shading and blending
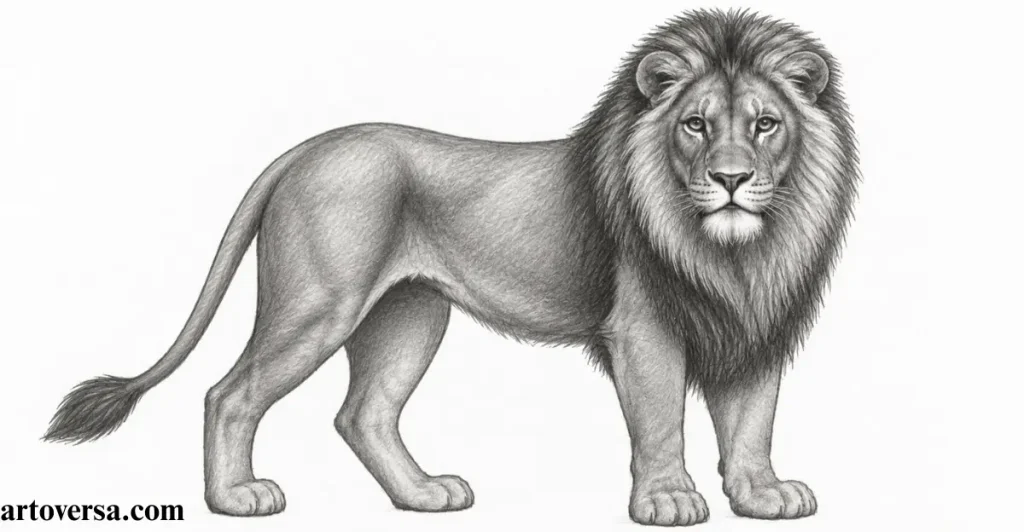
Build a smooth shading foundation with controlled basic shading and blending to create natural depth before refining the darker details.
- Begin basic shading by applying light graphite over the sketch, then use graphite powder with a Q-tip to blend gently while preserving the natural paper texture and creating better volume creation for more realistic shading.
- Work through the shading process slowly because careful rendering artwork requires patience and helps improve drawing realism, overall sketch enhancement, and more satisfying results using a controlled artistic technique.
- Cover the white paper gradually with soft graphite to achieve smooth blending, balanced tonal values, consistent even shading, and a softer realistic finish across the drawing.
- Keep the eyes untouched, nose untouched, and part of the lower jaw free from heavy shading to preserve natural highlights, protect important facial features, and support selective shading during drawing preparation.
- Refine the overall sketch realism by building blended graphite smoothly, improving smooth transitions, strengthening the volume effect, and completing a more realistic lion drawing through careful artwork refinement.
Common problems and how to overcome them
A common issue is applying too much graphite powder at the beginning, which hides the natural paper texture and makes even shading difficult. Build the tones gradually and blend lightly to maintain smooth tonal values.
When I first tried blending with a Q-tip, I covered the entire sketch too quickly and lost the softer highlights. After slowing down and building the shading foundation step by step, the realistic lion drawing looked much more natural.
Step: 5 Shading the eyes, nose and mouth (8B Graphite Pencil)
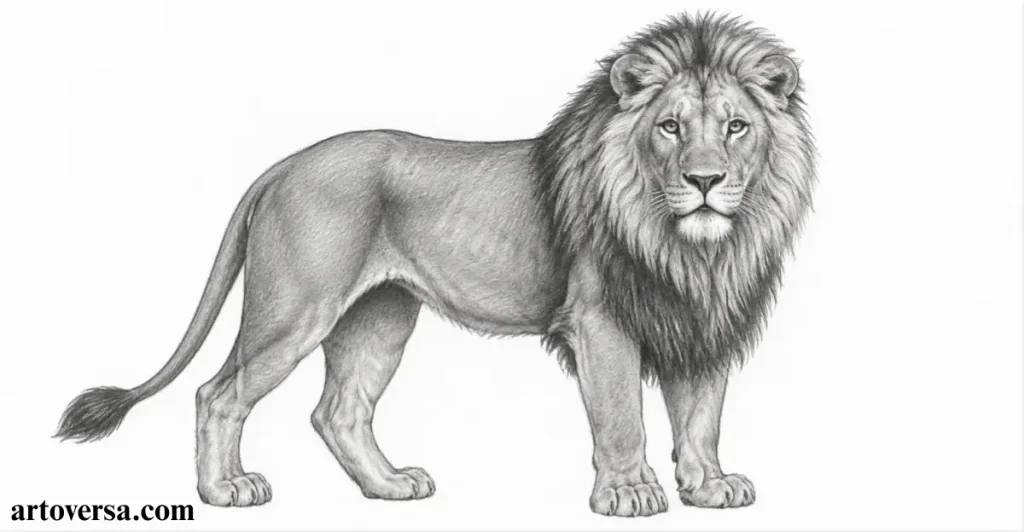
Use the 8B graphite pencil carefully to refine the eye shading, nose shading, and mouth shading, giving the lion stronger realistic features and a more lifelike appearance.
- Begin with the 8B graphite pencil and build the eye shading, nose shading, and mouth shading gradually to improve facial rendering, cleaner detailed shading, and stronger realistic features.
- Study the eye patterns carefully while refining the lion eyes to preserve unique markings, correct realistic anatomy, stronger facial identity, accurate eye details, and better feature accuracy.
- Balance the shadows, reflections and soft midtones around the pupil shading to improve tonal contrast, natural realistic lighting smoother smooth transitions, and a stronger depth effect.
- Continue careful rendering with patient shading to improve drawing precision, maintain better artistic control, strengthen refined details, and produce cleaner realistic artwork using a controlled shading technique.
- Complete the facial realism by refining the detailed nose and detailed mouth, creating completed features that strengthen the lifelike lion portrait through careful final rendering and overall drawing enhancement.
Common problems and how to overcome them
Many artists make the pupil shading completely black too early, reducing the natural tonal contrast and depth effect. Build the darker values slowly and preserve the reflections to keep the lion eyes looking realistic.
The biggest improvement in my drawings came when I stopped rushing the eye shading and paid more attention to the small reflections around the eyes. That simple change gave the lifelike lion portrait much more depth without adding extra details.
Step:6 Shading the lion’s face and mane
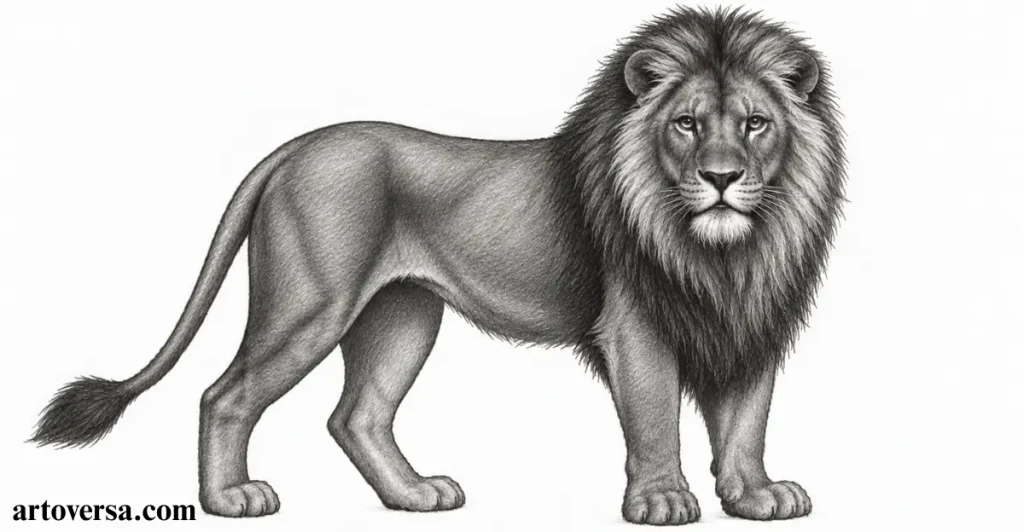
Refine the lion face and lion mane with controlled shading to build natural depth, smoother fur, and a more realistic appearance.
- Begin by adding soft facial shadows with a 6B pencil, paying close attention to shadow placement around the eyes and other facial features. Keep the uniform shading smooth and blend gently with a Q-tip to strengthen the overall facial structure.
- Shade the facial fur and continue into the mane shading by working with grouped fur instead of individual hairs. Use curved strokes to create a natural fur texture and improve the flow of the realistic mane.
- Switch to a mechanical pencil with 0.5mm lead and use controlled long strokes to refine the outer fur. Follow the natural mane length and shading direction to create softer blended fur with better realistic volume.
- Continue the face shading and mane blending by building balanced tonal values and maintaining smooth transitions. Layer the graphite gradually to create stronger realistic depth and improve the overall drawing realism.
- Finish the fur rendering by refining the facial texture and adding subtle detailed shading where needed. Blend the graphite carefully to complete a more realistic artwork while preserving a solid shading foundation.
Common problems and how to overcome them:
A common mistake is drawing every fur strand with the same pressure, making the lion mane look flat. Vary the long strokes and follow the natural shading direction to create a softer, more realistic result.
I used to spend too much time on individual hairs instead of the overall fur texture. Once I focused on larger fur groups first and blended them gradually, the lion face and lion mane started looking much more natural and realistic.
Step: 7 Advanced shading and final details
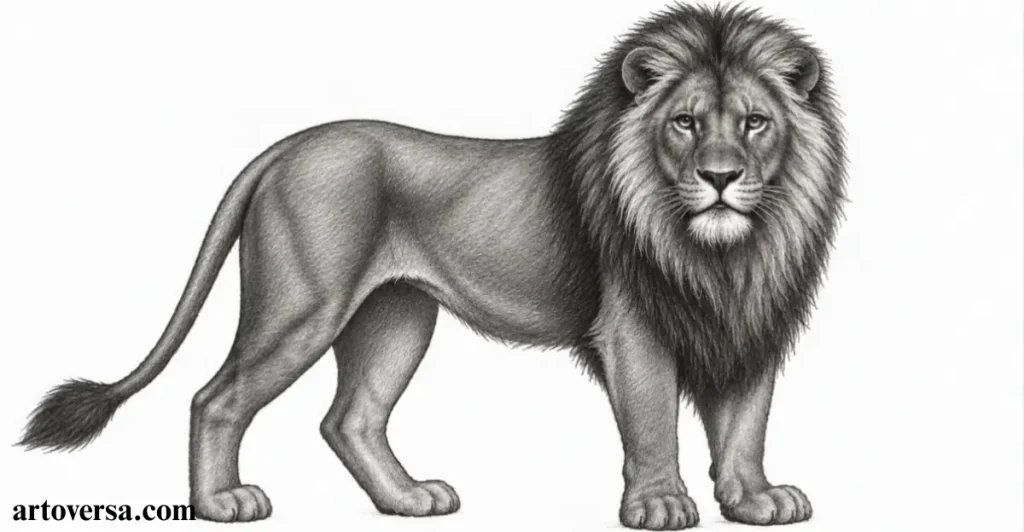
Complete the advanced shading carefully to refine the facial fur, strengthen the final highlights, and give the artwork a polished professional finish.
- Continue the advanced shading by refining the facial fur with short precise strokes that follow the natural fur direction. Blend the upward fur and downward fur carefully to create a smoother realistic texture and cleaner detailed rendering.
- Add depth around the lower jaw using soft mouth shadows, combining light strokes with controlled dark shading. Blend the face smoothly while continuing the mane refinement to improve layered fur and balanced tonal contrast.
- Use a kneadable eraser to lift the main highlights and improve highlight enhancement. Creating slightly brighter highlights strengthens the realistic lighting, completes the shading refinement, and improves the overall artwork finishing.
- Draw the white whiskers with a white Gelly Roll pen to create clean whisker details. Finish the charcoal background using medium Pitt charcoal to build a smooth black background and stronger drawing contrast.
- Review the final details before completing the completed lion drawing. Refine the background shading, strengthen the realistic lion portrait, and complete the finished illustration with a polished artistic finish, professional professional artwork, and clean final rendering.
Common problems and how to overcome them
One final mistake is adding heavy highlights or a dark charcoal background too early, which reduces the natural drawing contrast. Finish the shading refinement first, then add the highlights gradually for a balanced result.
I learned that the smallest final details often make the biggest difference in a drawing. Spending a little extra time on the white whiskers and soft background shading always helped my realistic lion portrait look cleaner and more complete without overworking the artwork.
Conclusion
Drawing a realistic lion may seem challenging at first, but breaking the process into simple steps makes it much easier to learn. From creating the basic sketch to refining the facial features, mane, and shading, every stage helps improve your drawing skills. Paying close attention to proportions, fur direction, and light sources adds depth and realism to the artwork. Practice each step patiently and make adjustments as you progress for the best results. With consistency and the right techniques, you can confidently create a detailed and lifelike lion drawing.
FAQs
What is the first step in drawing a realistic lion?
The first step is to create a light outline using basic shapes to establish the lion’s head, body, and overall proportions. A strong foundation makes it easier to add accurate facial features and realistic details later in the drawing.
Why is the lion’s mane difficult to draw?
The lion’s mane contains layers of fur that flow in different directions, making it one of the most detailed parts of the drawing. Using short pencil strokes and following the natural fur direction helps create a fuller and more realistic mane.
How can I make my lion drawing look more realistic?
Focus on accurate proportions, smooth shading, and realistic fur texture throughout the drawing. Gradually build dark and light values instead of pressing hard with the pencil at the beginning to create depth and dimension.
Which pencil techniques work best for drawing a lion?
Light sketching, layering, blending, and short directional fur strokes are the most effective techniques. These methods help create soft transitions, detailed textures, and a natural-looking coat without making the drawing appear flat.
How long does it take to learn realistic lion drawing?
The learning time depends on your practice and experience, but steady practice leads to noticeable improvement. By following each step carefully and refining your techniques regularly, you can gradually develop the skills needed to draw a realistic lion with confidence.
Please Write Your Comments