A Beginner’s Guide to Drawing a Giraffe Step by Step
Updated: September 22, 2026
21
Giraffes are gentle and fascinating animals, recognized for their long necks, unique spotted patterns and graceful appearance, making them a wonderful subject for artists of all skill levels. However, drawing a realistic giraffe can be challenging because of its unusual body proportions, facial details and distinctive spot patterns. With the right techniques and a step-by-step approach, the process becomes much easier to follow. Use the guide below to learn each stage carefully and create a realistic giraffe drawing with confidence.
Table of Contents
Step 1: Outlining the Giraffe
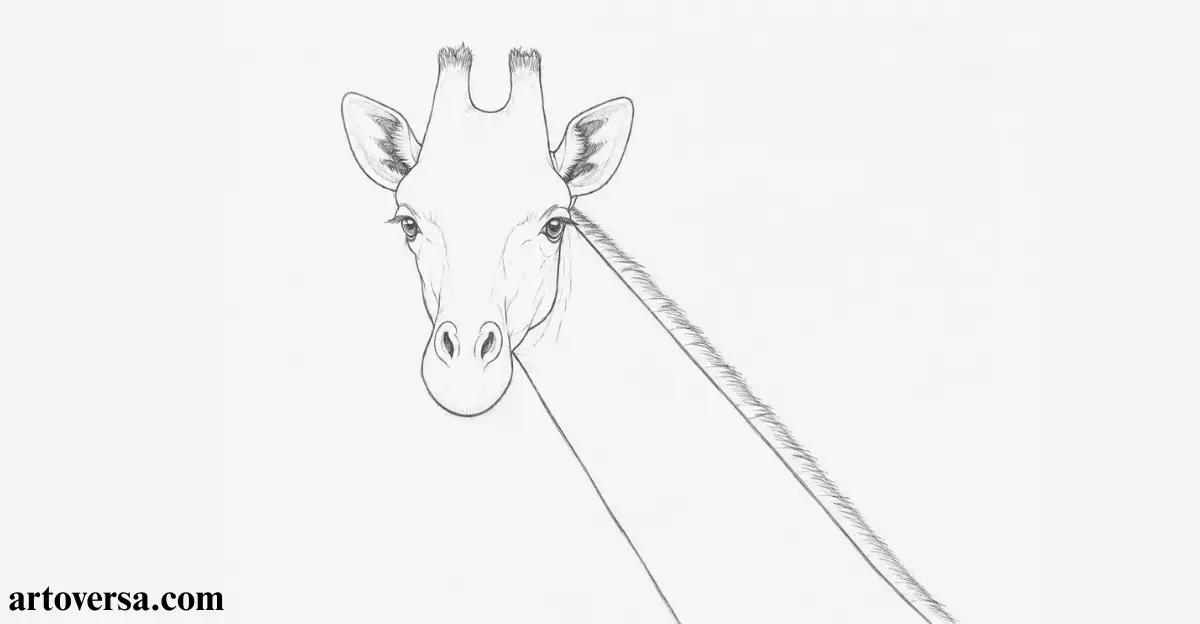
Start with a light outline and follow the reference carefully to build accurate proportions before adding smaller details.
- Begin by lightly sketching the outer contour of the giraffe head using the reference. Don’t worry about details yet; just focus on creating the basic shape that will guide the rest of the drawing.
- Once the head shape is in place, add the ears, ossicones, and muzzle by comparing them with the reference photo. Keep the horn-like structures and the outer shape light so you can adjust them easily if needed.
- After completing the head, continue drawing the giraffe neck with two long flowing lines. Then add the third line along the back of the neck to create the mane, making sure each line connects naturally with the head.
- Now step back and compare your sketch with other giraffe drawings to check the realism and overall neck width. Look from top to bottom to make sure the realistic proportions remain balanced before moving forward.
- Finally, review the complete outline of the head, neck, ears, ossicones, muzzle, and mane using careful reference observation. Make any small adjustments with a light pencil sketch so the structure is clean and ready for the next stage.
Common problems and how to overcome them
A common mistake is jumping to the smaller features before finishing the overall outline, which can affect the proportions. Complete the main shape first, then refine each section step by step using the reference.
When I first drew a giraffe, I kept changing the neck and head separately, which made the whole sketch look disconnected. Once I started building the drawing in the proper sequence from the outer contour to the smaller features the structure became much easier to control and looked far more natural.
Step 2: Completing the Line Sketch
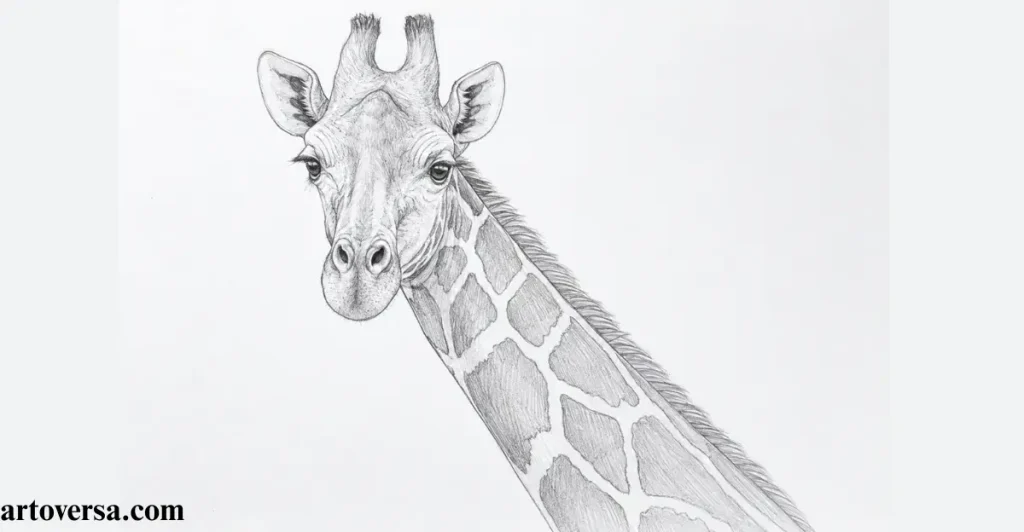
Refine the full outline carefully by placing every feature in the correct position before moving on to the shading stage.
- Start by checking the outline and refine the ears, ossicones, eyes, eyelashes, and nose one by one. Make sure every feature sits in the correct positions so the major features look balanced before adding smaller details.
- Once the main features are placed correctly, shape the large eyes to give the face a soft, gentle expression. Continue refining details around the head, neck and smooth muzzle curve until everything flows naturally together.
- Next, add subtle wrinkles around the head, neck, and ears. Then draw the ear openings, refine the nostrils, and check the eye placement again to improve the overall structure.
- After completing the facial details, adjust the line weight by keeping unnecessary light markings soft. Clean the sketch using gentle light pencil strokes so it is ready for the shading stage.
- Finally, sketch the spot patterns across the neck and continue toward the mane along the back of the neck. Keep the shapes soft and irregular, using controlled pencil strokes to create a more natural appearance.
Common problems and how to overcome them
Many beginners start drawing the spot patterns before finishing the facial features, making the sketch harder to correct later. Complete the major features first, then add the remaining details in order.
I used to rush into the spot patterns because they looked like the most interesting part of the drawing. Later, I realized that taking a few extra minutes to refine the head, eyes, and muzzle curve first made the entire giraffe look much cleaner and more realistic.
Step 3: Basic Shading for Volume
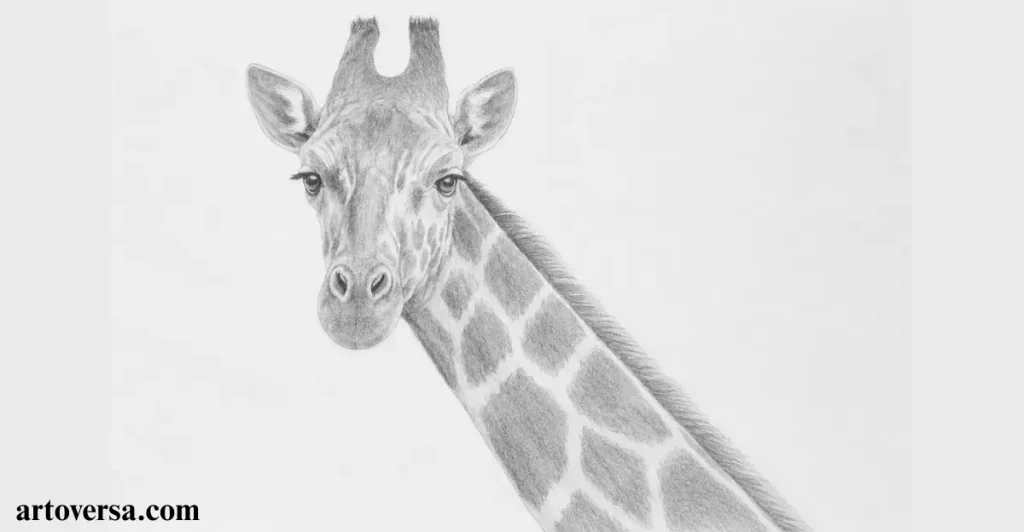
Build the basic shading gradually to create natural volume before adding darker tones and finer details.
- Start by applying the first layer of light graphite over the whole sketch using an HB pencil. Keep the pressure light so the basic shading creates a smooth foundation without hiding the sketch.
- Once the first layer is complete, add soft broad shading across the neck and face with light pressure. Avoid heavy shading at this stage so the graphite remains easy to blend later.
- After the main areas are shaded, lightly define the spot marks around the muzzle, ears, ossicones, and neck pattern. Keep the drawing soft so these details blend naturally with the base shading.
- Next, create a smooth shade by using careful blending across the graphite. Leave a few blended whites untouched and maintain lighter shading to build softer transitions.
- Finally, review the overall shading and continue blending around the neck, face, and spot patterns with the HB pencil. Add small amounts of light graphite only where needed to strengthen the realistic volume.
Common problems and how to overcome them
A common mistake is using heavy shading during the first layer, making the sketch difficult to blend smoothly. Keep the light graphite soft and increase the tones gradually instead of trying to create dark values immediately.
I used to think darker shading would create better volume, but it usually made the drawing look flat. After learning to build the first layer slowly with an HB pencil, the neck and face looked much softer and more natural before I added the darker details.
Step 4: Shading the Giraffe’s Face
Shade the giraffe’s face gradually by refining each facial feature one at a time to create natural depth and realistic texture.
- Begin with the eyes because they carry the emotional aspect of the drawing. Use a 4B pencil to darken the cornea, refine the eyelids, and build soft shadows without making the eyes look too heavy.
- Once the eyes are finished, draw the long eyelashes by studying close-up references. Then refine the ears, add the ear openings and use light strokes to create fine fur around the outer edges.
- Continue by following the natural fur growth with directional pencil strokes. Build a soft fur texture around the nose, muzzle and nostrils, keeping every stroke smooth and controlled.
- After the fur is in place, use a dark soft pencil to deepen the muzzle shading and nostril shading. Blend lightly with an HB pencil so the darker tones transition smoothly into the surrounding light shading.
- Finally, review the eyes, ears, nose, muzzle, eyelashes, cornea and eyelids together. Make small adjustments to the facial shading and texture so every feature blends naturally into the completed face.
Common problems and how to overcome them
Many beginners shade the entire giraffe face at once, causing the eyes, nose, and muzzle to lose their definition. Complete one feature at a time and blend the tones gradually for a cleaner result.
I used to spend too much time darkening the cornea, thinking it would make the drawing more realistic. Later, I found that softer facial shading around the eyelids and muzzle created a much more natural expression with far less effort.
Step 5: Shading the Giraffe’s Pattern
Build the giraffe spots gradually by following the reference so the pattern looks natural and blends smoothly across the entire drawing.
- Begin by observing the giraffe spots in the reference and remember that the spot patterns are unique to individuals, much like fingerprints created through genetic traits. This will help you avoid repeating identical shapes.
- Instead of drawing from memory, carefully replicate the main shapes from the reference. Keep the design simple at first by creating simplicity through lightly sketched spots before adding darker tones.
- Once the pattern is placed, start the initial shading on the spots and slowly build gradual shading across the face, neck, and mane to create smooth depth.
- Continue refining the spot texture by making each spot wrap around the shape of the neck and face. Blend the edges gently as the final step so the pattern follows the natural form.
- Finish the drawing by reviewing the full illustration and checking the shading process across the spot patterns, face, neck, and mane. Complete the blending carefully so every area looks connected and realistic.
Common problems and how to overcome them
Many beginners repeat the same spot patterns across the entire drawing, making the giraffe look unnatural. Keep checking the reference and vary the size and placement of the giraffe spots as you work.
I used to rely on drawing from memory, and my spots always looked too uniform. Once I started carefully replicating each pattern from the reference, the giraffe spots blended much more naturally, and the finished drawing looked far more realistic.
Step 6: Contrast, Light, and Shadows
Complete the drawing by refining the contrast, light, and shadows to create stronger depth and a more realistic finish.
- Start by comparing the value scales across the drawing, then increase the contrast between the dark values and light values. Build the deep shadows gradually instead of making every area dark at once.
- Once the overall values look balanced, deepen the eyes, the area under the chin, and the overlapping forms. Then lift soft highlights along the nose bridge and upper neck using a kneaded eraser to improve the light effect.
- Refine the eye highlights to create shiny eyes with a soft teary eyes appearance. Add gentle shading around the nostrils, then use a lighter pencil with soft blending to build a natural leathery texture.
- Continue shading the neck and mane using a 2B pencil with controlled short strokes. Repeat the strokes in the natural direction of the fur so the texture builds gradually without looking stiff.
- Finish by refining the spot pattern with soft edges and smooth tonal variations. Follow the natural fur direction while adding subtle fur texture, allowing the light to remain visible through delicate, subtle texture marks.
Common problems and how to overcome them:
A common mistake is increasing the contrast everywhere, causing the drawing to lose its natural balance. Focus the darkest values only in the deep shadows and keep the light values clean for a more realistic result.
I used to keep adding darker shading because I thought it would improve realism, but it often made the drawing look heavy. Once I started paying more attention to the highlights and soft tonal variations, the entire giraffe looked brighter, more natural, and much more three-dimensional.
Conclusion
Drawing a realistic giraffe becomes much easier when you follow each step with patience and attention to detail. Building the sketch with simple shapes, refining the body proportions and adding the unique spot patterns create a strong foundation for the artwork. Careful shading and smooth pencil strokes help bring depth, texture and realism to the drawing. Take your time to observe the reference image and make small adjustments throughout the process. With regular practice and consistent effort, you can confidently create a beautiful and lifelike giraffe drawing.
FAQs
What is the best way to start drawing a giraffe?
The best way to begin is by sketching light circles, ovals, and guiding lines to create the giraffe’s basic body structure. These simple shapes help establish accurate proportions before adding details.
Why is drawing a giraffe considered challenging?
A giraffe’s long neck, tall body, and distinctive spot pattern require careful observation and balanced proportions. Taking the drawing one step at a time makes these features much easier to sketch accurately.
How can I make my giraffe drawing look more realistic?
Focus on smooth shading, natural fur texture, and evenly placed spot patterns while following the reference image closely. Gradually building light and dark values adds depth and gives the drawing a lifelike appearance.
Which pencil techniques are most useful for drawing a giraffe?
Light sketching, gentle layering, blending, and short directional pencil strokes work best for creating realistic textures and shading. These techniques help produce soft transitions and detailed features throughout the drawing.
How can beginners improve their giraffe drawing skills?
Practice the basic shapes, body proportions, and shading techniques regularly instead of rushing through the drawing. Following a step-by-step process and comparing your work with a reference image will help improve your skills over time.
Please Write Your Comments